4 Shower Waterproofing systems for tile showers
Waterproofing a shower. This seems like common sense, doesn’t it?
Well, a lot of showers that are built these days still have no shower waterproofing whatsoever. Or they have poor or improper waterproofing.
Estimated reading time: 15 minutes
Click to Expand Table of Contents
What! No Waterproofing!?
How can this be? Well, I think there are multiple parties to blame.
For starters, the companies that manufacture tile backer boards deserve some blame. Oftentimes, they are prone to being a bit vague on whether waterproofing is required, or not.
Further, home builders, remodelers, and homeowners focus too intently on the price and go with whoever is the cheapest rather than paying for a properly built shower.
Tile installers lacking proper training and education would be another cause as they are simply doing as they’ve been taught. Maybe sometimes they reason it out themselves and decide waterproofing a shower isn’t necessary.
A common line of thinking is: “I’ve been doing it this way for “X” amount of years and never had a problem.”
Lastly, a lack of enforcement by local inspectors. Most local building codes require some sort of moisture barrier and oftentimes this is overlooked.
At any rate, you’re researching what kind of waterproofing your shower needs. Good! This post will cover 4 different shower waterproofing systems.
But first…
Is Shower Waterproofing required?
There’s a handbook, especially for tile installers. It’s called the Tile Council of North America Handbook (TCNA). It covers different ways to install tile in different applications.
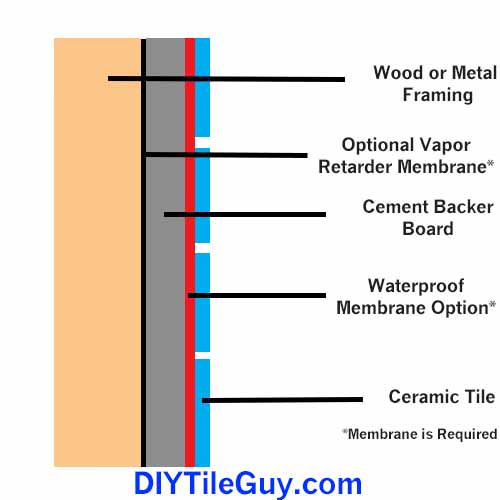
There are certain sections that cover wet areas like showers. Membranes are required and it book gives two different options for moisture membranes.
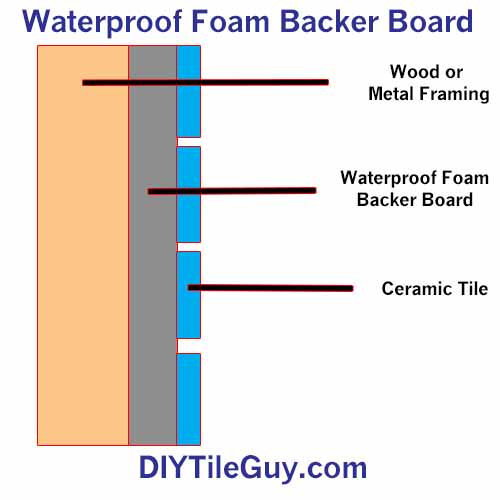
Now I can’t copy their material because of copyright restrictions but here’s my own drawing based on their information:
Is Hardibacker and Durock cement board waterproof?
So you can see that, yes there are options for membranes. But a moisture membrane isn’t optional. It’s required.
Moisture barrier or Waterproofing membrane?
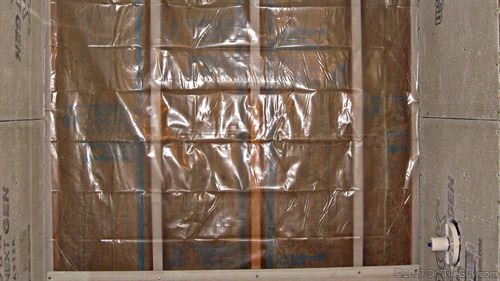
What are moisture barriers? Stapling sheets of plastic or tar paper to studs is an example. Something that repels water but isn’t completely watertight.
Oftentimes, they are installed behind cement backer board and mortar “mud” walls. It’s more of a minimal waterproofing system and would be used in areas like vertical shower walls and areas that don’t require more heavy-duty shower waterproofing systems.
A waterproofing membrane, however, is a more watertight option. If you have horizontal surfaces, more extreme conditions, or simply want a heavier-duty system then you’ll want a complete waterproofing membrane for your bathtub or shower.
For more information on waterproofing the critical areas in a shower see my post:
No Waterproofing: Will this cause shower leaks?
Vapor Barrier vs Moisture Barrier
As far as I know, there is no official distinction between these two membranes in the world of tile. In fact, the term moisture barrier isn’t used in the TCNA handbook. They use the term vapor retarder instead.
But I want to make a distinction between these two terms because a residential shower doesn’t necessarily need a vapor barrier (retarder). But it does need a moisture membrane.
When do you need a vapor retarder?
In the world of tile, you need a vapor retarder when you have extreme amounts of water vapor that need to be managed. If you have a steam shower with a steam generator then a vapor retarder is required.
But most residential showers don’t generate enough water vapor to be problematic. But they do generate enough water to need moisture management.
It can be confusing because even though they serve different purposes these membranes are often the same materials.
How bad of an idea is a marble shower?
While this post really isn’t about vapor barriers and perm ratings I do want to touch on the basics.
Perm Ratings:
- 6 mil plastic sheeting: 0.3 perms
- 15-pound tar paper: 5 perms
- Laticrete Hydroban liquid waterproofing: 1.247 perms (2 coats, each 15-22 mils thick)
- Schluter Kerdi Waterproofing fabric: 0.75 perms
- Schluter Kerdi-board 1/2″: 0.48 perms
- Nobleseal TS sheet membrane: 0.15 perms
If you are building a steam shower then you should know there are very specific ways to build these types of shower enclosures to manage both the water and water vapor that these will be exposed to.
Vapor barriers have perm ratings. To qualify as a vapor barrier the perm rating has to be below 1.0 perms for residential use and below 0.5 perms for commercial use.
This chart has some different shower construction materials and the listed perm ratings.
So that’s the background. Now let’s get to the 4 types of shower waterproofing methods. Starting with
What are the 4 shower waterproofing systems for tile showers?
1. Traditional Shower construction (Water in/Water Out System)
What is a traditional shower? For years showers were built out of “mud” and a sort of metal chicken wire.
The shower pan floor would have a copper or lead pan, a rubber liner, or a “hot-mop” tar waterproofing underneath the tile. Tar paper was stapled to the walls underneath the mud.
While this method is still practiced today over the years those mud walls have more commonly been replaced with cement board and fiber cement backer board. Hardibacker is an example of a fiber cement board.
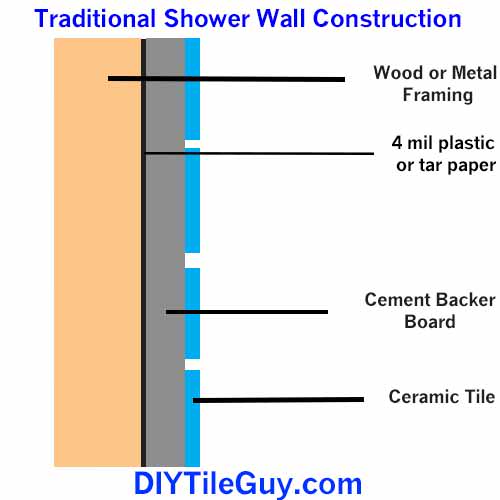
So this is what I’m referring to when I think of traditional water in/water out showers. These have a moisture barrier behind the walls.
Typically, the moisture barrier is 4-mil plastic or tar paper. The wall backing would either be mud walls, cement board, or fiber cement board.
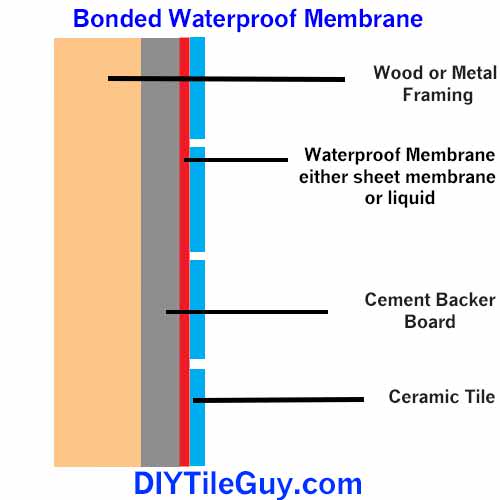
Looking at this drawing below you can see how these are built. I’m using cement board in this example.
This is an adequate way to build most showers. However, if you have any horizontal surfaces or other critical areas this method won’t work.
No Waterproofing: Will this cause shower leaks?
You’ll need to use what’s called a sealed shower system. These come in both sheet membrane and liquid form.
Sealed Shower Systems
A sealed shower system uses a waterproofing membrane that is bonded to a backer on the walls. This would have to be an appropriate tile backer board as drywall is not appropriate for showers.
Bonded shower waterproof membranes include two main types:
2. Liquid waterproofing membranes
Have you heard of:
- Redgard
- Hydroban
- AquaDefense.
These are the most popular liquid waterproofers although there are much more.
The concept of liquid waterproofing membranes is wonderful. You build your shower to any configuration that you want and then paint over it with a liquid membrane and *TADA* It’s completely waterproof!
Unfortunately, the reality isn’t quite like that. Although these liquids are excellent for shower waterproofing there are some details that need to be honored.
Mil Thickness
One of the tricks to applying these liquids is that you get the proper thickness of each coat. This is more difficult than it sounds.
Each product will have a requirement for the number of coats and how many “mils” (thickness) is necessary.
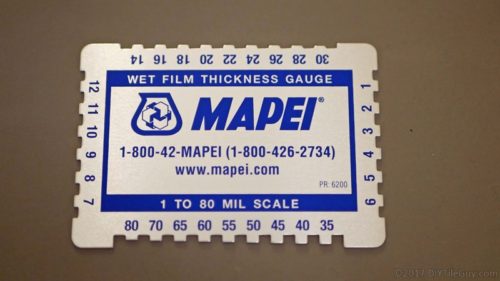
They make special tools called wet film gauges. These help to measure how many mils thick a liquid waterproofing is.
A rule of thumb is that each coat needs to be “driver’s license” thick. Another rule of thumb is that if you can see the lettering on the backer board underneath then it’s not thick enough.
These aren’t hard and fast rules but general guidelines. Putting the liquids on too thin is a problem but you don’t want them too thick either. More isn’t necessarily better.
Cure times
Another drawback of liquid waterproofing membranes is the amount of time things take to dry. You’ll put one coat of waterproofing on a shower wall and have to wait for it to dry. Yes, it needs to dry completely.
Generally, this takes a day for the first coat to dry. Then you’ll need to apply a second coat and allow that one to dry. The second coat tends to dry quicker.
Liquid waterproofing products are constantly improving and so are the dry times.
In fact, Custom Building Products now has a product called Redgard SpeedCoat which is urethane-based and supposed to dry really fast. See also, Hydro Ban Quick Cure.
Mud beds
We just talked about cure times while waiting for the liquid waterproofing products to dry. Shower mud pans have their own cure times, also.
What is a shower “mud” pan? A mud pan for a shower is a custom shower base that is sloped to the drain using a cement and sand mixture.
It’s still a very common practice today although prefabricated foam shower bases are gaining in popularity.
The traditional way of building a mud pan was to install a waterproof liner inside the mud bed.
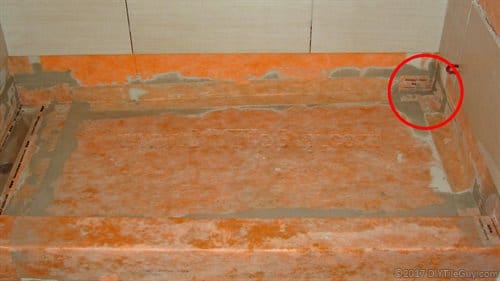
But when using bonded waterproofing membranes (Redgard, Hydroban, Aquadefense) the waterproofing layer would go on top of the mud pan. Then the tile sticks directly to the waterproofing.
Liquid waterproofing products are one type of shower system we call a ‘sealed shower system. This post has more information on how to build a shower pan.
Flood testing a shower pan: Why it’s done and how to do it
The reason I’m bringing this up is that before a liquid waterproofer can be applied to the mud bed the mud bed needs to cure for a minimum of 72 hours in “normal” conditions- so sometimes even longer.
So if you want to build, for example, a Redgard shower the cure times start to add up:
- 1 day to build a mud shower pan
- 3 days wait for it to cure
- 1 day to Redgard the shower and wait for it to dry completely
- 1 day for a second coat and dry time
- 1-3 days to flood test the shower pan
Fast-setting mud beds
On the market now are a couple of products designed to speed things up. Custom Speedslope is one that comes to mind.
Reinforcing fabric
One of the perks of using liquid waterproofing products is that they don’t need any special banding or reinforcement in the corners or anywhere else*.
However, my recommendation is that you use fabric reinforcement in the corners of the shower pan, around the drain, and any other critical area when using liquid waterproofing products.
I don’t care what they say in the instructions. It’s too critical of an area to take a chance on. I do know of some shower failures that have come from a separation in these critical corners. A little reinforcing fabric or mesh is good insurance.
This will add a minimal and probably unnoticeable amount of thickness to these areas but it’s worth it, in my opinion.
*Be sure to read the instructions on the products that you are using. Many liquid waterproofing products don’t require fabric reinforcement but there are still some on the market that do.
3. Sheet membranes
The third type of shower waterproofing system is the bonded sheet membranes. The most well-known example would be the Kerdi Shower system by Schluter Systems.
However, there are many other products:
- Laticrete Hydroban sheet membrane
- Mapei’s Mapeguard
- Ardex SK-175
are three examples and also considered a sealed shower system.
Additionally, many other companies like Noble Company, Blanke, Prova, and others have waterproof shower sheet membranes. See my review of the Noble Freestyle linear drain.
What’s nice about these sheet membranes is that you don’t have to worry about the mil thickness of the sheet. Another advantage is that you don’t have to wait 72 hours for the mud pan to cure.
Additionally, you don’t have to apply multiple coats and wait for them to dry.
The overlaps
But they do have some drawbacks. The biggest one is how you waterproof the seams. Typically, you have to overlap the seams by 2-inches to be completely waterproof.
Alternatively, you can use a 4 or 5-inch banding material for this purpose along with preformed waterproof pieces for the corners.
So, once you get into the corners you can have both a 5-inch banding material and a preformed corner over the top of the membrane. This adds up to three total layers of fabric.
Consequently, the corners are now built up and stick out further than the flat middle parts of a shower.
Other challenges include getting the membrane and the seams to be well bonded to one another and keeping wrinkles out of the membrane.
This post contains more information on how to build a shower pan using a sealed shower system like the Kerdi shower system. Additionally, I also have information for how to build a curbless shower pan.
For curbless showers, a sealed system is the method to use for building a shower with no curb.
4. Waterproof foam backer board
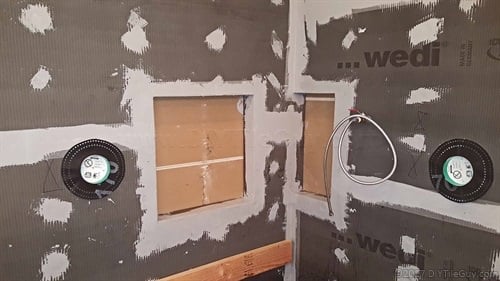
Lastly, the final type of sealed shower system to be covered is foam backer board building panels. These include:
- Wedi board
- Kerdi board
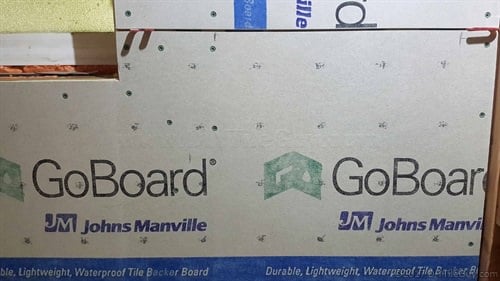
- GoBoard
- Hydroban Board
The waterproofing concept is essentially the same as with the bonded waterproofing systems mentioned above. They are waterproof on the surface rather than letting moisture absorb through to the back of the board.
What are the advantages of these backer boards?
Well, there are many.
They are lighter and easier to carry. The board itself is waterproof so you don’t have the labor of installing cement board and then waterproofing on top of it.
The waterproofing is where they really have an advantage. Usually, they have a waterproof sealant that you stick the boards together with to waterproof the seams. Others, such as Kerdi-Board, require a banding material that they want you to use like you would with Kerdi fabric.
Basically, once you install the board and glue everything together the shower is waterproofed and ready for tile.
Further, many of the manufacturers make prefabricated shower trays that will allow for a curbless shower installation without cutting any floor joists.
Costs
As you can imagine the costs are much higher than other options. In addition to the foam board panels, there are usually stainless screws and washers to buy. Don’t forget the urethane glue either.
Some of the newer boards such as GoBoard, Hydroban board, and Durock board can be installed with cement board screws.
Additionally, there’s more flex in these foam board panels and tile doesn’t like flexing. Some are worse than others.
In my unscientific opinion, Wedi makes the stiffest foam panels. As you can imagine they aren’t the cheapest either.
Conclusion
Well, that’s the breakdown of 4 waterproofing methods for tile showers: traditional, liquid, sheets, and foam. My hope is that this will give you enough information to make a choice on how to waterproof your own shower or tub walls.
Alternatively, it could arm you with the information needed for selecting a contractor. Do they intend to use waterproofing? Which method do they prefer? Which method would you prefer?
Let me know which shower waterproofing systems you guys choose to install and why in the comments below.
Christa says
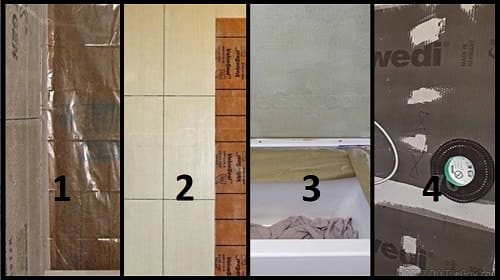
Hi there, I am concerned with my handyman’s methods and wanted to run it by you. He stapled plastic over the insulation on to the wood framing. Then he hung Durock sheets that had hairline cracks all over it (bc they were installed, taken down and then reinstalled again. Glass blocks dropped on our new tub and damaged the surface, so he had to take Durock down in order to rip the new damaged tub out.) So, my first concern was that he put the same Durock up that appeared to have cracks running through it and didn’t tape or mud it to repair the cracks. Not to mention, screw holes being reused. Then he did not use fiber tape and mud for the seams. Instead he ran a bead of silicone inside the seams. He proceeded to put tile directly on top of this masterpiece. I asked him about putting a waterproof membrane over the Durock and he looked at me like he had never heard of such a thing and didn’t know what Redgard was. He replied saying silicone was enough. All of the information I’ve read and videos I’ve watched state that Durock is not waterproof and that you should put a membrane of choice over it before tiling. I am especially concerned because he did not even tape and mud the seams as directed. I don’t understand how sheets of plastic stapled to the framing is going to keep water from penetrating behind it. Even if moisture was stopped and didn’t find a staple hole or opening in the overlapping seams, wouldn’t it run down the plastic and eventually drop into the wall cavity. The plastic doesn’t go overtop of the tub lip, so where else would it go? Am I overly concerned or am I more educated than my handyman? He’s supposed to do our master bath too, but I’m super worried and don’t want him to move forward with it any more. Also, he’s an acquaintance of my husband so it’s awkward to speak up. HELP!
DIYTileGuy says
It’s not unusual for people to think that cement board is waterproof but it does, and will, wick water. If you call the Durock people then they’ll tell you that a waterproofing membrane is a good idea and they will recommend their own brand of Durock waterproofing membrane.
If a sheet of plastic is installed behind the backer board then Durock can still absorb water. However, the water will be protected from getting into the wall cavity. You are correct that it could penetrate through a staple hole, or something, and that’s one of the drawbacks of this type of membrane. But it would take a tremendous amount of water concentrated at this point to be able to do lasting damage. Something that just isn’t going to happen with a properly built shower.
If plastic is used the plastic should overlap the tub flange so that water would drain into the tub as opposed to the wall. It’s not a bad idea to seal the underside of the plastic to the tub flange either.
Hairline cracks in the face of cement board are not something to be concerned about. If the cracks penetrate the mesh underneath the cement coating then that’s a problem. When someone cuts a sheet of Durock by scoring and snapping this is what they are doing: cutting through the mesh on one side of the backer board. But a simple hairline crack is usually from flexing and it cracks the cement coating and isn’t something to be concerned about.
So besides the plastic and waterproofing issues, the other concerns with the way that the board is installed is just the things that you are worried about: Not using mesh tape and reusing the same holes to attach it. Hopefully proper screws are being used but the only way that they work is by grabbing the board. They will lose all their gripping strength if they are installed in the same holes again.
Additionally, using mesh tape is right in the instructions for Durock, which it sounds like this contractor isn’t familiar with.
In conclusion, you’re right to be concerned and it’s probably advisable to halt the project until the issues can be addressed. Yes, this may put a strain on the relationship but that’s always a risk when hiring friends.
Christa says
Thank you so much for the quick and informative response. I truly appreciate it!
Zayd says
Hi, Jim. Excellent blog — thank you for keeping it up for us DIYers. I’d value your input on my thoughts below.
I’m beginning a bathroom remodel and have demo’ed down to the floor joists, stud walls and rafters. I’ve contemplated my walls system/waterproofing and done tons of reading. My bathroom is rather small at 5.5′ x 8′.
We’re putting in a tiled walk-in shower with no curb. This is for ease with the kids and my wife wants to be able to squeegee water from the rest of the bathroom floor into the shower when the kids are messy or she is cleaning the floor. The shower will have a 60″ linear drain at the end (far 5.5′ wall of the bathroom). And one thing you should know: I am very particular about the details, from engineering the structure correctly to the appearance of grout lines and how they interact with the planes of the room.
1. Although the non-shower portion of the bathroom floor will not really see long-term standing water, should I waterproof it nonetheless? I was considering the 1/8″ Ditra membrane for this.
2. I hate the crumbliness of cement board and can’t stomach the cost of the waterproof foam boards, so I’m using 1/2″ fiber cement board for the shower floor, walls and ceiling. To achieve the sloped shower floor, I’ll be creatively framing/cleating between my floor joists and recessing my 3/4″ plywood subfloor so that it ends flush with the top of the floor joists at the drain side of the shower; I’ll apply the fiber cement board over that. To achieve the slope I require, can I use 1/4″ board for the shower floor or should I stick with 1/2″ for the added strength? I will be confident in my subfloor strength but don’t know if any real strength/load spreading is gained from a thicker backer board.
3. After I have my plywood/cement board substrate in place, is it just a matter of applying the Kerdi membrane to that? I planned to go up the backer board walls about 6″ or so, but should I be applying my membrane over the entire wall/ceiling? Articles on this seem to be vague, focusing only on the horizontal surfaces like floors and niches. For my niches, I plan to use the liquid membrane for ease and to avoid the multiple layers of Kerdi membrane.
4. For the linear drain, I’ll be using a non-Schuter drain so do I need to simply run my shower floor membrane directly into the drain body? I don’t know how else to configure that so that I maintain my waterproof barrier.
Very much appreciate your feedback.
Zayd
DIYTileGuy says
So I’m assuming that you have some sort of enclosure, or barrier between the shower area and the rest of the bathroom. Even a shower curtain will do.
1. If so, you need to waterproof the transition area where the shower turns into the bathroom floor. So Ditra is ok outside the shower but make sure that you overlap the Kerdi membrane onto the Ditra membrane so that you are waterproof for a couple of feet outside the shower. You’ll also want to use Kerdi band to flash up a couple of inches up the walls outside the shower in this same area. At least 2 feet is what I would say.
2. If you want to do it this way then it should be ok. 1/4 inch board is fine but make sure that you apply thinset underneath it in addition to fasteners. You’ll need to make sure that you have enough room for the drain to sit at the end. The 1/4 inch fiber cement board should be flush, or slightly higher, that the drain.
3. Once this is set then Kerdi can be installed over it and up the walls. Schluter wants Kerdi to go all the way up to the shower head at a minimum. I would rather see you use Kerdi for the niches also as I’m not a fan of mixing the two types of waterproofing. Fiber Cement board isn’t waterproof so that’s why waterproofing should go up the walls a ways. Schluter has a Kerdi Handbook on their website that has excellent instructions and it’s worth a look.
4. It depends on the drain. You should get a drain that works with a bonded waterproof membrane like Kerdi. You don’t want a drain where the waterproofing membrane clamps down below the drain. Most linear drains will have a membrane attached, like the Kerdi drain, or they have a flange that you can bond a membrane to.
But there are two different kinds of linear drains and you need to make sure you get one that is compatible with surface bonded waterproofing membranes.
Good technical questions. You’re thinking everything through before you start!
Zayd says
Good advice. Thank you again, Jim.
My last sticking point is selection of the linear drain. I’m realizing that with the design of my shower, everything will really be dimensioned around the drain. I’ll be making an order today. I was hoping to find an affordable flanged drain, but it seems the flange doubles the price of these things. Looks like I can’t escape a $400+ drain!
I’ll keep you posted on my progress. Don’t be surprised to see a few more questions come down the pike.
All the best,
Zayd
Zayd says
Jim —
An interesting update. I just got off the phone with USG asking what adhesive they recommend to adhere their membrane to a linear drain flange. Aside from refusing to recommend anything since I wasn’t using their drain (and I totally understand his hesitation), he was adamant in insisting that I could not use a fiber cement board over the subfloor as my base. He said the industry — not just USG — was unified in this position and that I must either use a foam base product or pour a mud base.
Any idea on this?
DIYTileGuy says
The textbook way of building a shower pan is with mud or foam trays. The way that you want to do it isn’t textbook but as long as it’s structurally sound and slopes to the drain it will be fine. The tech people can’t make recommendations outside of the book which is understandable.
For an adhesive, I would use Kerdi fix, Wedi glue, or whatever you have that is along those lines. Maybe the drain manufacturer has a recommendation?
Zayd says
Good to hear that — thank you.
The drain manufacturer has their own adhesive, but it is not nearly as tried and true as Kerdi Fix, so I’m going with Kerdi Fix. I’ll keep you posted.
Thanks again.
Betsy says
Your story sounds just like mine. We hired a contractor just to install a 4 x 8 tile shower in a home we are trying to move into. He claimed to be the very best and tile showers and did everything wrong from the start, The second contractor ripped it all apart and have got it to the point where he thought it was time to tile but after Reading this post and also showing photos of our job to an actual tile expert it all has to be ripped out again. This information has been very helpful but has left Me in tears once again with no shower no new contractor and no way of moving in to our home
DIYTileGuy says
Sorry to hear about this, Betsy.
Jared says
This is by far the best tiling blog on the web!
I have the shower down to studs and am going with Rockwool R30 insolation, 6mil plastic sheeting, metal flashing around the 1 inch tub lib, and then 1/2 inch wall hardie backer with appropriate fasteners. Then of course the tile and mortar and sealer.
My question is that since I am the homeowner, is it advised to use mold inhibiting primer on the studs just in case? Or just leave the studs bare.
DIYTileGuy says
The primer I don’t think would hurt anything but it’s not necessary. It would be similar if one were to prime the rafters underneath the roof. That sort of moisture shouldn’t be in the wall cavity.
I would say to put your efforts into building your shower as well as you can. ☺
I appreciate your comments. Thanks
Paul says
Hi Jim, thanks so much for the informative blog even for a complete beginner like me who have 0 knowledge on this stuff. What drove me to this blog is to figure out the best way to water proof my bathroom. In the process of getting the estimate to demolish and rebuild the bathroom I came to know the different approaches from different contractors. Your blog mostly covered water proofing the shower wall, not much on the shower pan and I don’t see any diagram on water proofing the mud bed. My question is what are the different methods to build and water proof the shower pan and which way is the best. Thanks so much for your feedback.
DIYTileGuy says
This is good feedback and I appreciate your bringing it to my attention.
As you’ve mentioned, there’s different methods for building shower pans and each method has its own quirks and variables.
In general, I think bonded membranes, like the Kerdi system, and foam pans, like Wedi, are the safest way to build a shower.
If you are going to hire it out then a competent contractor can build a traditional “water in, water out” mud pan and have it work just fine.
You make a good point about shower pan information and I’ll work on this for the future.
paul says
Do you have any opinions or experience on vapor barriers and insulation in the drywall ceilings and walls in the bathroom? I’m planning on cement boards and RedGard behind tile but the ceiling (including over tub) and the bare walls are going to be GP DensArmor Plus paper-free gypsum board. All the walls with drywall on them are interior but there’s attic and under-heated upstairs space above the ceiling. I’m looking at vapor barrier primers. Does mineral wool insulation with fiberglass-backed gypsum then vapor-barrier primer and mildew-resistant paint sound like a solid plan?
I see a lot of videos where people put cement board on the ceiling above a shower with liquid membrane on the walls but not on the ceiling. I got the impression the ceiling wouldn’t be tiled. What’s the whole story there? Is there plastic above the cement ceiling and a skim coat of joint compound on the outside in the end (as a guess, I’m not trying to hold you accountable for other people’s work)?
Sorry for the long question. Thanks!
DIYTileGuy says
If someone has installed cement board and Redgard on a ceiling I can’t imagine the ceiling not being tiled. There’s no way to paint it, at that point, and the only good way to finish it would be with tile.
But you never know, and I’m not saying that someone can’t come up with a different way of finishing it but it would definitely be outside the box of it on anything but tile.
I’m afraid I don’t have good input on the first part of your question but I’m just not that knowledgeable on insulation and vapor primers.
paul says
Sorry, poor wording again. The situation I was trying to describe is cement board on walls and ceiling but the redgard only goes on the walls. The ceiling is cement board without redgard. This was a Sal DiBlasi youtube video but I’ve seen it elsewhere as well. Do people put cement board on the ceiling and finish it smooth with a skim coat or something to avoid putting gypsum above the shower?
DIYTileGuy says
I doubt it. There are other products for ceilings if they want to paint up there. Denshield would be one and even moisture resistant drywall would be another.
Waterproofing is only required to go as high as the shower head so waterproofing on walls and not the ceiling is fulfilling the requirements.
I’m not saying that cement board can’t be finished, because it can, but it’s my understanding that most drywall finishers would rather see other products for that purpose.
Sal’s got some good videos though. There’s a lot of bad info on YouTube but Sal’s one of the good guys.
whitney Summitt says
Okay, our house was built in 1992 and I decided to do a DIY remodel of a guest bath shower that had 4″x4″ white tile and is just dated. I ripped out the tile on the walls and noticed it was on green board so I ripped out the green board down to the studs. Then I attacked the shower curb. It was made of the the 2×4’s but with just drywall over it and gaps everywhere. I do not see any liner going over the curb.
Luckily, or surprisingly, I did not find mold anywhere. Probably because it’s only been used a handful of times.
I’m a planner and perfectionist and want to do this DIY project correctly. I have time on my hands and don’t have to have this done quickly so I was going to go with the less expensive route of cement backer board and waterproofing membrane than the more expensive foam board options.
My main dilemma is this…
I have not ripped out the white ceramic tiles on the shower floor yet but I’m assuming since, I don’t see any liner going over the curb that there is not a liner in the mud floor. Which of the following options can I or should I do? Or do you have another suggestion?
Option 1: Chip away at the white ceramic tiles and thinset to get to the mud floor. Put up my cement board on the walls meeting the shower floor and redo my curb correctly. Then do 2 coats of the waterproofer (RedGard, etc) everywhere… shower walls, floor, curb.
Option 2: Remove curbing wood and hammer drill out the white ceramic tile and mud floor down to the cement sub floor. Then rebuild the mud floor with the pre slope, liner and then final mud. Walls would still be cement board with waterproofer.
Option 3: Remove curbing wood and hammer drill out the white ceramic tile and mud floor down to the cement sub floor. Then rebuild the mud floor with the slope but no liner and just waterproof the floors. Walls would still be cement board with waterproofer.
Any other thoughts/options?
Thank you!
DIYTileGuy says
You’ll want to remove all tile, backer board (in this case- drywall), and tile mud pan. That way, you’ll be down to wood in all directions.
Now I do understand the appeal of installing a mud bed/liner system, especially if you have time and would prefer to save money. But there’s a lot of steps that have to be done just right to get them to work properly. But if you do choose this route then keep in mind that it should have a preslope under the liner and the curb should be made out of “mud” with no penetrations on top of, or on the inside, of the shower. In other words, cement board should not be used for the curb.
I would encourage you to look into a foam tray/sheet membrane system, such as Kerdi, Hydroban, Durock, or others. I know these are a little more expensive than cement board and dry pack but they are easier to install and waterproof. With the Hydroban system, I believe Laticrete will warranty the use of their liquid waterproofing with the sheet membrane used on the shower floor so there’s a little bit of flexibility that way.
Finally, another option would be to use a liquid, such as Redgard, and use that on top of the shower floor, curb, and walls. It does need to be tied into the drain properly but it would allow you to install cement board on the curb and use a dry pack for the shower floor. Make sure that it’s the proper thickness and I highly recommend flood testing any shower that you build, but especially this system. Maybe Custom Building Products has a video for this application?
But these are good questions to ask and I’m glad that you are researching your options before jumping in.
Whitney Summitt says
Yes CBP does have a video of how to use red gard in the shower and how to tie it into the drain. I watched it earlier in the week and it was well done. If I do a mud shower pan… I was going to use the Goof Proof pre pitch, and quick pitch system with their curb system and weep protector. The curb would be 2×4 with either liner then their curb system over liner and then mudded. Or if I go red gard route…. 2×4 with felt then the goof proof curb over felt, mudded and then red Gard. Definitely no cement board on curb. Goof Proof shower pan kit had good how to videos too.
Thank you for taking the time to offer advice.
paul says
Here’s a random question: how do you mark guide lines and such over applied liquid membrane? Any problems with chalk lines or pencil marks? Thanks!
DIYTileGuy says
Goof Proof is a good option because they make mudding the curb an easier process with their system.
It sounds like you have a good plan!
DIYTileGuy says
It depends on the brand and this is where the light green of Laticrete Hydroban works so well.
But if you are using Redgard or the dark green AquaDefense then you’re going to have a dark shower until it gets tiled. A black sharpie is usually what I use for those brands.
Believe it or not, this is one of the reasons I will spend more for liquid Hydroban.
paul says
I believe it. Could try a silver sharpie. Thanks!
Annette says
I am working on redoing the walls around our kids’ bathroom tub. We pulled the tile and backer board down to the studs. There is a plastic lining already stapled to the studs. The plastic lining is loose and goes down behind the tub and is only on the long wall of the shower (not the faucet or opposite ends). I like the idea of putting up cement board and putting the liquid waterproofing membrane over that before we either re-tile or put up a shower insert. I have two questions:
1. If I intend to use cement board and waterproofing membrane, should I pull down the plastic sheeting that is attached to the studs first? I read somewhere that we should do one or the other, not both.
2. Is it wise to do the cement board and waterproofing if we are going to install a shower insert rather than tile?
DIYTileGuy says
This is a question that comes up from time-to-time and I’ll try to consult some people smarter than me and get their input on this. The plastic sheeting that you see is likely on the exterior wall and is part of the moisture management of your home.
I know that doubling up on shower waterproofing barriers isn’t recommended but I am not comfortable recommending removing part of your homes insulation system (the vapor part of it) without having a complete understanding of what you are doing and the consequences of it.
So I would patch the plastic and leave it intact. Then build a waterproof shower as if it weren’t there.
For the second question, I would think that cement board backing is fine but I don’t know how much sense it makes to redgard over that. While I can’t imagine that it would hurt anything, a plastic shower insert should account for the water management and it’s probably wise to follow the manufacturer’s instructions for it.
Annette says
Thanks so much for your time and help!
Ray A says
Hi, can I install cement board or Hardie Backer to plaster walls? If so, do I need a vapor barrier and should I use some sort of adhesive on the back of cement board befor screwing to studs, Lastly, should I waterproof as well?
THANKS SO MUCH FOR YOUR HELP!!!
Ray
Jeff says
Hi,
Well, Im nearing the end of tiling my first shower. I’ve used the Schluter Kerdi system and followed the directions to a T, including the water test etc. However, nearing the end of tiling the walls I pulled off the 1″x2″ boards near the bottom that I started tiling on. Then I proceeded to install that very bottom row of tile. Now it’s been two days and I remembered I didn’t seal the brad nail holes that I used to nail the boards up with!!! These holes were hardly visible. They were about 5 inches above the floor.
I think I know the answer, but do i need to remove those tiles and thin set to seal those holes? Whats the best way? Smash tiles with hammer and chisel thin set off? Uhgg.
Sincerely,
Jeff (not looking forward :-( to it ) M.
DIYTileGuy says
I don’t know what manufacturers would recommend in this situation and I believe at least one of them doesn’t want their board installed over existing wallboard.
But the question is: can you? Which I would think is more of a “would it work” question. So it would probably work except you’ll have to locate the studs so that you can screw extra long cement board screws into. Thinsetting the back is probably a good idea. But, in my experience, plaster walls are usually uneven and this can cause problems.
Rather than adhering cement board to plaster, why not put Kerdi waterproofing over the plaster walls? It’s adds waterproofing and saves a step unless you need to shim the walls out for some reason. An added bonus is that it may even be a warrantied situation.
It’s worth looking into.
DIYTileGuy says
By-the-book advice might be to pull the tiles off but if they are above the top of the shower curb I wouldn’t worry about it.
Gabe says
Hi Tile Guy
My house is on a concrete slab and the shower was constructed with a mortar bed, smooth river rock was used for the shower floor and cement board with a vapor barrier was used on the walls. I recently noticed some wet drywall at the base of the shower on the outside corners of the enclosure. I removed all the wet drywall inside the bathroom and cut “viewing” holes in the drywall on the back side of the tile walls in the adjacent room and checked for moisture with a moisture meter. There was no water or moisture on the backside of the walls. I also did a water test and found that I do indeed have a leak and can see water coming out on top of the slab. I think its safe to assume there is some type of leak in the liner.
Is it possible to remove the floor tile and mortar bed to replace/ repair the liner, install a new mortar bed, and new floor tile without removing the wall tile. The wall are large 12 X 24″ tiles in a staggered pattern and am confident that they will be damaged if removed. I don’t have any spare or replacement wall tiles and hoping to avoid installing an entirely new shower.
Thanks for your advice-
Gabe
DIYTileGuy says
In order to properly replace a mortar bed shower pan you will need to go up the wall about 12 inches at least. If you don’t have replacement tiles then you might consider going with a complimenting tile at the bottom 2-3 feet so that it won’t look like a patch but rather like it was part of the design.
Raye A. says
Hi Tile Guy,
I am tiling a large shower with a 10 foot ceiling. Cement board with Kerdi membrane will be used for the shower walls all the way up above the shower head. We are using a Kerdi shower pan with a dry pack mortar extension, of course covered and finished with Kerdi membrane as well. It will be water tested before tiling.
We are considering using pebble tile for the shower floor. In researching this, a video that I watched said that 1/4′ backer board should be placed over the foam Shower Presloped Floor to prevent the “high heel effect” of the pebbles into the foam shower floor. I had never heard of that. Do you have any advise that you can give, BEFORE I ruin our shower project.
Thank you in advance,
Raye A
DIYTileGuy says
What’s being talked about is called point load where there’s too much weight concentrated in one small spot. This can be a concern with foam pans and small tile.
I don’t know anything about covering the pan with 1/4 inch backer. I think you’ll have to call Schluter’s tech line and see what they say.
If it’s a linear drain and one flat slope then I can see how that might work but I’m not as optimistic if it’s a center drain.
If Schluter says “no” then your options would be to reselect the tile, do a “mud” shower floor with Kerdi membrane on top, or chance using pebbles and hope it’s ok.
Just because point load can be an issue doesn’t mean that it will. It would be up to you to factor your situation with the risk and decide if you want to take the chance, or not.
Donny says
Hi Jim, I have an upstairs bathtub / shower I plan on tiling. The walls are made of plasterboard and plaster. The area was tiled previously, but I made some changes to the shower fixture and noticed the wall behind the tile had years of water damage. I removed all the old tile (which looks like it was glued on, a glue resin remains in the pattern in which it was applied). And I removed the areas of the wall which were damaged by water. I had planned on leaving my plaster walls that are in good condition and just replacing the cut out sections with hardibacker. I was then going to Redgard the whole space, over the resin, over the hardibacker and also I will be installing a premade niche if this is not enough ha! I didn’t want to cut out all the walls since they are in good shape, but I wasn’t sure if covering them in Redgard is enough. I’ll be using small, 6×3″ subway tile. Thank you in advance!
Donny says
Also, the previous tile went from the tub to about 6 feet up the wall. I would like to continue my tile to the ceiling, so I will be tiling over resin and smooth plaster. Could I thinset over the resin to make it workable? This is not a project I was planning on doing and if I didn’t have to rip out the entire wall, that would be ideal.
DIYTileGuy says
I think it’s best to cut out the area that is considered to be the shower and rebuild with the Hardibacker board and Redgard as you had mentioned.
Plaster walls tend not to be flat and tying into the Hardibacker is sure to cause additional bumps in the wall. Also, I don’t think Custom Building Products wants their Redgard product installed over plaster.
DIYTileGuy says
I’m not sure what the resin is. Is it glue residue? If so, I doubt that it’s porous enough for thinset to stick to it. You might be able to install a product like Multi Bonding Primer and tile over that but you’ll want to make sure that your situation works as I’m not sure how that product works in a wet area.
https://www.custombuildingproducts.com/products/surface-preparation/surface-primers/mbp.aspx
Donny says
It’s glue resin, yes. That’s how the previous tiles were installed. The plaster surrounding the tub is 3/4” thick. If I tore it out I would need to match the thickness for the wall transition. Would you recommend putting a 1/2” hardibacker with a 1/4” hardibacker over it or is there a less expensive material I can use? Could I put up sheets of pressboard and cover those in 1/4” hardibacker and Redgard or does it all need to be Hardibacker?
NicDIY says
I have a fiberglass reinforced with acrylic prefab shower pan. It has a lip on 3 sides for my tile board to go over and prevent water from getting past the curb of the pan. It is designed to sit in a 3 wall opening. I have half of a wall in front of the shower, essentially forming a 3′ opening for a door to get inside the shower. However without that lip on the front, I am afraid to tile that area until I design a way to prevent water from just rolling off that little front curb due to the design.
What product, if any, can you recommend? Or is there a good way to do this so that it is water tight and permanent?
DIYTileGuy says
I think the way to do it would be to use a waterproof urethane and caulk the bottom of the wall. Additionally, I think I would use the urethane underneath the wall- in between the bottom plate of the wall and the top of the shower pan.
You don’t want wood on the bottom of the wall. It should be either waterproof foam board over wood or a waterproof membrane over cement board on the bottom plate of the wall. Then sit the wall in urethane and then waterproof the seam again with urethane on the shower side.
Hopefully, that makes sense.
kameryn says
please contact with me for talking details
Alice Dunbar says
someone started replacing my shower -put down membrane and linear drain and mud floor and left the state. Can i put thinset down and tile directly over that?I have never tiled but am willing too try it..but want to be certain it’s the right thing to do
DIYTileGuy says
I’d be hesitant to just assume that the shower works properly. I would try running water in there to see if anything leaks down below.
Something that you might want to try is going to the John Bridge Tile forum and place a post in the “Advice” section. Here you can upload photos of what your project looks like now and you’ll get several sets of eyes looking it over. Uploading photos is a little bit of a pain sometimes but it will probably be worth it for you.
vince says
Hi there,
Allot of good info and had a question on a hot-mop pan. I have seen videos saying that you install the mud pan over the hot mop and then lay you tile on the floor. Then install backer board/ dens shield on the walls leaving a gap between the bottom of the board/shield and the tile on the floor. I have seen other info out there that says you install the board 1st then mud the floor. Is it necessary to waterproof the mud pan after it cures for 72 hrs ?
Im trying to figure out the best install procedure and with all the info, it’s confusing. What about the curb that is hot mopped ? How do you attach the lath/chicken wire to the curb without penetrating the tar from the hot mop and apply the mud to form the curb ? Please advise and thank-you !!!
DIYTileGuy says
Whether or not you hold the backer board above the mud pan, or not, is usually in the instructions for the backer board. It used to be that all cement boards were to be installed first- then mud up to them. I’m assuming Denshield would be installed above the pan.
My personal preference would be to embed the backer board so I would use one that would allow that method.
A hot mop should be your primary waterproofing system so there shouldn’t be any additional waterproofing done after that. At least not for the shower pan. However, I should disclose that I, personally, have never built a shower with a hot-mop waterproofing system. It’s pretty much just parts of California where you’ll find hot mops these days.
For the shower curb, the metal lath will bend around the curb and keep it’s shape. I bend it around the curb and fasten it in the front only. Not on the top and not on the inside.
vince says
Hi there, thanks for the reply. I found the manufacturer’s instruction info and they recommend above the pan. Im in California so thanks for confirming no need to water seal over the hot mop. Thanks for the tip on the curb. Last question about the curb :
I’m guessing I need to make a form on the outside of the curb to hold the mud in and float the inside part of the curb ?
thanks again
DIYTileGuy says
Yes. I would recommend some sort of a form-maybe even for both the inside and the outside.
It’s not required to do it this way and most tile guys just use screed sticks but if it’s not something that you do very often then a form is a good way to go.
vince says
I will do a search for that … thank you for your help. :)
DIYTileGuy says
When I say a form I’m just talking about a concrete- type of form that they use for pouring concrete. Usually plywood or 2x framing material. You can hold it in place with weight on the inside part of the shower and maybe find a way to attach it on the outside.
Then fill up both sides and scrape off the top.
Alice Dunbar says
Thank you
Richard Shirlow says
Hey There
Fantastic blog! I have a question on the Wedi installation, I have ripped out the old shower but have left the greenboard in place from above the shower head to the ceiling, can the Wedi board and sealant be used to join to the greenboard?
Would you also use wedi panels under and around the freestanding tub or is hardibacker ok to use there?
Thanks!
Richard
DIYTileGuy says
You’re OK on both of these. Greenboard above the shower head is fine and you can seal to it with Wedi sealant. Also, Hardibacker is perfectly OK behind a freestanding tub.
Carol says
I have purchased Granite tile for the shower wall without understanding it is not the best thing to do, it absorbs water. I will seal the front and back of the granite tile.
1. Do I tape and thin set the seems of the cement board before redguard or hydroban?
2. Will I be able to to use redguard or hydroban for heavy granite tile?
3. How do I prevent the tile from sliding down the walls?
4. Do I go right up to the area with redguard or hydroban to the new set up for fixtures that the plumber did?
5. In my situation is it better to use hardi fiber cement board or durock?
6. Floor: Outside the shower I have rotted wood sub floor and need to replace it and then use cement boards. Do I use plywood or exterior wood or what?
7. I plan to do the new sub-floor (and then wedi total waterproofing joint sealer to the tub) then thin set then cement board then redguard or hydroban on the floor and again wedi total waterproofing joint sealer on redguard to the tub as a precaution. Is this O-K?
Please answer fast. Thanks
Carol says
Can Wedi Board be used on a shower wall with Granite Tile or is Granite Tile to heavy?
DIYTileGuy says
Granite tile can be used with Wedi Board just fine.
DIYTileGuy says
Firstly, I want to make sure that you don’t think that sealer is a waterproofing. Sealer doesn’t suddenly make granite tile non-porous.
But I’ll answer your questions in line the best that I can.
1. Yes
2. Yes, but I’m not sure that I understand the question. Can you set granite tile over a backer board that has Redgard or Hydroban over it? Yes
3. They make plastic and rubber tile spacers and also small plastic wedges. These are widely available in home improvement stores and inexpensive.
4. I not clear on this question either but you can go right up to the holes for plumbing fixtures with Redgard or Hydroban.
5. Either is fine. My personal opinion is that Durock is a better product but if you wateproof the surface of it then it doesn’t really matter.
6. They make plywood for subfloors. I would rather see you get real plywood then OSB which looks like glued together wood chips. The lumber store should be able to match you up with the grades of plywood that they offer. It should be 5/8 inch thick minimum and preferably 3/4 inch. You want to replace the floor with however thick the old plywood is that you are removing.
7. Yes. This is a good plan. Make sure that you thinset the new cement board down to the floor as well as nail or screw it down with the proper fasteners.
Carol says
Thanks so much for answering my questions.
You are go knowledgeable.
I have another question. This would probably be helpful for others. Let me begin, I like tile and granite etc. I do not like grout. Is there a Superior grout I could use with granite tile/porcilian tile. (The best grout you know about) Price is not an issue, in the long run it doesn’t matter. A grout that does not come out, doesn’t turn colors, doesn’t get mold – mildew, and if possible doesn’t really need sealing even though I know granite tile does at times? I do understand that it might be harder to install less working time etc. Please explain this also.
THANK YOU
Carol says
Have you heard of Ardex 8+9 Rapid Waterproofing and Crack Isolation Compound – Gray. It is a 2 part system that you mix together and roll on for waterproofing. Someone online said it leaves the surface not as smooth as others and therefore more tooth. I am thinking it might be better to use on Durock with heavy granite tile.
Provides positive side waterproofing to all common building substrates that require protection from topside water exposure before the installation of tile or stone. Product Capabilities: ARDEX 8+9 is a two-component system consisting of a solvent-free, acrylic-based liquid combined with a Portland cement-based powder. When mixed and applied, these components produce a flexible, waterproof coating that protects moisture-sensitive substrates from water from above and provides an excellent bonding layer for ceramic tile setting materials
Rapid setting _ tile in 90 minutes
Flood test in 4 hours
Excellent coverage _ up to 100 sq. ft. per unit
Crack isolation up to 1/8î (3 mm)
Ideal for applications in commercial and residential bathrooms, showers and kitchens prior to the installation of tile or stone
Use for interior or exterior floors and walls
Easy to apply with a roller
A blend of Portland cement and other hydraulic cements
Solvent free
Can be used in place of a shower pan
IAPMO certified
DIYTileGuy says
Epoxy grout is the best and the single component grouts are good and low maintenance also.
Otherwise, look into the fast setting high performance grouts like Mapei Ultracolor FA and Laticrete Permacolor Select NS
Also, they make grout additives the can be added to cement grout.
https://www.diytileguy.com/stain-proof-grout/
DIYTileGuy says
8+9 is a good waterproofing product.
Veronica says
I live in Texas where a bunch of hurricane damaged homes are keeping contractors busy for months. I recently moved into my house and wanted some work done on my guest bath. Contractors came in, took out the old one piece tub shower combo down to the studs. In the process, broke the riser pipe (slab foundation with box open for drain). Contractors decided they didn’t want to finish the job, so they bailed (this was in mid April). So, I have been searching, calling, with no-shows and no return calls for several weeks. Finally decided to do it myself. Had plumber relocate drain to be more centered though still on the right side where tub used to be, put up wonderboard, dry pack mudbed down, built curb with bricks and stucco base, and let that all cure for about a week. The plan was to Redgard everything and then tile. I am doing this by myself with no help from anyone – just researching the internet and Youtube. I noticed the shower pan had quite a bit of sand on it so I cleaned it up prior to Redgard but apparently didn’t get it good enough. Let Regard cure and did a flood test which immediately failed. I didn’t see the little cracks in the surface which I read is quite common and needs another coat. So, water came seeping out from under the curb onto the bathroom floor. Mopped it up, peeled up the cracked Redgard and allowed the mortar bed to dry for about a week or so until it felt dry to the touch which I now suspect was not enough. Applied three more coats of Redgard to the shower pan and all of it has cured except for the spot where I removed the Redgard over the dampened shower pan. It has been 7 days and everything else is red but this spot (about the size of a dinner plate or so). I have taken a blow dryer to it which helped a little, but this morning I dropped a couple of drops of water directly on this area and it immediately softened and turned milky. All of the above to ask: what are my options here? My immediate thoughts are: 1) pull up the Redgard where I can and put down a thin flash of mortar and then reapply Redgard to that; 2) pull up Redgard and put down another type of waterproof layer such as Kerdi or even a liner and then put a mortar bed on top of the liner; or 3) pull up Redgard, try to remove current mudbed and redo it allowing longer cure time and being much more thorough with making it smooth and clean before applying Redgard to the top of that. Let me know your thoughts. Thank you for reading this really long post!
DIYTileGuy says
Redgard isn’t dry until it’s completely red. Once it’s completely red you can apply about coat or flood test it.
Apparently there was too much moisture in that spot and it’s having trouble curing.
One of your options is to wait and see if it will dry. You could also scrape it up and start over again.
There’s nothing wrong with sheet membranes and that’s what I use in personal practice. I feel like it takes some of the user error out of the equation.
But if I were going to do a liquid shower pan I would use the rapid curing version of Redgard which isn’t water based.
It’s a heavier duty product and less finicky than normal Redgard. It should be less prone to small amounts of moisture in the pan.
I want to be clear that I have not used this product yet so I can’t speak from experience.
But if can be difficult to get a sheet membrane tied into a drain if the shower wasn’t set up for that from the beginning. That’s why I think rapid curing Redgard would be a good alternative.
Ardex 8+9 is another option but probably is more difficult to get a hold of.
Veronica says
Thanks for your response! I have decided to try to dry it out a little longer. I put a box fan in the shower directed at the pink area and let’s see what happens. If that doesn’t cure for some reason I will try to get some of the speedcoat and try that. I was told today that Home Depot is no longer carrying it (?) so I will try to order it online and go from there. Ardex is another product I will consider (it’s cheaper than speedcoat). I have had the tile for this project since March 30th with 90 day return from Lowe’s, but they said that considering the circumstance, they would likely take the tile back even after 90 days with receipt, so I don’t feel as rushed with the project.
paul says
How flexible is 1/2″ permabase board? If I have a stud spaced 16 OC or less that’s bowed by 1/2″ from ends to center and/or is 1/2″ out of plane and I attach cement board to it, is the cement board going to crack, either right away or eventually? Is a 1/4″ to 1/8″ out of plane safe? I ask because I’m wondering if instead of driving myself crazy trying to flatten out the studs, I can do a less precise job on the studs and drive myself crazy flattening out the cement board with planitop.
Sorry, I asked this under the tub flange post but this is a more specific question.
paul says
Really meant to put this under the backerboard breakdown. Sorry again. Losing mind, need sleep.
DIYTileGuy says
It should flex that much so I don’t think it will be an issue if you just wanted to nail it up. Might not be a bad idea to take some of the bow out at least part way.
I think Ardex makes a product similar to Planitop but I don’t remember what it’s called. Don’t know if that makes it easier to get in your area, or not.
paul says
I found a big supply house that’s ordering planitop for me. Thanks for the tip on the Ardex product. I’ll check it out but Ardex stuff might actually be harder to get here. I don’t understand distribution strategies…
I’ll do some less fine evening of the joists and rely on the planitop to flatten it out completely. If I’m putting up strips of 3/8″ or 1/2″ plywood along the studs can I use pairs of normal wedge shims behind the screws only (like mounting a door frame)? Putting up a whole sheet of plywood sounds more solid but it’s still the same number of attachment points to the studs. Or am I missing something?
DIYTileGuy says
You just want to make sure that the board is fully supported along the stud itself. You don’t want the board to flex up and down the stud.
So a little flex in between the studs is ok. But no wiggle along the stuff.
Don’t know if that makes sense, or not.
paul says
A little weeble is ok but any wobble is a no-no. Got it.
DIYTileGuy says
Perfectly summed up! ?
Matt Shaffer says
Hello Mr Tile guy.
I am redoing my upstairs bathroom due to a flood so I ripped all the walls and flooring out and am at the stage of rebuilding, I installed the new tub and am now curious the best way to waterproof the walls for the tub/shower prior to tiling. I am using the mold/mildew resistant drywall NOT CEMENT BOARD. I’m new to tiling walls that need to be water proofed. Also the GF wants me to build a couple niche shelves for shampoos and everything like that, so I’m wondering what’s the best way to install glass shelves?? Should I drill and silicon into the tiles or set the glass holders into the grout???
Thanks in advance
Megan says
Please HELP!!!
I’m in the process of installing my first mud bed and after passing my flood test on my membrane I pulled the plug on the drain and when it was done draining I still have about 3/16 of water on my short side I have great fall on 3/4 of the shower but am holding water in a small area ( I evidently messed up my pre-slope a little ) sooo is it necessary to pull up my membrane and totally start over on my pre-slope or can I just repair the level area with some floor leveler ???
DIYTileGuy says
If you want to leave the gypsum board up then I would use a sheet membrane like Kerdi for waterproofing.
For glass shelves, I recently saw that M-D building products makes glass shelves just for this purpose. They can be cut down to fit.
They may have a waterproofing membrane for going over drywall too which would allow you to use all one manufacturer.
Otherwise, you can have a glass company specially make shelves for a niche.
I usually tile around the glass so that they are locked into the tile assembly.
DIYTileGuy says
It sounds like you have a small pocket, or section, that is low. We call these ” bird baths”.
You should be able to skim that section with a thinset or something if that sort to flatten it out.
Good job on doing a preslope, flood test, and watching the water drain. You’ve done things exactly right and this is exactly why you do these things. So you can see if it works properly before you tile the whole thing.
Edit: the floor leveler/patch would be a better product to use if you can find it. Planipatch from Lowe’s works well for this type of repair.
Candice says
This seems almost too embarrassing to ask — The soap dish and a few tiles fell out of my son’s shower. I was going to repair them. When I looked, it seems like the tiles were put up against cement blocks. Just cement blocks. Is that even possible? It is only a small section and I’m very loathe to retile the entire bathroom because of these few tiles, but I also don’t want to create a bigger mold problem down the line. Actually, I’m more afraid to discover that this has already created a big mold problem as the tiles were like that when we bought the house 6 years ago.
DIYTileGuy says
Every shower should be waterproofed but there are thousands of showers that are built incorrectly.
However, just because they are incorrect doesn’t mean that failure is right around the corner.
If you see signs of mold behind the wall then you may have a larger problem. But if there are no signs of problems then I think you’re ok to simply install the soap dish again and seal things up.
I have to cause an alarm off there isn’t something more to go on.
Donna K says
Hi, we had a contractor remodeling our master bathroom. He installed penny round tile for the shower floor. The pitch seems ok but we had to fire him for several reasons including a poor job installing accent glass tile. We have another contractor now and his tiler grouted the penny round but tonight we decided to pour water in the shower to see how it drains and there are several places that water is puddling. If walls are all tiled already, can the penny tile be removed and re-done easily? We are so frustrated! The new contractor suggested floating thinset on the current penny round floor and then install new penny round. What do you suggest?
DIYTileGuy says
The tile can be set over tile and a higher quality thinset should be used for that. Also, the height of the drain would need to be addressed.
Removing the penny tiles would also work but could be difficult if they are installed directly over the waterproofing membrane.
If they are installed over a mud later with waterproofing below that then that’s a much preferable situation to remove and replace.
Michelle says
Great blog! I live in California and am getting ready to tile a tub surround. The steps you have laid out are extremely helpful. My tile installer is proposing to install the tile directly on the hardibacker, or for an additional $300 will lay chicken wire and float on top of that. What are the advantages or disadvantages of each application?
Thank you
Michelle
DIYTileGuy says
This is a good question to ask the tile installer but here’s my input:
The chicken wire/mud method will get the walls perfectly flat, plumb, and straight. Or at least it should.
Hardibacker should also be installed flat and straight but does take some additional work. I have a hunch the installer is offering to install Hardibacker without flattening.
$300 additional seems like a good value to me however the side walls can stick out past the drywall using the mud method. This should be discussed ahead of time.
Ray says
On a plywood subfloor, I’m getting ready to have a mud base built for the shower. My question is, do you need the rubber liner if the mud base will be completely covered with a membrane, such as Kerdi menbrane? I have watched several of Sal’s videos and have yet to see him install a rubber liner (basically over a concrete slab). Thanks
DIYTileGuy says
Good question and the answer is: No, you don’t want both membranes. But you definitely want one or the other.
If you’re using a Kerdi membrane that is glued to the top then that will waterproof the pan. You should do a flood test on it to make sure it works when you’re done. A flood test is where you plug the drain, fill the shower pan up with water, and make sure there are no leaks.
Gabe says
Great information, thanks! I have. Similar project and was planning on doing what he outlined in option 1 above. I have a recessed shower in a slab. I wanted to chip the tile up, resmooth the slope, Redgard and retile. I don’t need to rebuild the crub and was going to run the cement board to the shower floor. That will work, right?
Thanks!
DIYTileGuy says
This sounds correct. Make sure that there is waterproofing across the recessed seam.
Karen Tohidi says
Thank you diytieguy, your expert advice is both interesting and helpful. I’ve read through all previous posts I have seen and unfortunately still left with a question. I took out a bath tub, on slab floor. I’ve moved the drain to center for a walk in shower. I would like to do a mud deck, sloped to center and denshield on the walls. I will be building a shower bench with concrete blocks and a curb using concrete bricks. Would it be acceptable to hang denshield on walls first, build bench and curb, place mud deck, and then use a liquid waterproof membrane over all? I appreciate your advice, and thank you.
DIYTileGuy says
The only way that can work is if you use a method called the “divot method”.
I’ll do a post on this at some point but, in the mean time, you might head over to the John Bridge forum and type “divot method” into the search bar and look for a thread started by gueuzeman. Read the first few pages and he shows how to do it.
Rick says
Your GoBoard video was informative and sold me on it for my bathroom project. Just a couple questions on sealing seems:
1. Instead of two layers of sealant would Aqua Defense, which I already have, work as a second layer over the polyurethane sealant?
2. I have a couple outside corners on the platform for a drop in tub. Do you treat those corners any differently?
DIYTileGuy says
If you want to use Aqua Defense for the waterproofing then that’s fine. But don’t use it over the sealant. Instead, fill the seams with thinset and cover with mesh tape. When that’s dry, coat two coats of AquaD over the thinset.
For the outside corner, it depends. If it’s tile on both sides of the corner then I would just treat the seam the same as the others. If it’s drywall on one side and tile on the other then you’ll want to install a metal drywall corner before tiling.
Patricia Gomez says
Is it ever ok to use tar to waterproof a shower? The apartment downstairs was repaired using what looked and smelled like black roofing tar. I want to know if this is normal because it was awful when they do our shower I want to say No to the tar
DIYTileGuy says
There is a method of wateproofing called “hot mopping” which is just what you describe. It’s still fairly common in some areas of the US, parts of California, for example.
So, as long as it’s done to code, passes inspection, and can hold water, then it’s still considered an acceptable method.
Jim bold says
I have ripped shower down to studs to get thickness to match walls. I. Was looking at.putting on hardi tile backer board to studs then half inch wonderboard then. Redigurd and tile.. Or am i smarter to put on wonderbard first then backer board and. Aqua defense. If you have recomendation on best method and sealeant to use like rediguard.
Shoud i use sealant some type of aquashied on the wolmanzed. Sub wall below shower pan grade that wondeboard. Mounts to
DIYTileGuy says
It sounds like you want to double up the backerboard with two different brands? If so, this is unnecessary and not recommended.
Typicall, one layer of 1/2 inch tile backer board will be flush with the existing wall. That’s the reason they make it 1/2 inch thick. If your situation requires you to install it thicker then the best course of action is to sister new studs onto the existing studs and make the new studs the proper depth.
The last part of your comment didn’t come across real well but either AquaDefense or Redgard is a good choice for installing over a single layer of either cement board or Hardibacker.
Denise Weil says
Hi, I’m interested in you opinion on the best anatomy of a wall for PVC panels. Starting from the outside: standard construction (siding, house wrap, osb, studs, fiberglass insulation, Now here’s where I start to question. I’m wondering what is the right choice so I’m not going to trap moisture between layers. Faced or unfaced insulation? Plastic sheeting behind wonderboard or DensShield? Titebond Advanced polymer troweled on or beads of 100% silicone.to attach the 10mm PVC panels? I like working with the Titebond (which is a green choice) better than silicone and I’m told the Kwik Ultra Seal is awesome vs silicone for sealing the edges. I’ve never used either though or installed PVC panels before.
Mark W. says
Thank you for all the great information. You are the most knowledgeable person I’ve found so far on the subject of bathroom tile. Now I think I’m confident in doing a watertight tub shower but I have one concern. After applying the plastic barrier over the studs and having it overlap the tub flange then the cement board and paint on sealant then tile. After everything is finished, I am told to apply a bead of caulking all along the bottom edge of the tile where it meets the tub. Wouldn’t the caulk act as a dam and prevent any moisture from draining out from the back of the tiles? I hope I explained my concern without confusion.
DIYTileGuy says
I hate to disappoint but my knowledge is pretty tile specific. When it comes to house wraps, insulation, and pvc panels I really don’t know enough to speculate on what a proper assembly is.
DIYTileGuy says
Firstly, you typically wouldn’t want both a plastic barrier behind the cement board and a paint on waterproofing on top. Usually, you want one or the other and the paint on is oftentimes the better choice.
As far as the silicone goes, you are correct that, in theory, there’s an issue with drainage. If it’s your own bathroom you may choose to leave the silicone out or leave weep holes in it. But the reality is that a paying customer is going to want that sealed up. Leaving holes or a gap is going to look unfinished and that’s not even mentioning the cleaning issues.
My experience is that leaving it sealed up isn’t an issue in real life. Additionally, some tubs have a designed relief that will allow water to escape. Seems like it’d be a good idea if all of them had that but they don’t.
Good question, though.
Louis Jr Roy says
Hi, quick question, I’ve been doing shower the way it’s indicated on top since my first shower. I don’t remember where i read about it but someone recently told me a 10mill plastic was required for shower so that is why i ended up reading your very interresting article. Have you heard about this? Also one thing i notice, you memtion loosely overlapping the paper or plastic, I always installed the plastic in one piece , should i leave seam for air flow? One last thing, I called Custom regarding putting redguard when a plastic membrane is install behind hardibacker and they told me that I should never do that, it seems according to them that there would be moisture created in the wall
DIYTileGuy says
Every shower needs a moisture barrier whether that is a 4 mil sheet of plastic behind cement board or a waterproofing membrane bonded to the surface (like Redgard, for example). But you don’t want both for a normal residential shower.
If you choose to use a sheet of plastic you’ll want to tape any seams.
Ronald Rube says
I am replacing my plastic shower. I have removed old plastic shower and have installed a PVC liner. Just completed mortar mud bed. Ready to water test, I have wo questions: Can I install Redgard on top of mortar ( for extra waterproofing just in case weep holes became plugged with mortar). Second question, how long do I have to wait before installing tiles. I have read I should wait 28 days for the mortar to cure.
DIYTileGuy says
Don’t install Redgard over the top. The PVC liner is your primary waterproofing membrane. Make sure to use a weep hole protector, or pea gravel, around the clamping collar where the weep holes are located.
Also, when you drain the water from the flood test, watch it drain. The water should all go down the drain and there shouldn’t be any pockets that hold water. Additionally, it shouldn’t gather around the clamping collar.
No need to wait 28 days. The mortar for shower pans is different. You can tile over it as soon as it’s dry- usually 24-36 hours.
Caitlin says
Our apartment building is replacing the risers. They removed 1929-era wall material to access the old pipes. It was some kind of plaster brick, around 5 inches deep. I assume they will just try to close up the hole with drywall but I am worried about moisture from sweating pipes, and I have a mold allergy. What material should I request they use? The risers are between our bedroom closet and the neighbor’s kitchen, so we will also want it to deaden noise and be fireproof. Should the install foamboard or a plastic membrane, and then durock or hardboard? Thanks in advance.
DIYTileGuy says
I’m not really sure what you are referring to when you say “riser?” Is this something to do with tile? Foam board works well in showers over cement block walls. But I don’t think that’s answering your question. I need more information.
Luis B. says
Hey man, i hate to bother other people but it seems like you are the perfect guy to ask, im trying to replace my tile shower floor and walls. I removed the old tile on the floor already, can i just use the same concrete, just smoothed it out, then paint redguard over it and put the tiles on? I will paint the hardiebacker for the wall before installing the tiles but i wasnt sure if that works ok with the concrete. Should i do the floor first then the wall? Thank you for your time.
Tami says
Hello! I was wondering if I could get your opinion on an issue I’m having with Durock waterproof membrane. I have tried to install it over the Durock foam board joints and everything I’ve read indicates I could use Mapei Kerabond T (exceeds ANSI A118.1). I’ve tried to embed the membrane over the Durock foam board (over the joints between boards) and I checked one of the pieces after it’s been curing for about 6 hours and it just peels right off. Mortar underneath is still a little damp but mostly dry. Shouldn’t it stick at least a little!? I’m wondering if I need to take it off and redo, or if I’m using the wrong thinset, or if the consistency is wrong…or something else I haven’t thought of.. Have you ever heard of this issue? I’m really at my wit’s end since no one else seems to have heard of this problem. I’ve never used foam board before. Thanks!!
DIYTileGuy says
I suppose this could be done but typically the hardibacker is embedded into the shower floor. So if that’s the case then how will you get the hardibacker back behind the concrete base?
The other things to keep in mind is that there is a shower liner (usually) that goes up behind the hardibacker. That will need to stay in good condition and you can’t use fasteners below the curb height. Additionally, you don’t want to Redgard over the top of the shower pan. If it has a liner, then that’s the waterproofing and painting Redgard on the top can be counterproductive.
I think you might be better off installing tile-over-tile for the shower floor. They make drain extenders for this application. This is assuming the existing base is in good enough condition to reuse.
DIYTileGuy says
6 hours isn’t enough time for a full cure. Keep in mind that, once tiled, there is no situation where a corner of the membrane would peel off in the manner that you pulled it off.
Just install it with no bubbles or gaps and it will be OK.
Trent says
Hello there! You have tons of great answers so hopefully you can answer my questions. I am creating a master bath with a double shower, bench, niche with shelves and a freestanding tub within the shower box. Total dimensions are 52″ X 110″ with the freestanding tub on the far end. Shower dam is roughly 2/3 of the way along the length, closer to the tub and about 18″ wide with a half wall after that. Shower drain is centered beneath the two opposing shower heads on the other end. The tub will have its own drain. It will be essentially open without any glass or shower door at the opening of the shower dam. Contractor completed framing, plumbing and installed DenShield on the walls with a 6″ gap at the bottom. My plan is this:
1. Build the slope which will go the full area of the shower. Standard drain is in place so will be doing the divot method at the drain.
2. I am going to be using a topical membrane such as Redgard or the like on the slope and walls, floor to ceiling.
On to my questions:
-Should I silicone the gap between the slope and the bottom of the DenShield? Or should the DenShield go behind the slope?
-What is the best method to ensure a waterproof transition at the freestanding tub drain? There won’t be much water here but I want to ensure a completely waterproof pan at all areas.
-Since the tub is on the slope, what is the best method to level the tub? I was thinking of building up a mud platform with tile on top of the cured membrane. My thinking is that any water that would move through the tile and mud under the tub (most likely very minimal) would hit the membrane and flow to the shower drain. Is this sound thinking?
Thanks in advance for your thoughts and expertise!
-Trent
DIYTileGuy says
I’m not a big fan of this type of shower/tub design where the tub and shower share the same wet room. The reason is that there is no “proper” way to waterproof the tub area. What you’ll end up doing is relying on some sort of sealant- hopefully a urethane, to seal around the underneath of the tub. I understand it may not see a lot of water but I just don’t like this design.
On top of that, I really don’t care for Denshield at the bottom part of the shower. Denshield is a gypsum-based product (water-resistant gypsum, to be fair) and the bottom of the shower is going to see a lot of water. I suppose if the only moisture that it sees in from the initial mud bed drying that it would be OK to embed it in the mortar bed.
Then there’s the Redgard as the primary waterproofing barrier. The combination of Redgard and Denshield makes me cringe. I would much rather see you use Kerdi over the Denshield. If not Kerdi then Redgard Speedcoat. But, if you want to use regular Redgard and Denshield, make sure that you flood test your shower for 72 hours. Also, make sure that you waterproof the Denshield properly which probably involves using Redgard over all the seams and penetrations.
Finally, I’m not really sure how to level out your tub. Flattening out the platform would be the way to do it but it sounds like a lot of small tile cuts.
Hopefully, this doesn’t come across as me being too much of a downer. I appreciate your comments about my blog and I hope your project goes well.
Liz says
Hello
I am trying to decide between a Laticrete/hydroban complete shower system and a Wedi complete shower system.
The Laticrete foam board is a bit soft and can be compressed (about 1/8 inch) with pressure from my finger. The Wedi board feels more solid. The firmness in this board I would think would be more tile and weight friendly for a shower floor. I have been trying to find info from professionals in the field who have a preference for one system over the other. Waterproofing wise they both seem like good products.
Thanks in advance for sharing your thoughts and expertise.
-Liz
DIYTileGuy says
Both Hydroban board and Wedi board perform essentially the same function and are competing systems. Hydroban board is a little cheaper and, as you noticed, a little flimsy-er. I’ve used both and Wedi board is the better of the two.
However, both products will give you a waterproof shower and you’ll be happy with either product.
HeidiT says
I am so glad I found you!! My handyman put roofing-like tar paper over the stubs of the shower walls, then put Wonderboard over it. He mudded the seams and nail holes. He then tiled directly over that. The shower floor had been hot mop, mud and tiled.
I have a few people saying that he should not have used Wonderboard as it is not sturdy enough to hold tiles and would fall apart in a few years! And that he should have waterproof the Wonderboards by painting them with waterproofing membrance like Redguard otherwise shower will leak.
Tiling is about 90 percent complete and I hate to have to demo and start all over again (marble tiles expensive). I have stopped the tiling until I know if I need to further waterproof and/or replace Wonderboards with something else. Please help!
DIYTileGuy says
It’s fine. It’s an approved method and it’ll be OK as long as there are no horizontal surfaces such as a half wall or niche.
Olivia says
Question?
If you have a window in your shower/bath combo how do you protect the casing around the window. Also, is there something the contractor is suppose to use to protect the title by the tub, the mud cracked and broke, now its a huge gab (I hope I asking this question correctly)?
DIYTileGuy says
Typically, a window in a shower doesn’t have casing. Rather, it gets tiled around. If it’s above a tub and there’s no shower head above then that’s OK. But if it’s in a wet area, like a shower, you don’t want casing on it. Hopefully, it’s not a wood window.
I don’t really understand the second question but tile should be protected if there’s work going on above it and it would be the contractor’s responsibility to not damage the tile.
HeidiT says
No half wall but i do have one niche. I had my tile guy removed finished tiles on the curbs and redo. Toke it back down to hot mop. Painted the curbs and the niche ( and a few inches around the niche) with Redgard. Does this seem good to you?
Thanks for all your help!
DIYTileGuy says
The hot mop is sufficient waterproofing and doesn’t require anything additional. The niche hopefully has some waterproofing on or it is a premade waterproof niche. If it’s not waterproof then that’s not acceptable and plastic sheeting behind it isn’t acceptable.
johan kim says
Hi DIYTileGuy…. would you be able to help me with this dilemma?
I have CBU abutting drywall with 1/4 in gap where the “wet” shower area ends and the rest of the bathroom wall picks up. CBU also sits about 1/8 inch higher than the drywall. How would you make a smooth transition here? I will be tiling a few inches beyond the border of the shower glass.
Mud and tape the seem, feathering the edge. Then kerdi memb with unmodified thinset. Then tile?
-or- Smooth out and fill the gap with thinset. Then kerdi membrane. Then tile.
Although with the second option…. i am not sure how smooth the transition will be with thinset being feathered out.
Second question I have is regarding Ditra.
I need to level out about half bathroom floor (1in plywood) with self leveling compound. What kind of thinset can I use under the ditra? Can I go with just Unmodified….. or do I use unmodified over the self leveled part and modified over the plywood part of the subfloor?
Thank you!
DIYTileGuy says
For the Ditra question, I would not switch between the two. If in doubt, use modified for the whole thing.
For the drywall transition, you could mud & tape the seam, keep it as smooth as possible and tile over it, then live with the gap between tile and drywall. It would get grouted.
You could also remove the cement board, shim out the drywall on the edge where the two meet, then reinstall the cement board, and mud & tape the seam, etc.
Thirdly, you could do the first option, then use drywall mud to build out the drywall and lessen the gap.
curbless in CA? says
Great blog, site and info! Learning a lot reading through all the questions/answers.
Looking to replace a fiberglass tub with a tile shower (60″ x 32ish”). Demoed to find the osb subfloor (under the tub) is 1 1/4″ lower than the concrete subfloor next to the area (I live in multifamily in CA). I am leaning toward Schluter kerdi system pre-formed shower slope (max height will be ~1 1/2″ perimeter)/point drain/membrane etc over hardie (or cement board) for the walls. The immediate part of the bathroom next to the shower is enclosed room with toilet, an additional 5′ wide x 3.5′ to the door (total room is 5’x6′).
I have read that the foam slope kits need to be very level, unfortunately the original construction butted the osb tightly together, so I have a bit of an uplifting in the middle of the floor. The bubble is on the edge of the line (still within), however over 4′ level it is about 1/8″ – 3/16″ off (in wrong direction). Can i just make that work with thinset? Should I sand down “mount osb? to get closer, or self leveling on the low side?
If I add Ditra (maybe Ditra heat) as underlayment to subfloor for rest of room tile, I can get that extra 1/4″ to have a nice curbless transition (on paper). I saw an earlier post that you recommend going up the walls in the room with kerdi for a certain distance on the walls around the room? Do you then just construction glue baseboards when reattached (avoid nailing)?
Any recommendations on how to construct a temporary dam for the water test for curbless shower? Not having much luck on the internet (weird huh?) Any other curbless words of wisdom?
Since I will be cutting the pan to fit my floor space, I can’t guarantee that the perimeter height will be absolute/identical for all sides. Any words of advice on how to plan tile placement for walls for a nice consistent look? (evaluating medium (6″x12″ or 12″ x 12″) and larger (12″ x 24”) format tile for walls).
Thanks a million!
DIYTileGuy says
For the subfloor, Ithink I would try to sand down the seam as much as is reasonable. Then buy a product like Mapei Planipatch to flatten the floor. Then install the foam pan.
I’ve never worried about nailing on the base when installing over waterproofing that flashes up the walls. Just don’t nail too low and I think you’ll be OK. In a worst case scenario, flooding water will run out a door way before it will travel up the walls significantly. If your nails are 1/2 inch above the tile floor then I think that will be plenty high enough.
For a temporary dam, I’ve taken scrap pieces of foam board and glued them down to contain water. Also, spray foam will work fine. Just be careful when removing the glue or foam as you’ll have to scrape some of it off.
curbless in CA? says
thanks for the quick response!
One more follow up: The existing lightweight concrete is a bit soft and worn down on the uneven edge (which the foam will butt up against). Do you have a recommended product or concrete/mortar mix that I could use to 1. fill in any gaps and 2. be able to slope properly with the foam edge to make a nice continuous sloping system? A dry mix or patch? Or should I just fill with thin set when I apply waterproof membrane? (Gaps would very, ~1/2″-3/4″ deep, ~1″ horizontal. My concerns are around how well it would bond to existing lightweight concrete that is easy to rub off/uneven and foam edge)
thanks again!
DIYTileGuy says
A product like Planipatch should works fine. You’ll have to double check that it’s okay bonding to lightweight concrete though. Not all products are compatible with that stuff.
RenoDrinkingWater says
Hi Tile guy,
Wish I had found this site before this project, but I still have 3 bathrooms to do.
what my contractor has done during our hall bathroom shower remodeling: The walls are redguarded and I don’t have a problem with them. However he built the curb out of masonry board (screwed through the pan liner and then Redgard over it after the pan and floor was tiled. I was told that they would float the curb and pan but was not written into contract. When doing the walk through at tile completion I confirmed with general that it was a float curb (“they didn’t even have Hardi backer or masonry board “) then I mentioned I have pictures of the masonry boards screwed in. He has agreed to redo the curb but now I need to know what to look for during deconstruction and new build up. How can they save or integrate the existing vinyl liner? Would a leak test be worthwhile? I want to inspect the 3 corners if possible to check for proper folds.
RenoDrinkingWater says
An update. My contractor has agreed to rebuild the entire curb and tub due to his workers deviation. I’m having them do a leak test also. Thanks for a great blog!
Steve says
Get rid of that idiot , sounds like you know enough to do it yourself , but you’ll have to research finding qualified installers
DIYTileGuy says
I’m glad that you checked this. They will need to pull the tile off of the curb and the tiles on the wall around the curb.
Then they can patch the holes in the liner, add metal lath, and make the curb out of what’s called “fat mud.”
DIYTileGuy says
Good! and thank you!
Boris says
Hello,
Would you share your wisdom on the possibility of adding a toilet to a wet room? I don’t know any of the technical jargon so this may be long-winded.
In short: can a couple square feet of floor be ripped up to install the toilet drain (I’d like to keep in hidden out of the way) and re-insulated with “rubber paint” then re-tiled without compromising the water isolation properties of the whole room?
This is in an apartment building where the whole bathroom (floor and walls) is water-isolated with a rubber paint and then tiled over. The building sewer drain pipe for the line of apartment buildings is on the other side of one of the tiled walls. There is already a floor drain in the bathroom by the shower and the the drain pipe is under the floor connecting to the building sewer drain pipe.
Penny for your thoughts.
DIYTileGuy says
This is something that I really don’t know about. Sorry.
Scott Tillman says
Zayd, I have almost the EXACT situation. Linear drain with curbless. 3×5 (60 inches).
A few questions:
1) how low did you recess/drop the floor. My math is 2-7/8″ total (1.25 drain+ 7/8 slop+ 7/8″ tile composite (mud/waterproofing/thinset/tile).
2) How was using the combination of manufacturers?
3) Did you end up using a cement board for floors?
4) Can I call you for advice?
PS. I too am particular about the details (former engineer)
Alec says
I’m redoing a shower in my house, which is about 50 years old. I believe that the shower is original to the house, but not positive. It had a mud bed in a sheet liner with a drain in the center. I’m replacing the subfloor in the shower, as it was water-damaged, and I’ve been researching modern ways to do the new shower. I’m in an older house in a fairly expensive area, so I want things more modern and fancy, but I want to do all the work myself. I’m going to be using a linear drain, and I’m wondering if it’s possible to build the pan out of cement board and waterproof with liquid membrane. I would install the linear drain at the back side of the shower, slope the floor to the drain using plywood subfloor material, then install concrete board on all the walls and floor, tape and mortar the seams, then apply a liquid waterproofing membrane. Then I would flood test it and if all’s good, tile over. I can’t find anyone discussing this, so I imagine it’s probably a bad idea, but would like input from a pro. Will this work, and why not? ;)
Thanks
Alec
DIYTileGuy says
This comes up sometimes and it’s not a by-the-book way of doing it but I think its feasible to make it work.
The floor has to meet structural standards and the tie-in to the drain is crucial.
J Buchanan says
My home is old and has 3″ wide plank walls. The bathroom has no shower–only a bath tub. The previous owner “glued” ceramic tile to all the bathroom walls. The tiles have loosened and fallen off. Can I just stick them back directly to the walls, or can I apply a liquid waterproofing to the planks first? I really don’t want to remove the plank walls around the tub. Thank you.
DIYTileGuy says
Tile should be stuck to a backer board or drywall. The planks are going to be problematic.
LaVonne Pockat says
I have a shower that was tiled on the walls and floor about 9 years ago. I was cleaning it good so that I could reseal the grout as I do 2-3 times a year. After washing it and rinsing it one grout line from the wall to the drain is staying dark after 3 days! When I use toweling on the grout, it gets wet where ever I push it down- even after 3 days. I know a rubber barrier was put down, and the cement layer etc. and don’t question the instillation. I was told by one person to just get some grout and seal the crack, or even just do the resealing and it will probably seal the crack- but what about the water that is obviously still under this? Won’t it continue to weaken the existing grout, and the new grout, or come up through another crack if one should appear? I would love some advice from you – even if it’s to get a a professional tile person to step in. Thank you!
DIYTileGuy says
If it’s one grout joint then it makes me think it might be cracked. But the shower floor underneath the tile can stay wet. It may not dry out as quickly as it does above the tile.
It’s hard to say if there is a bigger problem, or not. You might just continue to monitor things.
Christi says
Hi,
I have Laticrete Hydro Barrier and want to use it as my waterproofing membrane for my tub/shower surround. How do I determine which type of thinset (ANSI whatever number; modified versus unmodified) to use with this barrier for taping the seams of the HardieBacker with the Laticrete fabric and as thinset for my tiles, 12×24″ porcelain?
Thank you for your help.
DIYTileGuy says
253 is a good all-purpose mortar to use for taping the seams and for installing “normal” and small-sized tile. For the 12×24, you’ll want to use something like their LHT, 4xlt, tri lite, and 255.
Greg says
Hi Tile Guy – great blog/site.
Are you familiar with solid surface (e.g. Corian, Hi-Macs, Transolid…) used in showers?
I’m in the process of ripping out an old acrylic three-wall shower insert. It is screwed directly to studs with nothing behind, and ordinary (not even greenboard) drywall above it to the drywall ceiling. Nothing else present – no waterproofing or vapor resistant barrier. This has apparently been ok for the 22 years this house has existed, although I note that some of the drywall near the shower seems a little crumbly – is that what happens when it absorbs and releases water over the years?
Anyway, I’m getting a custom built solid surface (both walls and pan) shower. The solid surface material is 0.5″ thick and comes in big sheets. My understanding is that when one piece is properly bonded to the next, it’s effectively a chemical weld – like it becomes one piece. So, if that works as advertised, I’m thinking I don’t need to put in the full waterproofing system like you describe for a tile shower. I do need something for the solid surface to be installed on – I believe the Hardie fiber-cement board is good for this. So I was thinking of Redguarding that, either just at the seams, or all-over (the latter only if the solid-surface installer tells me Redguard won’t interfere with the solid surface bonding to the Hardie. Does that sound sufficient to you?
Thanks!
DIYTileGuy says
In the world of tile, we never count on the surface material as the primary waterproofing membrane. This is true whether we are tiling or installing big sheets over walls.
So I would read the instructions for whichever product that you are using and follow those. But what you are describing doesn’t sound right to me.
Wayne says
I have a new construction home and I have a 3’x5′ shower with 3 full walls and then the door will split the other 5′ wall in half. My architect designed the opening to be 37”x61”, I assume to account for 1/2” of backer around the outside. I decided to just buy a 3’x’5 fiberglass shower base with a flange.
1. Wouldn’t I actually want the flange to butt right up to the studs and then put my backerboard and waterproof membrane overlapping the flange? If so, any ideas for how I should account for the extra 1/2” around each side? Should I put green board or an additional sheet of 1/2 cement board around the walls to fit the base in there snug?
2. My shower base actually only came with flange on two sides. Any ideas for how to ensure the other sides are sufficiently waterproofed?
3. My thought for the installation process was studs, cement board, waterproof membrane sheet, tile/grout. I would think the cement board and membrane should overlap the existing flanges?
DIYTileGuy says
You want the flange to sit up to the studs or even inset into them just a bit. The idea is that the cement board will stick out past the flange or sit entirely in front of it. Then the waterproofing should overlap down past the flange. So I would fur out the walls by framing them out.
The lack of a flange is an issue that can cause big problems. I think you can buy a kit that will “add” a flange onto the tub. Also, you might want to watch this video that Schluter has put out on how they seal to a tub.
https://www.schluter.com/schluter-us/en_US/faq/shower-system-kerdi-bathtub-seal
Ellie says
What a great post! We gutted and re-did the master bath in our old house and used the 2nd method to waterproof our tiled shower, and I was very worried it wasn’t enough… Now I feel a bit better and hope that it stays in great shape for the new owners!
Now we are looking to update our kids bathtub/shower in our new house and I’m trying to decide which is the best method. There is currently tile installed, but only about 3 feet up from the tub, as it is not technically a “shower”. It’s just a cast iron tub, and then has one of those “hose” shower heads. We plan to tear down the old tile and will be getting an actual shower head plumbed in. We got a quote for a shower surround to be installed and it seemed pretty costly considering I know how to tile and we have done this project before!
My question is, since we have no horizontal surfaces since its going above an existing bathtub, do we need to do anything more extensive than the traditional install? If I’m reading your blog right, it seems like our scenario is the “best” case for the traditional, and we wouldn’t necessarily need to go as far as the sheet membrane or kerdi boards type materials.
thanks so much!
DIYTileGuy says
A traditional shower with a vapor barrier would be OK. However, you might find that your cast iron tub doesn’t have a flange that goes behind the tile.
Suzanne Dingley says
Hi there, so glad I found this post. Hoping you can help shed some light on what is going on with my recently installed shower.
The walls of the shower are ceramic tile and the floor is a small marble hex mosaic. The shower was completed about 6 months ago. Immediately we noticed that the area around the drain was darker and not drying out. The tile installer came back and took that section of tile out and replaced it. They said that they didn’t know why the tile was staying wet in the area, possibly clogged weep holes. They also said that the floor underneath the tile was dry. Anyway, that solved the problem, although it was interesting that we could see the outline of the replaced tile because the grout in that section around the drain darkens when in use.
Fast forward 6 months, and we are now seeing darkening of the marble around the perimeter walls that is gradually getting bigger. I noticed a crack in the grout between where the wall meets the floor. So I’m wondering if water is getting in there and going underneath the floor. What concerns me is that the tile is retaining water in that area because it is not draining as quickly as it should suggesting an insufficient slope. I took a level to the shower and it definitely flattens out towards the wall. The tiler and our general contractor is saying that marble tile retains water and the slope is fine. He is suggesting that we replace the marble with ceramic. But my question is: wouldn’t the entire floor be darkened if this was a problem with the marble, and not just the areas around the walls?
Also, I have photos of the construction of the shower and it looks like the liner only goes 3 inches up the wall and is on the outside of the Kerdi board. The liner looks like it was then mudded in place over the board. It also appears that the liner does not go over the shower curb. Could this be a problem in the future?
I definitely feel like our contractor and tiler don’t want to have to deal with redoing the shower. I also feel that they are not being truthful about what is really going on. Help!
Suzanne Dingley says
In my comment above I meant to say Wedi board, not Kerdi.
Suzanne says
In the comment about, I meant to say Wedi Board and not Kerdi Board. Thanks!
DIYTileGuy says
The darkening of marble is becoming more and more of an issue with these types of shower systems. These types being the Kerdi System and other bonded membrane systems.
Your drain doesn’t have weep holes if they used the Kerdi drain. If you have a drain with any kind of Schluter logo on it then you have a Kerdi drain.
If they did a Kerdi board system with Kerdi membrane on the shower floor then the overlap can go in front of the board. So none of those things sound alarming.
The darkening of the grout joints around the repair could be that you have two different kinds of grout installed. It could also mean that no sealer was applied over the repair but sealer was applied over the whole shower prior to the repair.
Unfortunately, I’m not really sure what to do about the issue. The darkening of the marble doesn’t mean that the shower isn’t functioning properly. It does mean that there is moisture in the stone. That, in itself, isn’t alarming. Natural stone can absorb water.
This is something where you might try to contact the National Tile Contractors Association and see what they have to say. This is a known issue and a couple of years ago they formed a focus group to look into it. They may have more information on it by now.
https://www.tile-assn.com/page/ContactUs
Sorry this has happened and I wish I could be of more help.
DIYTileGuy says
Ok. It’s still the same type of board and I wonder what they used for a drain. If it’s a normal 3-piece clamping drain then it could very well be that the weep holes are blocked. The moisture collecting around the drain is a sign.
Find out what kind of shower waterproofing system was used and, in particular, what kind of drain was used. If it’s a standard three piece clamping drain then it’s almost for sure a weep hole issue. If this is the case then it’s not the worst repair to have to do.
John Givens says
What is your advice about which is a better fit for a DIYer to use? Kerdi or Wedi?
I’m tearing out a small fiberglass one-piece shower unit at my daughter’s house (guest bath) and going to expand the footprint, reframe it and build a tiled shower, with a curb. I will be using a prefab foam pan and prefab curb. The drain is accessible from the basement below. I plan to use either a kerdi systems or wedi system for waterproofing the walls and floor. Looking for advice on which to choose. Currently I’m thinking of using the Kerdi membrane over new drywall for waterproofing the walls – I don’t see that Wedi has the membrane – only the wedi-board…is that right? I prefer the membrane idea vs the foam board walls. Is that valid?
I’m very handly – done a lot of remodeling, fix-up, etc, but not very experienced with tiling. I’ve done one tub surround and one penny tile bathroom floor – which turned out well.
How would you compare and contrast the two systems? Ease of use, functionality, support, quality of materials, etc. What would you advise?
DIYTileGuy says
Personally, I think it’s easier to install a piece of foam board vs installing backer board plus a sheet membrane over it. The foam backer board is waterproof by itself. It doesn’t need a waterproofing layer over it.
But, if you feel more comfortable and confident with Kerdi fabric then that’s the path that you should choose.
Dale says
Fantastic questions and better answers!
Here is mine.
New construction
curb less entry into shower on pitched concrete floor
10″ x 10′ box-out around drain pipe stub to allow for setting height of drain
considering cement board as backer, fiber tape and thin set the joints
My questions are, do I tape and thin set the walls to the floor?
Then Redgard the entire surface to be tiled?
Thank you for all your Information
Victor Patton says
I am building a shower in my home, I am building a mortar shower pan, using Sakrete type S (sand) mortar. While reading on the Sakrete site, they recommended that if you were not able to set tile on the mortar bed within 16 hours it entered a “green” stage and tile should not be set until fully cured (28 days).
Question is, if I am using a liquid membrane and and applying it within the 16 hours, since the thin set actually is sticking to it, can I disregard the “green stage” and set tile when the membrane is fully cured?
Thanks,
Vic
Victor Patton says
Sorry, Quikrete type S, not Sakrete….
Victor Patton says
Disregard, I found the answer, called Quikrete. Imagine that, the Home Depot employee who recommended the Type S did not know what they were talking about. I called Quikrete, they know what they sell. Sand topping mix, is the right product. Cures in 3-5 days then good to go. Evidently not all Home Depots carry it, the store in my town does not, but one near by does. Word to the wise, people working in big box stores are not there because they are know how to build stuff.
DIYTileGuy says
The backer board definitely would need to tie into the floor. Then waterproof the entire shower floor, shower walls, and outside the shower area by at least 3ft. Follow the waterproofing companies instructions for how to treat the corners.
Keep in mind that you can’t just use any drain on the shower floor. It needs to be a bonding flange drain (Kerdi drain, for example).
DIYTileGuy says
I would not use Type S mortar which is a mason’s mortar and has lime in it. What you want to use is a sand/topping mix. The problem is that most of the sand/topping mixes are 3:1 which is 1 part Portland cement and 3 parts sand. That’s too “rich” for a normal shower pan.
If you can find some 4:1 or 5:1 locally then that’s what you want to use. I, personally, buy Quickrete sand/topping mix in a 5:1 formula locally but it’s a specialty item. Mapei makes a 4:1 that is a nice product and usually more available.
Otherwise, you can always buy the 3:1 product and add play sand to it to make a 4:1 or 5:1 mix. Make sure to mix it dry first before adding water and mixing it.
For the waterproofing part of it, you won’t be able to waterproof a fresh mud bed until a minimum of 72 hours passes from when it was completed. If you live in a colder environment then that can even be longer. This is assuming that you are using a liquid waterproofing product.
An exception to this is the newer urethane-based products like Redgard Speedcoat which can be installed quickly, I believe. Make sure to double-check that with the instructions. Another exception is most waterproof sheet membranes.
DIYTileGuy says
Good advice and I’m glad that you got good information prior to installing. Thanks for the feedback!
Dale says
Thank you sir
Jason Huffine says
Fantastic article. I have only one thing that struck me as I was reading this. You mention the vapor retarder being optional and related it to the amount of water vapor available? In today’s showers and with the temperatures that can be achieved, extreme amounts are always available. So I think you’re right, but I think there’s more to the picture. Note that the retarder is between the studs and the backer board. If it was just the steam generated, then it should be on the front, which the membrane does already. I think this layer is really because of vapor drive (not necessarily from a shower) and temperature differences. The backer board is made of concrete which is a great condensing surface because it’ll always be cooler than it’s surrounding. Vapor molecules are small enough that they can push through materials. A material’s ability to allow vapor drive through it is called permeability. Drywall allows vapor drive to occur through it which means any moisture in the air (adjacent laundry, kitchen, etc) can drive through the outer drywall and condense on the surface. The moisture can also be derived from other sources. If the shower wall is an exterior wall that may not be properly sealed, then high humidity can drive in. Also, from the crawl space, especially if there’s wiring or holes drilled through the bottom plate. So with this in mind, I feel like the purpose of the vapor retarder is to prevent condensing on the back of the backer board and create a mold situation within the stud bays. Otherwise, there are just too many sources of vapor to stop them all, though good air sealing techniques can sure make a dent.
Caleb says
Doing a large 3×7′ curb-less, walk-in shower and this may seem like a dumb question, but can I:
A. Just form my mud-pan with the correct 1’/0.25″ slope and then paint the top with Ardex 8+9 liquid membrane? It seems to me that this would provide the necessary waterproofing without having the upper mud layer to soak up any water. Why sandwich the liner in between the “mud” layers, I’m sure there is a reason, but I can’t think of one.
B. If A is not recommended: I will have extra Ardex 8+9, can I use this instead of buying a separate 40 mil liner in between the mud pan layers? The website says that you can, but I’m hesitant.
Also, (wacko alert) I want to put a square-ish granite boulder from my property in the corner as a shower seat. My plan is to use a hammer-chisel to shape it to fit the corner, and lay it over top of the mud shower pan and Ardex 8+9 waterproofing membrane. Then mortar (grout? silicone?) in any gaps along the wall. My worry is that the weight might eventually compromise the Ardex or mud-pan. Ideally I would also like it to look as natural as possible (ie, just sitting there with no mortar line), so considered just increasing the slope of the mud-pan in the corner so that water could flow out from behind, and leaving a gap along the wall, just enough to spray and clean. Obviously, even with the wacky idea, a waterproof shower pan is most important, so not sure which approach is safer.
Great resource! It seem like everyone on the internet has their own option and will rant and rave for hours with no real direction, but you give clear concise, logical answers. Kudos!!
Caleb
Caleb Taylor says
After doing much more research (your site is a GODSEND for the diy’er!) it seems that the rubber liner is mainly for protection if you ever need to rip up old tile and the second concrete layer just adds more protection to the waterproofing membrane? Is that the main reason not to only have a liquid membrane (8+9) on top of the mud pan?
I realized that I have already run my Hardie board down to the plywood subfloor, can I still do a mud pan up to the backer board, most diagrams show the rubber shower liner BEHIND the backer board. I have already taped Hardie joints, but could possibly unscrew and slide the liner up behind the cement board, but corners would be tricky or impossible. Maybe just cutting the bottom 12″ of cement board and reinstalling, but not my first choice.
I am still leaning toward doing a mud pan directly on the subfloor and then covering with Ardex 8+9, also because I am doing a curb-less entry at the end of the 7ft shower area, the liner would have to make some awkward folds to get around the 3.5″ half wall. Also not sure where to attach liner to main bathroom subfloor. Overlap on top a foot? Won’t that make the bathroom floor uneven for laying snap-in waterproof vinyl flooring?
You sir, are amazing for all of your help! If I buy anything off amazon (installing a natural stone mosaic floor, your post on pebble seams was a HUGE help!), I will definitely use your affiliated links, can’t believe you give such great advice for free!
Caleb Taylor says
Final thought. Since I already have the ardex 8+9, can I just use this in place of a rubber liner? Still make the pre-slope (overtop of the Hardie board though) then paint with 8+9, then pour a second mud pan over top? It says in the site it can be used as a liner, but I haven’t found anyone that does it. I would also rather just make the mud pan once and do Ardex on top, unless you advise against this. Then paint the rest of the Ardex over the backer board, tying into the final mud pan. Thoughts? Thanks!
DIYTileGuy says
So you can do the pan either way, with a liner sandwiched in between or waterproofing on top. That’s the difference between a traditional shower and a bonded waterproof membrane shower.
It’s important that you tie into the drain correctly, though. A normal 3-piece clamping drain for a shower is designed for a traditional liner shower. So you’ll need either a bonding flange drain (kerdi drain) or a drain flashing like the ones that Noble Company makes.
As far as the big rock, I would build the shower and waterproof as usual then put the rock in. You’ll want to make sure the rock doesn’t harm the waterproofing which might be a reason to go with the traditional liner shower.
DIYTileGuy says
I didn’t catch that you were doing a curbless shower in the previous post. So, there’s no industry-approved way to do a curbless shower with a traditional liner. You’re going to want to use Ardex 8+9 for the shower pan and cover the seam between the shower and tile floor by waterproofing at least 3ft out past the shower.
Again, it’s all about the drain. You’ll need to use a Noble flashing drain piece or a bonding flange drain.
DIYTileGuy says
Yes, you can do it either way. Most people would just install it as the top layer and tile directly over it
Suzanne says
Hello –
We are having our small master bath re-done and are using a contractor that is highly recommended by neighbors. We had our bathtub removed and a shower put in. I just assumed my tile guy had waterproofed before he tiled, but upon inspection of my photos I took the night before he tiled, nothing was applied to the vertical surfaces of the walls or the niche shelf. I was not there the day he put the tile up on the walls, but I’m assuming he wouldn’t have applied the waterproofing the day of. The floor he did a waterproof liner and had it go up about 3 inches and nailed it at the top and then applied the cement, but no waterproofing over that either. Upon reading all of the posts here, I am very concerned about leaks/mold down the road. Also, he installed subway tile and about 4 of the tiles aren’t flush and are sticking out in various places – enough for me to notice just with my eyes, and you can definitely feel them when you run your hands over them. There is also an uneven grout line right above the top of the niche shelf which runs the width of the shower. It’s very noticeable and not even the same size as the grout lines between all the other subway tile. How would you proceed with this contractor?
DIYTileGuy says
I think you should be concerned. The niche is a highly likely spot to leak as is the curb. I think you’ll have to ask the installer to remove at least those two areas and fix the other tile issues at a minimum and removing everything and starting over is a legitimate option also.
If you’ve already paid this person then you don’t have that as leverage but you do have online reviews, possible state licensing, and attorney consultations as potential options.
Randy says
Hi Gabe if I could get your opinion on my shower project. I also have a recessed shower in slab. I want to resmooth the slope as it’s uncomfortable to stand in fear of slipping. It’s also very small so I’m looking for a solution where to
extend the shower bed. The
recess is 2 inches. How might I raise the shower floor to slab level? There is no bed lip or flange. Rip out the tile or mud over tile with a possible drain extension?
Thanks for any input.
DIYTileGuy says
Not Gabe, but I think the tile and the mud bed. You could also cut the recess larger at this point. Then you should be able to raise the drain, remud, and retile. The seam between the recess and the slab should be waterproofed across. 3ft, I think, but don’t recall exactly.
Caleb Taylor says
Can I bond the Ardex 8+9 directly to the PVC drain flange where the liner would normally sit? Or cut a small circle out of liner and bond to that? Or do I need to purchase a separate Kerdi drain?
Also, building the mud pan inside the concrete board won’t be an issue?
Thanks!
Andy says
Hi,
Super help needed. We are in France with block of flats and shower cabinet leaks and have cut hole in ceiling of flat below and when shower starts… Drip drip… A lot of drips.. I can’t rent this flat. Have tested the reservoir and Evacuation and no leak. Someone tiled second layer of tiles 40 cm in height on top of old and this does not leak. But if I hold shower on tiles above water will come through ceiling few minutes later. No holes or cracks observable. I think the shower has no waterproof membrane behind. My question is if I remove all joint grout and replace with epoxy 2 in 1 glue and joint filler which is guaranteed waterproof would this stop the leak as to me the only way through for the water are the joints?? Please help this is driving me nuts. Can’t afford to take off all tiles, use red guard and re tile as tilers here charge you 50 euros just to see their face!!!!
DIYTileGuy says
You can bond it directly to the drain flange. Ardex wants you to use a mesh tape or their own Ardex SK Drain Mesh for tying into it. You’re also supposed to use mesh, or reinforcement, in the corners. If you go to the Ardex website for 8+9 they have a technical data sheet that should be downloaded and reviewed before proceeding.
Also, I would scuff the top of the drain flange with sandpaper to aid in bonding.
DIYTileGuy says
Unfortunately, you never want to rely on tile and grout as you primary means of waterproofing. This is true in the USA as well as Europe. It might slow things down temporarily but you’ll have a tenant in there when someone starts to notice it again. Sounds like a bigger fix is going to be necessary.
Andy says
Thanks.. Not good news for me but little surprised as the tiles are ceramic and non porous and as there has been no movement if I remove old joints and use this all in one poxy glue and waterproof joint filler it should maybe provide a fix for a year or so and it will costs me 150 euros to fix the hole in ceiling.. We had a guy saying if we didn’t remove the tiles we could glue waterproof solid sheets to existing tiles and the re tile on top of these.. Which iam sure will work but he’ll probably charge me 600 euros min as he’ll need to come at least twice for drying times. Is there no one who has thought about producing a waterproof clear coloured mixthat you can roll and paint all-over existing tiles and joints which effectively forms a waterproof barrier?? I know Sika produce a white grey or red roll on product to fix external zinc roofs and just about every substrate… 3 hours to dry and 2 coats… May not look pretty but surely would do the trick assuming it sticks to ceramics??
DIYTileGuy says
In the US, we have a company called Bath Fitters that will come in and install a plastic surround over the top of the existing surface. I don’t know if there’s a company like that in France but you might look into something like that. Anything else that is short of replacing the primary waterproofing membrane is simply an emergency fix that a isn’t reliable solution.
Wendy says
Great post!!
I have a question regarding waterproofing. I have two showers that I am adding on a second floor (wood floor joists). I am kinda obsessed with ensuring the showers are perfectly waterproofed to eliminate leaks (problem that I’ve dealt with in the past). If we use the traditional liner below the mortar bed, is it bad to use a waterproof membrane above the mortar bed around the shower corners, curb and near the drain? Would this still allow enough area for water to evaporate should it reach the mortar without causing that “mold sandwich” I’ve read so much about? I don’t completely trust just waterproofing the top of the mortar with liquid waterproof but also hate the idea of just using the traditional liner below the mortar but I’ve read I can’t do both so I wonder if doing a “partial” waterproofing above (in the problem areas) is acceptable.
Thanks!
Wendy
Andy says
Hi,
After several weeks…..
Just to let you know I took out all the old joint
filler with
a macallister multi tool with a circular diamond attachment. Then used spray from aerosol recommended to seal leaks in roofs which worked great on my flat zinc roof last year.. 1 coat then let dry for 24 hours.. Second coat and let dry for 24 hours.. Cleaned up tile surfaces with razor blade tool. Then filled joints with epoxy 2 in 1 glue and joint filler.. Got to be quick as only 90 mins before begins to get difficult to use. Let rest for 24 hours, cleaned tiles with razor blade tool. Over a week of heavy use by tenants…. No leak…. This has saved me a lot of money.. But the products are there but as in this case I have used an external waterproofing roof membrane for a different purpose and it seems to have worked.. For the moment.. Thanks for being a good sounding board and getting me to think the problem through clearly.
DIYTileGuy says
If you want to use a traditional liner that is just fine. The liner will go up the wall maybe 8-12-inches then the wallboard would go over that with waterproofing eventually going on the wall. So, it’s really unnecessary to apply the waterproofing onto the shower floor. Plus it’s not going to help anything.
The traditional shower system works and it works just fine. I know people want to go beyond the minimum but it’s not advisable in this situation.
DIYTileGuy says
Thanks for following up. Good luck and I hope things hold up for you and the tenant.
G. Val says
We are retiling a tub/shower combo using Durock and planning to use Redgard roll-on waterproofing.
Apparently we have installed the Durock in a less-preferred way – with an 1/8” gap above the tub flange instead of the Durock overlapping the flange. Also the Durock is thicker than the flange so there is a 3/8” deep by 1” high void between the Durock and the tub deck. If we redo and fur out the duroc, which we don’t want to do, it will not be flush with the adjacent drywall.
Do you know how we can remedy this?
Thank you!
DIYTileGuy says
I wouldn’t worry about it unless you have to. Unless you’re using small tile I don’t think it will be an issue.
Jonathan says
I am building a shower on ground level on top of a slab. The slab was poured with a 4″ recess for the shower to sit into. All the other showers in the house were built with a custom fiberglass shower pan. Those were build on the 2nd and 3rd floors over wood framing, so I understand why we went with fiberglass on those levels. Is it overkill to build a fiberglass shower pan for this ground level shower?
Would it be adequate to go the mud pan + liquid waterproofing membrane route?
DIYTileGuy says
There’s no reason not to install a fiberglass shower over the slab if that’s what you want to do. You can also go the mud pan and liquid waterproofing route if you want. I always encourage a flood test of the shower as the liquids can be finicky sometimes.
Bob HEarn says
DIY Tile guy.
I am writing from Sydney, Australia.
I just happened upon your site and am highly interested to read about all the problems that occur on the other side of the Globe that we call Earth. I experience all the same problems here !!! The same range of failures, stemming from incompetent tradesmen that use the wrong material/s and/or wrong application techniques.
I have been in the Internal Wet area Waterproofing game for 40 years and we developed a system in the early 1980’s that is based upon flexible sheet p.v.c. membranes that are either heat welded at the seams/laps and /or chemically solvent welded.
Wall membranes are attached to the stud framing, a full floor membrane covers the entire floor and 6 inches up the wall behind the wall sheet and a custom-made shower tray (pan) completes the membrane system, with a doorway threshold angle between the door opening studs.
We haven’t had a failure in that time, and once on site the install time is around two hours.
There is a similar system in the U.S. using materials branded “Oatey” that I saw last time that I was in the U.S. (My wife is from N.J.!!)
You will see our system on YouTube, It is called April Showers Waterproofing.
Stephen says
Our tiler is using tile adhesive instead of thinset mortar in our walk in shower walls and shower niche. Purple moisture resistant drywall is used. They said the corners would be taped and thinset mortar used only along all joints on the drywall. No waterproofing. They said the tiles and grouting seals everything and the corners would have a silicon line.
I have read that tile adhesive shouldn’t be used in high moisture areas. I would prefer a thin set mortar be used. Our tilers keep saying they have been doing this for 30 yrs. And they dont use redgard on any jobs. It’s a waste of money. His own bathroom he doesn’t use it.
He sent the specs for Tile Grab Chembond 1640 and its say
For residential interior wet walls (tub surrounds) where service
requirements do not exceed ANSI A136.1 Type 1 standard
We are tiling a walk in shower not a bathtub surround.
Is this something where thinset should be used?
DIYTileGuy says
What I’m more concerned about is the drywall with no waterproofing. Tile and grout are not a waterproofing system.
I looked up the technical data for National Gypsum Gold Bond XP and it specifically mentions that it’s to be used as a tile backer for dry areas or areas of limited moisture such as sinks and toilets or above a shower. Not IN the shower.
If the niche is made out of this same material then that’s even a bigger problem.
In regards to the mastic (adhesive), they say the product is OK for wet areas but it’s a very minimal product. In fact, it can only be used on a maximum tile size of 10×10 inches (according to their literature). Also, a maximum of a 1/4 x 1/4 inch notch trowel.
This product can go over drywall but you shouldn’t have drywall in your shower. Typically, even if your tile are small enough to fit into the requirement, a normal shower has waterproofing and a mastic typically isn’t supposed to be used over a waterproofing.
The issue is that it will never dry if it’s sandwiched between waterproofing and porcelain tile. Also, if it’s applied too thick. Hence the small tile size requirement.
So, I would have them stop as they are using the wrong products for your shower. If they argue, tell them they need to provide product listings that show that they are appropriate for the application. Purple board isn’t appropriate. You could call the manufacturer to verify that.
Yvania says
Hi DIYTile Guy,
Been reading the website and thank you for all the great reading and insights. I’ve been reading about water proofing for a shower. I’m looking to replace an old 3 piece with shower unit with a new tub and tile on the wall. I received a quote and listed as the materials include weyerhaeser double paper, versabond thin-set, impregnator sealer, self adhesive waterproof flashing. Would this work to waterproof a shower?
Thanks
Jason says
Please help: I am would like to tile a small section in my kitchen which butts up to hardwood which is 3/4 thick I want the two surfaces level. Should I use .5 inch cement board (which is really .42 thick) then the tile is 12×24 and 1/4 thick. If I use a 1/2 x 1/2 trowel then I’m afraid the tile plus the mortar plus the clement board will be over 3/4 inch.. please help!
DIYTileGuy says
That sounds like a handyman’s way of waterproofing a shower and doesn’t sound like the proper products. You want some sort of waterproof membrane from a brand: Redgard, Hydroban, Wedi, Kerdi, etc. Roof and siding flashing isn’t correct.
DIYTileGuy says
The thing to do would be to wait until you have the flooring removed then use samples to mock-up the heights. Since you have to trowel mortar underneath the cement board that may make it closer to 1/2 inches.
Are you going to use the factory edge up next to the hardwood? If so, the factory edge has a slight rounding to it which you may be able to use to your advantage.
Mike says
What a great website. Thanks for all the info.
I am doing a curbless shower. Right now, the entire bathroom is down to the studs and concrete subfloor. My plan was to use a concrete saw and cut 2 inches into the subfloor where the shower is (using cross cross cuts and then chisling out with a root hammer) so that I have a recessed shower pan. Then the plan was to do the following:
1. Put slurry down and then the preslope deck mud down, which slopes from the floor outside of the shower down to the drain (sloping 1/4 inch per foot from the drain to the farthest wall).
2. Wait till the mortar bed dries, then put thin set down and then one of the paper moisture barriers (such as the schluter orange membrane paper).
3. Seal all of the corners and seems using thinset and kurdi strips (walls will be some form of a concrete board like wonder board).
4. Put a liquid membrane like red guard or Ardex 8+9 over the entire pan and all seems on the wall.
5. Tile.
Does the step-by-step process sound correct from a high-level to you? I have seen videos where they two two mortar beds, one for the slop, followed by the waterproof membrane, and then another over the membrane. I have also seen where they only do one mortar bed. Because I am cutting into the concrete to lower the shower pan, doing two mortar beds would require a deeper cut. Considering my subfloor is only 3.5inches ish thick, I would prefer to only do one mortar bed (thus, resulting in less of a recessed floor) to keep the subfloor as intact as possible. Maybe that is not an issue at all but it seems that if I had to cut deep enough for two mortar beds that there would be only a minimal amount of the subfloor in tact (I read that it is not ideal to take the entire concrete out where the pan is and report because that would result in a cold joint and that is not good??). Anyhow, that is what I am struggling with now. Any thoughts tiling right on the waterproofed deck mud and my approach?
Thanks so much!
Mike
Mike says
Also, I forgot, from a waterproofing standpoint, the other option I am hearing from a lot of people is hot mop, which I am told MUST have two mortar beds, one above and one underneath the hot mop. I am hoping the paper + liquid membranes would be just as good?
Thanks again,
Mike
Amy Avey says
Help…I am terrified! We hired a tile guy and let him do his job on a house we are selling without watching extremely close since we were not living in the home. There was a pause in installation (waiting on tile) so I went to check out the work…
There are tiles cut at a slant in the corners above the tub. I thought the walls should be straight before any tile installed? Also the shower we are waiting on tile for in another bath has rock in it…nothing else right now. I’m assuming that he is trying to save money but I would think this would be tricky to get the mud to settle enough not to shift?! We are putting 2×2 tiles in the shower floor. Now I am worried that he cut corners with all the substrate installation that I did not see.
What do I do?
DIYTileGuy says
For your shower, because it’s curbless, you want to do one mortar bed only. I recommend using a bonding flange drain for your application. The Kerdi drain is the most popular bonding flange drain.
So, cut the concrete down. Install the backer board, install the mortar bed, install the drain, wait for it to dry, install the Kerdi over the pan and 3ft out onto the bathroom floor and up the walls.
I would stick with just one shower system and I think the Kerdi system would probably be a good one for your project. They have good videos and instructions as well.
DIYTileGuy says
You don’t want a hot mop. For a curbless shower, you want one of the branded waterproofing systems. Ardex, Hydroban, Kerdi, or the like.
DIYTileGuy says
It sounds like it’s kind of a quick and hurried job. I’m not sure what you mean by rock in the other bathroom. Do you mean that it’s sheetrocked? or actual rocks?
I would bring up your concerns and have him fix things. Tell them you want all of the showers flood tested for leaks. Make sure to pass on his information to the next buyers because they are the ones that are going to suffer the consequences of a poor installation.
Rick Williams says
DIY’er here…installed Kerdi membrane over moisture resistant (MR) drywall. Taped and primed and painted drywall (both coats latex per Kerdi advice) . Installed membrane with Unmodified thin set. While still damp had to take all membrane off. Most of thin set on wall dried hard ( almost like I skim coated it ) but there are numerous areas on wall where skim coat came off with membrane and left depressions in the coating…got a new roll of fabric intending to recover the walls, but now have doubts:
1. Should I install new membrane over the skim coated walls ( remember the small “craters”)
2. If so, will the craters pose a problem? And if so should Insand walls or fill craters in?
3. Or should I tear out glued and screwed and finished green board and install Hardie Backer as a base for the membrane?
PS: I am using Schluter kit with shower pan, curb, niche and corner seat.
Any advice you can give me will be appreciated.
Thank you.
DIYTileGuy says
If the craters are small enough, I think they could be filled in. If they are too large to fill then the drywall would have to be repaired in those spots. If there are a lot of repairs then probably replacing the drywall completely would be the way to go.
Schluter recommends drywall as a backing for their product because of how easy their product is to install over it. Hardibacker is a better product for wet areas than drywall but the mortar will dry even faster over this surface. So drywall is going to be the easier install.
Yvani says
Thanks! What are your thoughts on the plastic behind the hardi-backer? I mentioned the waterproof membrane, but sounds like his preferred method is traditional? Any pros or cons? This would be in a shower/tub area that has tile on the walls.
Rick Williams says
Thanks for your response.
I tore the drywall out in the shower area ( 3/0 x 5/0 x 7/0 ) to the studs and intend to install Hardiebacker ( only because that is most available where I live).
Intend to install Kerdi pan, drain, corner seat and wall niche.
I have a new roll of Kerdi membrane but have concerns about my ability to install over Hardiebacker ( using Ladicrete 317 Unmodified w/ANSI of 118.1).
What are your thoughts on putting roof felt over studs, Hardiebacker,
Then pan, bench and niche ( using the Kerdie band at the transitions to the Hardiebacker) ?
Thanks so moch for your help.
James says
Hi DIYTileGuy
When placing a new slab, can the placers inset the area of the shower floor so that the slope is set into the cement. For example for a 3′ x 4′, could the slab be sloped down to the drain by 1/2″ from the edges?
Is that how that would be done typically?
Thanks for the great advice.
James
DIYTileGuy says
Plastic behind the Hardibacker is fine as long as there are no horizontal surfaces like a bench, half-wall, or niche. If there are, then those areas will need to be waterproofed with a membrane that is bonded to the surface, like Redgard or Kerdi.
DIYTileGuy says
If you are going to use the Kerdi pan then the waterproof membrane is supposed to go up to the shower head for the system to work properly. I would pre-cut everything and work in small areas until you get the hang of it.
DIYTileGuy says
I think what you are asking about is pouring a concrete slab throughout the house and then sloping this same concrete slab in the shower. If so, there are questions about which waterproofing system that you are going to use for your shower? Which drain? Is the concrete supposed to be the finished surface or are you going to put tile on top?
I’d have to spend some time thinking it through, but I think there is a theoretical way of making it happen. But it’s not simple and would be difficult to make something like that happen in real life.
If that’s the route that you want to go I would spend some time with concrete and tile waterproofing experts in your area, and probably your city’s building department, and come up with a plan that will work for your specific application.
James says
Thanks for that advice
My plumber says he has never seen it done that way and it would be difficult for the concrete placers to give that much attention to the shower area while placing the whole slab. So we are going with tile and will build the slope with thinset and tile.
After seeing your GoBoard video, I’d like to go that route as I really don’t want to work with cement board.
One question though, I’m assuming you’d use a membrane for the floor. How high would you need to go up over the goboard with the membrane if that is how you would do it.
And does it matter what type or make of drain (we plan on just using a square centre drain) or do they have to “match” up with the membrane manufacturer?
Thanks
James
DIYTileGuy says
Yes, you would need a membrane is you are using GoBoard as the backerboard. Typically, most membrane manufacturer’s specify a minimum 2-inch overlap. So, you would install GoBoard on the walls, install a mud bed, then install the membrane over the mud bed and flash the sides up 2 inches onto the walls. Then tile over that.
For the drain, you’ll need what’s called a bonding flange drain. The best-known bonding flange drain is the Kerdi drain. The other alternative is to use a normal 3-piece clamping drain for the shower and do what they call a “divot” around it. If you go that route then you’ll probably want one of these flashings.
The different ways to build a shower can get complicated. I’m don’t want to overload with too much information. You might take a look at the Kerdi Shower System. They do a good job of explaining how their system works and how to build it. Even if you don’t use their products their information is helpful.
Gabriela says
I would appreciate some advice: what is the right material to fill in uneven spots on the walls of a shower lined with Hydroblok as the substrate for tiling?
We are remodeling an old bathroom; no wall is straight. We installed Hydroblok on the shower walls. We should’ve used shims for a straight installation, but we didn’t. As a result, we need to fill in uneven spots on the walls (some corners are recessed by 3/4″ to 1/2″ and need to be leveled). We hired a contractor who installed ceramic tiles with lumps of mastic unevenly spread behind each tile to make the walls look straight. Suffice it to say, I didn’t go to sleep until I removed every single tile. So now I am going to do it myself.
I read that thinset should not be used to fill in uneven spots. A CTEF website said “When repairing walls, a good quality flash patch should work well.” Could you explain what this is? And can be it applied over Hydroblok? Thanks!
DIYTileGuy says
You’re in a little bit of a spot here and the CTEF website is correct. You won’t want to hear this but the best way to proceed is to remove the Hydroblok and start over with shimming the walls. Having flat, level, and plumb walls is the beginning of a nice tile job.
You could leave the backer board up and use a product like Planitop which I discuss in this post. This is one of the products that the CTEF is talking about. But you will still have a lot of work getting the walls straight and you lose some of the waterproofing features of Hydroblok by installing a thick cementitious layer over the top of it. Not to mention that Hydroblok may not approve of this product over their board.
Sometimes people do use thinset mortar in place of Planitop but you aren’t really supposed to do that either. It doesn’t smooth quite as well and it really isn’t the right product.
So, my vote is to bite the bullet and start over. Use drywall shims or sister studs and get everything flat and plumb ahead of time. Eventually, you’ll be happy you did.
DM says
We have a similar story with a contractor totally botching a job. We had a shower enclosure replaced with a “Luxury Bath” system by an “Expert” contractor who had good reviews. It’s a proprietary acrylic enclosure to which even their own silicone will not adhere well. We’ve tried several other silicone caulks cleaning completely and using different preparation methods – sanding, acetone, MEK, isopropyl alcohol, with no success. Are you aware of anything that could seal this enclosure?
If not, we’ve decided to DIY rip it out to the studs and subfloor, and tile the enclosure using the Schluter system. We think it would be easier to put up Schluter panels but are concerned because you’ve mentioned flexing of those panels. How bad is that? Could the tile crack if a person fell against the wall between studs? Would we be better off to use the green water resistant/mildew resistant drywall for the walls and cover them with Schluter membrane? We’ll use a Schluter foam pan.
DIYTileGuy says
Personally, I like the foam panels. You can always reinforce the seams with additional 2×4 cross blocking in the walls. Once it’s tiled it won’t be easy to crack. For what it’s worth, Wedi panels are much stiffer than Kerdi-board but it depends on what is available in your area.
Sherry Lawson says
Just read your waterproof diy on showers today maybe get some idea of how to fix a problem. I have a new construction home and at last minute after vantech boards were installed, I added a porch to part of a sunroom. I now have a vantech floor instead of concrete. I wanted to ask your opinion on waterproofing that floor the same way as you would a shower Before adding tile. I can find nothing for outdoor waterproofing with a wood floor. Any help would be greatly appreciated. Thanks
DIYTileGuy says
I’m guessing that you are referring to AdvanTech? Exterior spaces are not something that you want to take lightly. I know that Noble Company has an exterior deck membrane with very specific instructions on how it’s to be installed. Also, Schluter has a way of doing exterior spaces with their Ditra product but you would have to contact them so they can provide instructions for your specific situation.
So, those are the tile options and there are ways of doing coatings also but that’s not something that I would be familiar with.
Mary Anderson says
We are doing a remodel and did not feel comfortable to do a shower pan by ourselves so hired someone to put it in. He put Aquaban on top of the studs, then put the pre-slope foam and rubber membrane over that. He taped the Aquaban to the rubber mat with Forti-Flash (a wide black tape) then installed Goboard but stopped about 8″ off the floor. The next day he put in the mortar bed. Does that sound right the Goboard should not go to the bottom. I asked him what he was planning below the Goboard and he said mud and tile. Will the mud stick to the rubber mat?? We also have concerns about him stopping so far up and leaving a big wad of the rubber membrane that extends out past the surface of the wall. His answer was put mud and tile, then wedge a board to “HOLD” the tile in while the mud sets. Sounds to me the pressure of the stiff rubber will only cause the tile to fail before a shower door can be installed. NEED HELP and advise!
DIYTileGuy says
Some installers will do their pans that way where they stop the backer board a couple of inches above the mud pan. The reason is that the waterproof liner won’t bulge out the backer board.
However, the way that I’ve seen it done is to have metal diamond lath in that space. Like you mentioned, I don’t know how mud is supposed to stick to the membrane without the metal lath. The lath would be fastened at the very top and the bottom would be embedded into he mud bed.
Additionally, if he’s hired to prep the shower then he should fill in all of the spaces. It shouldn’t be your responsibility to wedge tiles. You should be able to tile over the area as-is.
Gregory Cole says
Great site.
A couple of questions about a bathroom im forced to finish because contractor took the money and ran, anyways first off I live in California so pan and curb and pony wall with bench were all hot mopped, they hot mopped about 10 inches above the pan all the way around until it reaches the curb. So my question is do I still apply redgard or aquagaurd to all the seems on hardibacker ? and when in come to the niche would you recommend using the papermesh when applying the outer sealant for the corners the niche and pony wall? and finally would you seal the ceiling portion? there is hardibacker there because I wanted to tile the ceiling of the shower also, I should point out I have a rain shower witch is 3 or 4 inches below the ceiling. I also have a window that is about the same level as the rain shower head should I waterproof around the window also. I do have a vapor barrier behind the backerboard if that makes a difference. Thanks for any advice
DIYTileGuy says
If you have a vapor barrier behind all of the hardibacker then you don’t need to waterproof all of the walls. You’ll need to do around the niche and window. If they didn’t hot mop the bench then that will need Redgard also. If there is Hardibacker installed over the hotmop then that will need to be waterproofed. Any horizontal surface needs waterproofing on the surface.
The ceiling doesn’t need any waterproofing as it’s above the shower head.
All Hardibacker seams and corners need to have alkaline resistant mesh tape embedded in thinset. This includes the window, niche, and all inside corners. That’s how you seal the seams and that should be done before waterproofing.
Laura says
Thanks for this article. It has helped me to make an informed decision on how to properly waterproof my tub/shower walls before tiling (I’m doing it myself). I have a question I’m hoping you can answer. I’m going to build a shower niche and I plan to use the Aquadefense as well as Durabase seam tape to ensure the niche is completely waterproof. Since I’m taking these steps, do you think it will be okay if I use the mosaic tile on all 5 sides of the niche (including the bottom)? I know using the mosaic for the bottom will result in a lot of grout lines, but I really want the look of the entire interior of the niche being all in the mosaic. Thank you
DIYTileGuy says
Yes, you can install the mosaic on all the sides that you want.
Laura says
Thanks. When I use the Durabase seam tape, do I use that INSTEAD of the cement board tape, or do I need to layer one on top of the other? Thank you
Thomas Elliott says
Hello! I need some help. The area just above the shower had some type of tape to come loose from the wall. I had to pull out all the tape that surrounded the wall just above the shower. What type of tape would this be? I imagine that it would be made to be waterproof since it seems to surround the shower. I have pictures that I could share but I am not sure how to upload them. What process would you recommend to complete the repair?
Thanks so much!
DIYTileGuy says
Either way is fine. You don’t really need to treat the seams twice, though. Once is enough.
DIYTileGuy says
I really don’t know much about the tape. What was above the shower? Drywall? Tile?
Michael says
Is there a problem with installing a vapor barrier and a kerdi membrane ? Wood framing, moisture barrier, green board, kerdi membrane then tiles ? Just asking as my next step is installing the tiles so if I need to make a change and start over I rather do it before I install the tiles.
Thank you
DIYTileGuy says
The general thinking is that there should only be one barrier. In your case, that would be the Kerdi membrane. There’s a theory that water vapor could get past the Kerdi membrane, hit the vapor barrier, and then turn back into liquid.
Your best bet is to simply use the Kerdi membrane only.
Brent says
I’ve just finished with Kerdi membrane walls and floor. I tend to overkill and don’t fully trust the Schluter-Kerdi membrane install that I did (1st time using Kerdi). Would it be good if I used Ardex 8+9 over Kerdi membrane? Maybe go up 12” on walls and cover floor…?
DIYTileGuy says
I know people that do that and it’s probably OK. Schluter won’t supply a warranty with that sort of install though.
Juney says
Can I use red hard along the corner seams of a Kerdi shower pan? I just want to be extra careful preventing leaks.
DIYTileGuy says
I would flood test your shower pan. It either works or it doesn’t. If it works then the Redgard just voids the warranty.
https://www.diytileguy.com/flood-testing-shower/
Robert Little says
We are remodeling an older home. Tore out a shower and found that the sub-floor was rotten. I have replaced the sub-floor but the floor is not level. I want to use the Kerdi-Board shower pan which appears to require a level floor. Is it ok to pour 3/8″ thick Mapei Ultraplan Self Leveling Underlayment then thinset the Kerdi pan over it?
DIYTileGuy says
I don’ think so. It is OK to pour a self-leveling underlayment under your shower pan to level it out but there are only certain kinds that will allow you to pour over a wood subfloor with no metal lath.
Check out this post for more information: https://www.diytileguy.com/self-leveling-underlayment/
Samantha Love says
Is Hardibacker with fiber cement and mold blocker considered a sufficient waterproof membrane?
DIYTileGuy says
I don’t think so. Hardibacker does have a new product that they consider to be waterproof. You can find out more about it with this link.
https://www.jameshardie.com/products/hardiebacker-cement-board/hydrodefense
Paul says
Hello Dave, thank you for the valuable education. I am hoping to use it when consulting tile contractors for my shower remodel, doing the demo and prep myself. Trying to come up with a plan before I start, with attention to waterproofing.
The shower in question is 22 years old, unknown wallboard material, likely a traditional mortar base with embedded membrane, and does not appear to be leaking. I mostly just want to update the tile for a fresh look. There are a few hairline cracks in the grout on the 12×16″ wall tile near one side of the curb (I suspect due to some historical water ingress via shower door mounting screws higher up which I’ve addressed).
The 3×3″ floor tile and grout appears to be in good shape, just tired-looking.
I know how to build it from scratch, but for this project I want to minimize the scope and cost, where reasonable.
I would greatly appreciate your opinion on the feasibility of option 1 or 2 before I proceed:
1) attempt to save the existing substrate by carefully peeling off wall tiles (repair/smooth the subsurface and apply waterproofing), tile over tile on the floor (raise the drain cover height);
2) carefully demo the entire wall, tile mostly still attached to the wallboard, attempting to preserve the existing membrane (which I can only hope will be run up the wall some distance), replace wallboard (sealing joints and waterproofing), then tile over tile floor; or
3) bite the bullet and demo everything down to the studs, hammer out the mortar bed, and do it right using the recommended techniques presented on this site.
Thank you in advance!
Paul
Paul says
Update: I determined that the existing shower walls are greenboard.
Griffin colvin says
I plan on using durock with hydro paint on for a waterproofing membrane on three tiled walls for standard tub bathroom. One of the walls will be on the exterior side of the house, do I need to put plastic sheeting behind the durock against the exterior studs/installation?
DIYTileGuy says
I’m obviously a fan of option #3. Additionally, I would completely rule out both options 1 &2 as I don’t feel either is a practical option.
If you don’t want to go to the work of completely redoing the shower then I would look into tiling directly over the tile that you have in there right now. Don’t remove any of it and just tile over it.
I would not spend too much money on this option because if you have green board for the walls I wouldn’t expect this shower to last a long time. But tile-over-tile can improve the looks of the shower while you plan on a complete tear-out in the future.
DIYTileGuy says
If you are using a paint-on waterproofing membrane for the shower then you do not need, nor want, an additional plastic barrier for the waterproofing of the shower. But you’ll have to do some research and figure out how the vapor protection for your exterior walls and insulation is handled. Exterior home insulation is outside my expertise.
Paul says
Thank you for this.
Start fresh for both longevity and code compliance.
Griffin Colvin says
Thanks for the help, I’ve been doing research and even asked hydroban for their advice and what I’m finding is for exterior walls, still need a vapor barrier behind the cbb. My concern was a double vapor barrier sandwich but since this is exterior wall I think plastic sheeting is to protect studs and insulation. So for a standard tub I’d place the plastic sheeting over the tub flange.
Katrina Jennison says
Hello, You have been most informative and helpful with your advise. We hired a GC to do a full bathroom remodel. He took our old shower down to the studs. We extended the shower into the closet space to make it larger. The style is an inset w/ barrier and glass enclosure. A bench and insets. He build it with cement board, used a mud bed, seamed in the cement board, mudded and sanded all the seams and sealed using a liquid waterproof membrane on the walls but not the mud bed.
He says we are at the point of being ready for tiler… however. I am concerned that he is not putting a layer of the liquid waterproof membrane on the mud bed or fabric seaming with an additional 2nd coat of the liquid membrane. Mistake? I am concerned there will still be seeping of moisture into the walls. Your thoughts?
DIYTileGuy says
As long as there is a waterproof membrane inside the mud bed, and it’s properly installed, the shower will work fine. Ideally, the contractor would have done a flood test on the liner before installing a top layer of mud.
Assuming this is the way that he built it then an additional layer of liquid waterproofing is not advisable. I know it seems like a “belt & suspenders” approach but the additional waterproofing can actually be countertproductive.
Sarah says
I am working on remodeling our basement bathroom. It had a built in shower that we removed and then put up hardie backer board on the walls. We’re extending the shower some and those walls are finished with green board. I went to floors and decor and they instructed me to use aqua defense on all the walls, including the green board and then to use a kerdi shower pan/dry pack on the floor and kerdi bands for the corners and seams. I put the first coat of aqua defense on and the kerdi band did not stick to it like they told me. Also, I was not feeling confident that it should go on the green board like they said as it dried much differently than on the hardie backer. So I am thinking of changing plans and putting up kerdi membrane on the walls to do a more seamless system. Will it be a problem to do this on top of the one coat of aqua defense I already applied?
DIYTileGuy says
When you build a shower, it has to be a cohesive system. So, your course of action is going to be determined by your shower floor.
Did you install a foam Kerdi pan with the Kerdi-drain? If so, the proper course of action is to use Kerdi fabric over the whole shower anywhere that is inside the shower area. I recommend going to Schluter’s site and downloading the Kerdi handbook. It’s a great resource.
If you are using a 3-piece clamping drain and a dry pack (concrete) shower floor then it’s OK to install AquaDefense over Hardibacker. The Hardibacker seams should be sealed with mesh tape and thinset into place. In this case, greenboard shouldn’t be in the wet area of the shower.
Additionally, there should be a vinyl liner that goes under the dry pack in your shower and behind the Hardibacker.
So, the way you should go depends on how you are building your shower.
Sarah says
Thank you for your help! Yes, I have the Kerdi shower pan and drain. I haven’t heard anything about a vinyl liner. Everything I’ve been told and read said it would be fine to install on the concrete subfloor. That’s all that is there now.
The majority of the shower walls are hardie backer, and I did seal the seams with fiberglass mesh tape and thin set. But then I did put the first coat of aqua defense on. Since I am using the Kerdi pan, is it ok to put the Jerdi membrane on the walls over that first coat of aqua defense?
DIYTileGuy says
You can probably just put the Kerdi membrane over the shower pan and flash it up the walls 2-inches minimum. You won’t get a Schluter warranty on your shower but I don’t think you’ll get one if you install Kerdi over AquaDefense, anyway.
The AquaDefense will protect the walls in place of Kerdi membrane. Make sure that you install it according to instructions.
Also, make sure that you flood test your shower before you start tiling. https://www.diytileguy.com/flood-testing-shower/
Paul says
Proceeding with DIY option #3, (full redo, built right).
Based on off-centre drain location in concrete floor, looks like a Kerdi H-drain and pan will work best. I would like to use Goboard on the walls. Is there any issue with using mesh tape/mortar to bond Goboard to Kerdi, then waterproof the seam with hydroban? I’m ok with no warranty.
Paul says
Sorry, I just found the answer in the comments on your Goboard post! Best to use sealant then mesh tape for good measure.
DIYTileGuy says
That joint is a pretty critical joint and I would feel better if it was full of sealant. However, you could do it the way that Schluter specifies with Kerdi board and put Kerdi band over it with the preformed corners. The advantage to this is that it might be difficult to get sealant in that joint with the Kerdi shower tray. Or you could employ both methods.
Ali says
Hello Sir,
Thank you for this great website. Newbie here, and wanted to know my shower I will be removed all the tile from the floor and walls.
I intend to put a prefabricated shower base pan (acrylic with fiberglass support). I have a cement floor.
So when removed the tiles from the floor, other then leveling the floor and sand mix, is there anything else needed before dropping the prefab shower pan on top of it? Is there additional support needed?
For the walls, I intend to put GoBoards. Do you recommend any adhesive on top of goboard before putting the tiles on it? or the tiles can go directly on the goboard?
Is Ardex 8+9 needed to be put on the corners of the goboard or anywhere else?
DIYTileGuy says
For the shower base, different products have different instructions. If yours says to use a mortar base then that’s all that you would do. Keep in mind the mortar will need to support the entire shower floor. This is in addition to fastening it to the studs.
With GoBoard, the board itself is waterproof but the seams and penetrations aren’t. So you need to use a sealant, or mortar, tape, and waterproofing, over the seams and screw heads. But you shouldn’t apply a waterproofing over the entire board.
Check out my post on how to install and waterproof GoBoard here:
Benjamin R Friend says
Is it overkill to install 4 mil plastic sheeting on the studs, then backer board, then the paint on style water proofing, and then thin-set/tile? Would the two layers of waterproofing supposedly trap moisture inside the backer board? I guess my main question is can I use both types with durock backer board
Thanks!
DIYTileGuy says
The thinking is that the plastic can be counter-productive. So, just stay with the liquid waterproofing.
Andrew Pendleton says
We have a similar situation to this. We bought a house that was flipped and is a pier and beam foundation, but I don’t know what kind of shower pan was built. If the tile is directly on the membrane, what would I need to replace it with? It’s a large shower, 76″x44″. We hate the penny tile and are going to use large format instead but I need to figure out how to level the corners before tearing everything out. Three of the corners have pooling as well as a few other sports and we hate cleaning the penny tile grout.
DIYTileGuy says
If the tile is stuck directly on a membrane then that most likely means that the membrane doesn’t drain properly either. It likely has low corners, etc, that you are seeing with the penny tile. The odds are, however, that the tile is not adhered directly to the membrane. One telltale sign is if you have a Schluter drain. If your drain says “Schluter” on it then the tile are attached directly to the membrane.
If you don’t have a Schluter drain, then that doesn’t guarantee that it’s not a similar system but the chances are decreased greatly.
If we assume that the tiles are adhered to the mud bed, this would be a traditional shower, then you don’t have to worry about compromising your shower membrane. You could remove the penny tiles, fix the slope, and install new tile.
Marlis Nguyen says
Good morning, I have a quick question. My bathroom had a leak and now we are in the process of retiling the whole thing. My home was built in 1996. I removed the tiles from the shower stall and I am a little confused. The layers are as follows: the studs, then regular drywall, then cement board and then tile. No membrane or water barrier. I have removed the tile and the old cement board. If I remove the drywall, then the shower wall will be sunken in further than the surrounding wall. Can I install the new cement board or foam backer board on top of it?
Thank you for your help!
DIYTileGuy says
It sounds like you may be in some sort of multi-family housing like a townhome or condo. So, if your wall already has two layers then you’ll want to have the two layers back in.
What I’ve done in that situation is to leave the first layer of drywall intact and add the tile backer board onto that. Usually, the backer board will need to be shimmed out 1/8 inch as you probably have two layers of 5/8 inch drywall.
So add the backer board onto the first layer with longer screws and shimmed out as necessary and make sure that the backer board will be waterproof before you tile. It’s important to leave the first layer of drywall as is because that helps with fire protection and sound transmission.
Joey says
Doing a custom shower pan. I understand you want a dry pack deck mud with around a 1 to 5 ratio of portland cement to sand. My local stores don’t seem to stock either premixed deck mud or “concrete sand”. My options are either to buy portland cement and play sand and mix it myself, or buy a 1:3 sand/topping concrete mix and dilute it with some play sand. Any opinions as to which is better?
DIYTileGuy says
If you can find Mapei 4:1 that would be my first choice. Sometimes Lowes will have it and Floor and Decor usually carries it, I think. That’s a nice dry pack mortar that you don’t have to do anything to other than add water.
Otherwise, I would probably opt for your second choice although either would work.
Jody says
Hello! We recently prepped our master bath for tile and hired a tiler with 30 yrs experience. Sadly, we are ripping everything back out. I was trying to pull out the worst of it to try to fix individual areas, but because we used durock, it was breaking the cement board and we decided it is probably easier to start fresh.
I found the waterproofing foam panels of interest, or we may go durock w/redguard again.
The thing that concerns me and I’m not sure how to address is the waterproofing around the tub. Our shower is more of a wet room, with a walk in shower and a tub inside the shower. I have a drop in tub on a marble threshold, so there is 4-6″ of exposed marble, directly up against 3 walls (only 1 side is not against a wall). We had previously waterproofed everything, but with the wall removal, the seams between the walls and the marble will lose the “Seamless” waterproofing. I’m already spending a fortune to redo everything and don’t really want to have to remove the tub and marble surround. Is there anything you suggest to help waterpoof those 3 sides? Thanks!!!
David says
Have you ever seen anyone use flashing behind the cement board? I was thinking of using flexible flashing like a door and window Henry’s flashing. This is a self adhesive material. My plan was to use it behind the backer board and flash it to the shower pan which is an arc truedek, so curbless right on the floor. My thinking is that if any water gets behind the backer board, it would find its way to the flashing then to the drain and not the wood. However, I do plan to use Redguard or similar on the surface along with sealing the seems and such. Is this too much waterproofing? I’m worried about the amount of buildup and issues with putting tile over these areas. But also worried about moisture getting behind the cement board as I know it is not waterproof. Thanks,
DIYTileGuy says
I’m inclined to think that the marble should come out but there might be a way of doing it without. As long as the tile can be removed and you can save the cement board around the marble then you might be OK.
So, if you can leave, say, 1 inch of cement board sticking up past the marble then you could tie into it again. Doing it this way would be time-consuming but might be worth it in this case.
DIYTileGuy says
I think your best bet is going to be to follow their installation instructions. I was just looking at this product and they have a way for you to fill every seam and cover every joint so that it’s waterproof.
So, not only do I think that what they have designed is most likely sufficient but by straying from their method you take on additional risk and liability if something does go wrong.
David says
Thank you for the reply. I will follow the manufacturers recommendation.
G_Davis says
Hello. I am replacing an older tiled shower with a new direct to stud Delta kit. I have a high bathroom ceiling so I wanted to use cement board above the kit walls up to the ceiling since I thought it was waterproof. The cement boards overlap the lip of the walls and then we used silicon to seal the bottom of the board to the top of the kit wall, if that makes sense. So there shouldn’t be any chance of it draining behind the wall. Will it still be fine? Could I just paint over the cement board since it will only have condensation and no contact to a constant flow of water? Thanks for any info,
G_Davis says
Sorry if this was a stupid question. Just thought it couldn’t hurt to ask. I will keep researching on my own.
DIYTileGuy says
Thank you for following up on this. Every once in a while I miss a comment. However, you are correct that it sounds like your plan will work just fine. The waterproofing, in your case the Delta tub walls, only need to go up to the showerhead. So installing cement board above that is optional and certainly wouldn’t hurt anything. There’s no need for additional waterproofing and you could paint right over it if you choose.
Daniel Gawlinski says
I am looking to purchase a custom shower pan, shower seat, and shelf from KBRS to build my shower base. Do you have any opinion on the company and its products and shower preparation process? Does it make sense that they say to apply their sealant to the bottom of the shower pan that “Go Board” then gets placed on? Instead of using “Go Board” and KBRS’s “ShowerSeal” product can I use Cement Board and a different water sealant, like Aqua Defense or should I just follow the KBRS process exactly?
DIYTileGuy says
KBRS I think is a good company and they’ve been around for a long time. That being said, I’m not really familiar with their system and these questions would be best asked of them. You can never go wrong following the instructions either.
G_Davis says
I greatly appreciate the your response. Thank you!
Jolene says
I had to pretty much gut my whole bathtub and am trying to find out how to put waterproof shower walls in since I have a window in my shower. I am not sure what is the best way to go? Do you have any suggestions?
DIYTileGuy says
Wedi, GoBoard, and the Kerdi system are all good choices
Syd says
Hello! I’m hoping you can help with something I’ve been struggling with. We are installing a new tub surround. We went with 6 mm plastic behind cement board, and the plastic overlaps the flange. However, I’m confused as to how to seal the bottom of the cement board / plastic to the flange. Do we just use a silicon bead at the bottom and leave it at that? I know you’re the expert at tile but our intent is to install a 3 piece fiberglass tub surround on top of the cement board; I know we caulk the bottom of that, but what about before we put the tub surround in?
DIYTileGuy says
You can caulk the back of the plastic “flap” that’s hanging down below the cement board. That will seal it to the flange.
Joey says
I’m gonna try my best to describe this. I’m working on a custom shower with a cement board base and I’m about to install the Kerdi. My wife wants tile edge trim where the shower wall tile meets the drywall. So how far do I run the Kerdi out towards the drywall? Couple options:
1) To the location of the shower glass on the wall – but I see no reason not to go farther.
2) To the edge of the tile – I’m thinking this forces the edge trim to go overtop of the Kerdi, and there will be a very small gap between the wall and the trim which could be filled with caulk.
3) Close to the edge of the tile – runs the risk of the trim piece being half on top of the Kerdi and half over drywall, could lead to an uneven placement against to wall, could cut the trim flange to fit.
4) Halfway between the glass and the edge of tile – this way the water protection runs past the glass, but the trim flange will sit flush against the drywall and your tile will seat nicely because the trim flange and the Kerdi will be close to flush above the wall as well.
I have a picture here: https://www.diychatroom.com/threads/schluter-kerdi-questions.714067/#post-6441645
Seems like Option 4 is the way to go. Have I grossly overthought this, or is there a right answer?
DIYTileGuy says
#1 is the only one that I would remove from your options. #4 is probably the best answer.
You need to be past the glass for sure because everything inside the glass is considered the “wet area”. So, 1/2 inch past the glass? 1 inch past? It doesn’t really matter unless you have a very tight space that you are working with. Typically, I run the waterproofing membrane 1-2 inches past the curb, if possible. I like to have the Kerdi cover the outside of the curb down to the floor so that if water drips down the curb then the edge will still be waterproofed and not just drywall.
I wouldn’t worry too much about the thickness of the Kerdi interfering with the metal trim. It’s a pretty minimal amount and that gap will be grouted anyway.
Joey says
Thanks! We want the edge of the wall tile to run vertically up from the front edge of the curb, so going past the curb with Kerdi isn’t an option. I will extend the Kerdi as far out as possible from the glass!
I will also tie-in the curb Kerdi into the floor Ditra, so only where the drywall meets the curb will not be waterproofed.
Addy says
Thanks for this article. Not a question, but just wanted to comment. This is my first time demo’ing and renovating my bathroom. If you’re working solo as I am, I highly recommend the foam backer boards, which in my case, I’m using GoBoard. One thing that Jim mentions in the article is the concern about foam boards flexing, potentially damaging tiles and/or grout lines. To remedy this, I added plenty of blocking. It was a bit time-consuming with measuring, cutting, and ensuring they were flush with the studs, but that effort outweighed having to install Durock or Hardiebacker, which is heavy and unwieldy for 1 person to handle.
DIYTileGuy says
Good input!
Julia Everett says
Can one use the red “waterproof” hardie backer board and tile directly on to this? (I tried posting before but think that the link won’t post my question) the type is the John Hardie “waterproof” red hardie backer. Per the description, it says that it doesn’t need to be sealed with liquid coverage bc it already is sealed.
Im trying to make sure before our tiler moves ahead with a bathroom tile project. I didn’t think this was a way but the person doing the bathroom said this is specific for bathroom showers and is pre-treated/sealed. He said he has to use special membrane tape at edges where each board meets to seal it and in corners.
DIYTileGuy says
Yes, the new kind of Hardibacker board is already waterproofed. However, the seams and screw penetrations need to be treated as per their instructions. It’s a new product and I’m not familiar with how they want it installed so it might be beneficial to take a look at the installation instructions on their site.
Colleen The Clumsy says
Dumb question: I applied redgard with a trowel and it dried with some bumps and lumps (not a huge amount). Pepto-Bismol pudding is a little hard to work with! I need to flatten these before I get start putting tile on the wall. It cuts with a razor blade but a utility knife is too fat and can’t cut flush. Can you sandpaper redgard? Can you recommend a tool? Surely I’m not the only one who’s done this.
DIYTileGuy says
It depends on how thick the notches are. If they are relatively small and won’t get in the way of installing your tile over them then I would simply add another coat onto the wall and fill in the grooves. Probably be easier with a paint brush rather than a trowel.
Otherwise, scraping and peeling off the Redgard off or sanding it down would probably work. I’d want another coat on after doing one of those two things though.