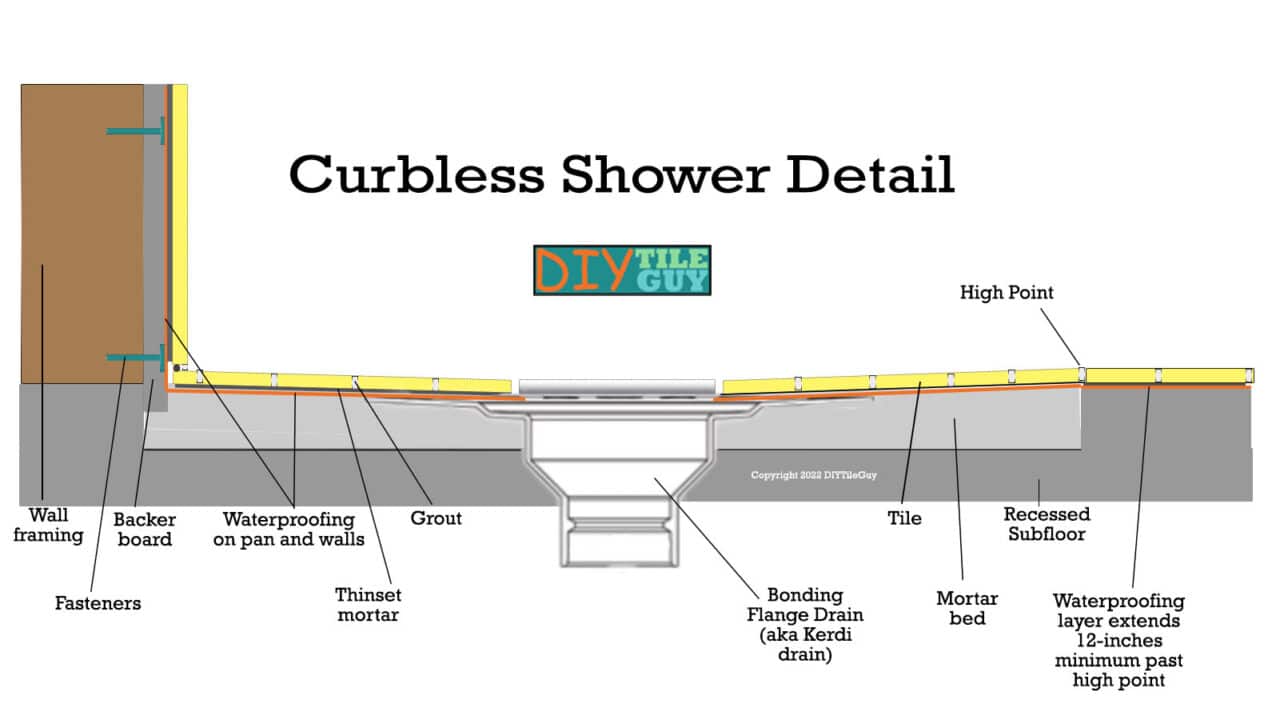
Curbless Showers have exploded in popularity. But did you know that there is only one industry-accepted method for constructing a shower with no curb?
This post will explain how to build a curbless shower using the only industry-accepted method for doing so.

Estimated reading time: 4 minutes
What is a Curbless Shower?
A curbless shower has no physical barrier to step over to get into the shower. Hence, they are sometimes called barrier-free, zero-entry, or simply no-curb showers.
How to Build a Curbless Shower
There is only one industry-accepted method for constructing a barrier-free shower base. The detail can be found in the Tile Council of North America’s Handbook for Ceramic, Glass, and Stone Installation (TCNA) methods B421C and B422C. [1]
Technically, they break it into two details but it’s the same method with two different drain details. More on this later.
Sealed System Showers only
According to the TCNA, if you want to build a shower with no curb you have to use a sealed shower system.
The Schluter Kerdi Shower System is an example of a sealed shower system. It uses a bonded waterproofing membrane (A118.10) on the walls and shower pan.
Curbless Transition to the Floor
The reason the sealed shower system is required is that it’s the only system that will properly waterproof the transition from the wet shower area to the dry floor.
High point of shower
You have to waterproof up to the high point of the shower and beyond.
If a shower has a curb then that acts as a natural barrier to contain water inside the wet area. However, when the shower has no curb then it’s important to make sure of two things:
- The high point of the shower is outside the wet area
- Waterproofing extends well past the high point.
Industry standards call for waterproofing a minimum of 12-inches past the high point of the shower. Further, I think it’s a good idea to add a capillary break to your curbless shower even though it isn’t an industry standard.
Two Different Drain Options for Curbless Showers
As I mentioned, there is one way to build a shower and it has two different drain options. These are:
Bonding Flange Drain
Examples of bonding flange drains are the Kerdi drain and FloFX. They use a topical waterproofing system and stop the water immediately below the tile layer.
Divot Drain Method
There’s also the divot method. This is a way of adapting a sealed shower system to a traditional water-in/water-out clamping ring drain.
Prefabricated Shower bases for curbless showers
You might be wondering if you can use prefabricated shower bases that let you build a curbless shower without cutting into floor joists.
Those types of shower bases are OK because they are using their own variation on this exact method. Make sure to follow the manufacturer’s installation instructions when using a pre-formed curbless shower kit.
I’ll have more to say about pre-formed shower kits in the future.
The Final Word on How to Build a Curbless Shower
The only proper way to build a curbless shower is with a sealed system like the Kerdi Shower System. From there, you can use either a bonding flange drain or create a divot to adapt the bonded waterproofing membrane to a 3-piece clamping ring drain.
There is no industry-recognized method to build a shower the traditional way using water-in/water-out shower construction.
Foam shower receptors for curbless showers are OK as they rely on a sealed shower system to be properly installed.
FAQ about curbless showers
No. The Americans with Disabilities Act has several shower design requirements that must be met and creating a barrier-free entrance fulfills only one of the stipulations. [2]
Linear drains can work great with barrier-free, curbless showers. But just like the smaller center drains, linear drains come in two types. You want to make sure you get a drain that works with a sealed shower system.
A linear drain that’s compatible with a 3-piece clamping ring drain isn’t going to cut it for a curbless shower.
A properly built curbless shower will have the high point outside the wet area. This will keep water inside the designated shower area. However, there are design elements that can help with water management in curbless showers.
Further, adding a capillary break can help with water management.
With proper design and construction, curbless showers will contain water inside the designated shower wet area.
References
- Tile Council of North America
- ADA