When someone tells you they want a wood-look random tile pattern they are telling you what they want the floor to “look” like. They want a “random look“.
What they don’t want is a truly random manner of installation. To sum up:
Random is a look; not a definition
Estimated reading time: 6 minutes
Wood-look tile vs real hardwood
Wood grain tile looks are alive and well.
In terms of this blog post, the key difference between real hardwood and tile that looks like wood is that real wood comes in different lengths.
So, it’s easier to get a random-looking pattern when the material being installed is random in length.
However, wood-looking tile planks come in the same length. Whether that’s 6×24, 6×36, 9×36, etc. they are all the same length with few exceptions.
So, a little more effort needs to be taken with porcelain tile planks to make sure the staggered tile pattern actually looks random- like real wood.
Here are your 5 Random Pattern Tile Rules
As you go through these rules you’ll see the reasons behind them and why they are good rules to have.
Without further ado, here are the rules for laying random wood-look tile patterns.
1. 33% offset maximum
The reason for the 33% offset is that these large porcelain tiles typically are bent, or warped, a bit. You definitely want to stay away from 50% offsets when installing wood-look tile. [1]
So, keep your offset to a maximum of 1/3rd of a tile. A 33% offset is typically recommended for 12×24 tiles and other large formats.
2. Minimum offset
It makes sense to have a minimum tile offset also. Typically, tile setters will restrict themselves to a minimum of the width of a plank.
For example, with 6×24 tile patterns, you would have at least a 6-inch difference from one tile to the next.
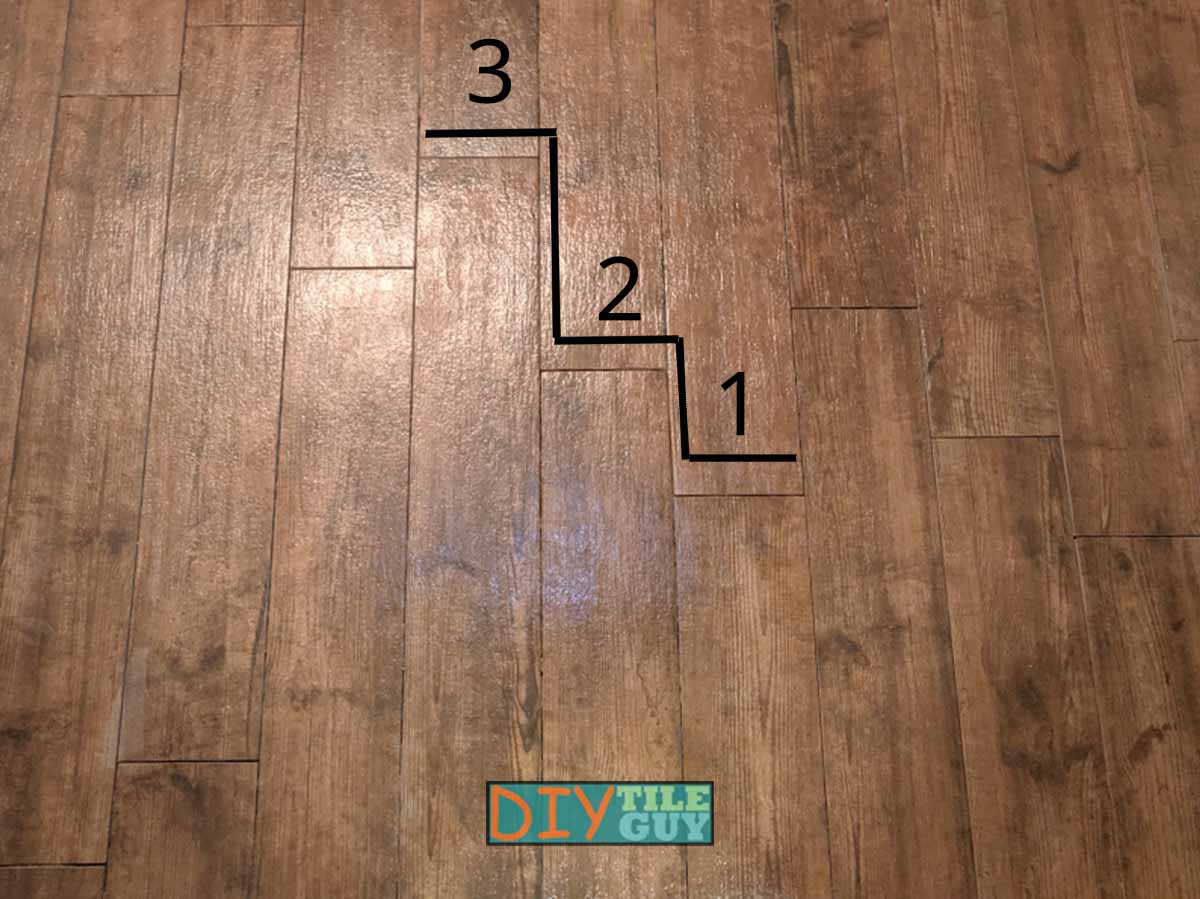
3. Random tile pattern stairsteps
You’re going to have some stair-stepping in your pattern. The key is to have a rule on how many stair steps you’ll allow with random tile patterns.
With smaller floors, I cut it off at three stair-steps. With larger floors, I might let it go to four or five.
If you don’t watch for it you can end up stair-stepping most of the room before you realize what it looks like.
4. H-joints in wood tile patterns
H-joints are another one that can sneak up on you. They are exactly what they sound like: they resemble the capital letter ‘H’. This means you would have two evenly placed planks with an offset in the middle.
You want to make sure that you have, at least, two to four planks in between before you go lining up your offsets again.
5. Rules are meant to be broken
This rule may not seem fair. But as an installer that has done several random tile patterns, there will come points during the floor when you have to break your own rules.
This is especially the case with the shorter wood planks like 6x24s. With 24-inch long tiles, you have to offset the pattern at least 6-inches but not more than 8-inches.
That just doesn’t give you enough room to work with before your random offsets start to become not-so-random repeating patterns.
So, throw in the occasional 50% offset tile. Stagger a row or two by only 2-4-inches. It’s OK to break the rules as long as you are doing it to keep things random-looking.
Random tile pattern wrap-up
Follow the rules most of the time but break the rules when you get stuck.
There’s nothing wrong with simply taking your cuts from the first row and using them to start your next row. But just be conscious of how they will carry across the floor.
Further, installing random patterned tiles requires concentrating the entire time on your layout to make sure you get that truly “random look”.
Let me know how your random tile installs go in the comments section below.
Finally, if you want some layout tips for not-so-random installations, take a look at why I don’t like centering floors and some tips for backsplash tile layouts.
Frequently Asked Questions about Wood Look Tile Patterns
Most people that want wood tiles installed in their homes will want a random staggered pattern to resemble real wood floors.
You can run plank tile either way on a small bathroom floor. Typically, it would follow the longest wall but that’s not a rule.
The random pattern that typically accompanies wood-look tile will cost more than installing a straight-lay floor pattern. A random pattern takes more skill and thinking to install.
There are rules to follow even if the pattern is random. See this post to learn how to lay a random tile pattern.
There’s no technical reason to stagger wood look tile. However, most people that choose tile that looks like wood will want a random staggered pattern to mimic real wood floors.
Every tile installation needs a grout joint. If you coordinate the grout color to color of the wood you can still get a tile floor that looks like wood planks.
Tile leveling systems can help make a random pattern go easier. However, they aren’t an excuse to not flatten your floor prior to beginning the installation.
Random tile patterns often create less waste than other tile installations. This is because you can make use of many of the cut ends of the tile.
This post covers how to calculate square footage for tile floors including extras. With a random tile pattern, you can be at the lower end of the recommended overage.
References
- https://www.tileletter.com/why-do-manufacturers-require-a-33-offset-brick-pattern/
Leave a Reply