Typical tile layout advice is:
- Measure off of each wall
- Find the center of the room
- Draw intersecting lines
- Start tiling from the center intersection
You’ll find this type of information on many DIY sites that also have tips for cleaning out your gutters, staining your outside deck, and painting your ceiling. But let’s put this advice into practice in the example below:
This post deals with tile layout as a concept. If you are looking for a more How-to, nuts & bolts post then be sure to check out my related post on Bathroom Floor Tile Layout in 5 Easy Steps.
Why not have a centered tile layout?
A rectangle. Why is a rectangle with a centered tile layout wrong? Let’s see what it looks like here in the image:
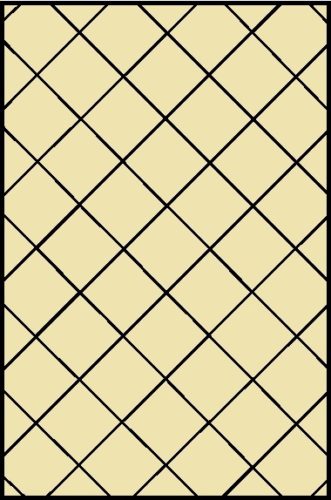
Looks great to me!
Now let’s think about this: how many people are tiling rectangles? Perfect rectangles with virtually nothing in the room so everyone can see how perfectly centered the tiles are?
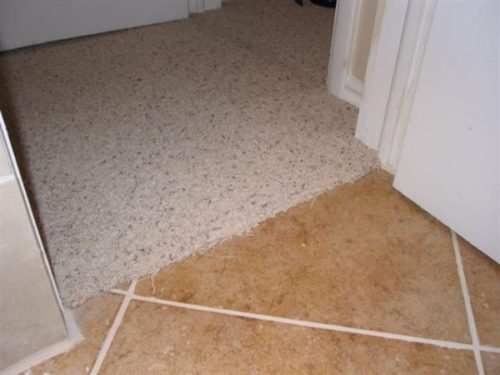
While there are rooms like this let’s take a look at some imperfect rectangles that people are installing tile in, like this one:
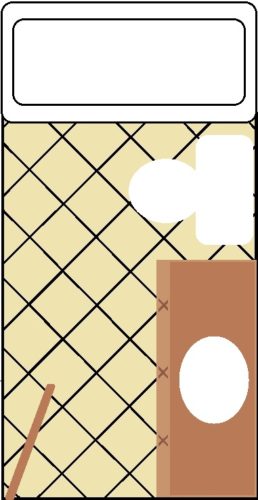
This type of rectangular room is in many homes and it’s called a bathroom. Take a look at the layout of the tile.
Technically, it’s still the same centered layout but most people won’t care to look behind the toilet at the cuts of the tile and notice how centered they are with the wall on the right.
This is why conventional centering advice isn’t always the best way.
Once you get real-life “stuff” in the room a centered tile layout loses its impact.
If a centered tile layout isn’t optimal then what is the best way to figure out how to layout your tile before installing it?
Floor Tile Layout Principles
Before we get to another diagram let me share a few layout principles that I use when figuring out what will work best:
Layout principal #1: Centering is best (when it’s noticeable)
I’m not against centering. In fact, I’m all for it when it makes sense to do so.
I find that I center walls more than floors. Kitchen backsplash layouts are often centered. Floors generally have too many obstructions in them to justify a centered tile layout.
Walls generally have higher visibility so the back wall of a shower should be centered. A floor? Not necessarily.
Layout principal #2: Start with a full tile in the entranceway
I would tell the other installers that I work with that they are to start with a full tile in the doorway or have a good reason why they didn’t.
I would estimate that 90% of the floors that I install have a full tile in the entranceway. Keep in mind that I work almost exclusively in residential homes.
The tile in the entrance to the room will always be open and visible and will also be visible from other parts of the house.
Layout principal #3: Identify one or two focal points in the room
Another word for focal points might be priorities. Try to identify the most visible spots in the room.
Sometimes you may feel that in front of the vanity is the best place to have full tile. It may be the longest wall. It may be in front of the tub or shower. It may even be the center.
Try to identify these one or two areas and look to start with full tiles at these points.
These aren’t hard and fast rules.
Sometimes following these principles may lead to small ugly cuts elsewhere in the room and compromises will have to be made.
But typically, these are the principles I use when I start to layout a floor and I’ll see if reasons come up as to why they won’t work.
Now back to our rectangle bathroom
If I were to layout this bathroom, I would start with wholes/halves on the left wall (most visible) and a full tile (and halves) in the doorway and then see what the consequences are of that layout.
Behind the toilet doesn’t matter. Underneath the vanity doesn’t matter. There’s often a mat in front of the tub.
Every once in a while it won’t work out but I feel that this is the optimal layout for these types of bathrooms.
An alternate way of doing it that I would consider acceptable is to have full tiles directly in front of the toe kick on the vanity. That way, when you’re standing there, you would be standing on full tiles.
I would be more inclined to go with this layout if the tiles were set square (not diagonal) and if they were large tiles. It would also depend on the types of cuts it left on the left side wall.
Centering your floor tile layout isn’t wrong
It just may not be the best way to take advantage of the focal points of the room.
I just get irritated with the overly simplistic advice on some of the other DIY sites. Let me know what you guys think in the comments down below.
Read this if you want to know how to calculate the square feet of your tile floor.
5 Ways to Screw up your Cement Board Installation on Floors
Why Schluter Ditra is so cool: Uncoupling membranes explained
Colleen says
How about this philosophical point: subconsciously it feels more normal to have a tile appear to be diving under a bathtub or a vanity, and it makes less sense for a tile to appear to be diving under a wall or threshold.
DIYTileGuy says
I’m not sure. If by diving, you mean a cut tile, I think it depends on the room and the “right” thing would vary from project to project. Typically, I like to start with a full tile in the doorway. For the other direction, it could be centered, come off of one wall or the other, or be determined by something else.
I do think the subtleties are lost on most but, like you said, it’s a subconscious thing. People will not understand why one way looks better than another but they will pick up on it subconsciously.
John Pucci says
Thanks for spending your time sharing you knowledge with others. I agree whole heartedly and have always tiled based on the initial view entering a room.
My current layout seems impossible to get looking right. The master bath is divided with a double vanity as one portion and the toilet and tub as a second room with it’s own door.
The entrance to the vanity has no door and is centered about 4″ left of the right vanity. I’m putting 18″ tiles with dots at every other corner. (2 dots per tile) If I center the dot on the entrance (ALWAYS visible) then the dots in front of the vanity are way off center. The door for entrance to the tub is on the right as one enters the first portion and I can center a dot & joint on the opening and it looks good that direction as the toilet centers on the next joint over. (a pic would help)
If this is remotely comprehensible, do you have a thought that might help?
DIYTileGuy says
I have a general understanding of what you are talking about. One of the disadvantages of the blogging commenting section is the inability to upload photos but you’ve done a good job of explaining the situation.
With layout, there’s always going to be compromises. So you just want to get the best compromise that you can. But I think it would bother me that the accent dots aren’t centered from left-to-right in front of the vanities. I would want the dots to be the same distance from each vanity toe-kick. Then let the rest of the dots fall where they may.
In general, you don’t want to cut the dots or have partial dots. The ideal way of avoiding this situation is to alter the layout so this doesn’t happen. However, that’s not always a solution. So if you find yourself having to put in half a dot then you may consider just not having any dot in that spot- just run it as a normal tile intersection. You may run into this problem where the dots go under the baseboard, where they run into the tub, or where they fall in the doorways.
However, I wouldn’t worry about it if one of the dots is cut off underneath the toilet. That’s one of the cases where I make an exception to this principal.
Additionally, this is an example of a situation that may make sense to not start with a full tile at the door. If it makes sense to center the dots both ways in the first room (vanity room) then you may opt for a cut in the first doorway and let the dots run as they will in the toilet/shower room.
Sounds like you’ve done a good job planning this out and that will pay off when it’s all said and done.
Good question though!
SUSAN says
Thanks for the information and insight. We just had tile installed, but not grouted yet, in a hallway connected to the bathroom. I wish I could post a picture, because the hallway, which is open to the kitchen, is not centered and it is driving me crazy. Four tiles make a pattern and we have one full pattern off center to the right, with an almost full pattern (inch or so cut off) to the left and half of a tile to right. Our tile guy said he did it that way because the bathroom would have looked horrible with a different layout. The bathroom is small and will have a vanity and rug covering most of the floor. I would rather have the bathroom look bad and the hallway, which will be seen by everyone coming into the kitchen, look good. I don’t want to be unreasonable, but wish we would have been consulted before the decision was made. I am tempted to pull it up, buy more tile and do it myself. Any thoughts on why the pattern shouldn’t be centered in the hallway? Thanks!
DIYTileGuy says
I agree, that a hallway looks odd unless the tile is centered. But without being in your house it’s difficult to say that something was done wrong. I am not aware of any tile standard that says to center a hallway so I think this is probably going to fall into a miscommunication category. I always try to go over the layouts with customers but it doesn’t sound like this was done. The best thing that you can do is talk to the installer and see if you guys can come to some sort of an agreement. But I don’t believe there’s an easy fix for this.
Joe Scalia says
How about 2’x1′ tiles layed long ways in a brick pattern? 2′ , 2′ 1′. Then 1′ 2′, 2′? Or center a 2′? that leaves you with an 18″ on each side. But then the next row leaves you with a 2′ and a 6″ on each side.Which is better?
DIYTileGuy says
I’m guessing that you’re talking about a tub surround or a 5ft shower.
edit: centering is the way to go
Deborah says
I will have a wood threshold that transitions from wood hallway into the tile bathroom. So I justify where the first tile will be set (on a diagonal) so the tip starts immediately after the transition ends? Thank you.
DIYTileGuy says
Yes. Ideally, the tip of the tile will meet up with the threshold so it appears to be a full tile as you enter the room.
Shiloh says
Thank you for sharing your insight. I’ve been laying tile for several years now; almost exclusively commercial at first, and more residential recently.
Although I’ve been doing this for going on 10 years, I humbly acknowledge that I still have much I can learn from other pros in the field.
What I have always done when tiling, almost without fail, is keep full tiles at the center of the room (the most visable places, like you mentioned), and keep cuts against walls/tubs/under counters. I always lay it out and ask the homeowner’s opinion and preferences so they can get the final say.
I recently took on a contract to install some interlocking mosaic tile on a bathroom wall; a 4” strip around the whole room, and an accent area/wall behind a pedestal sink. I’m trying to make sure I don’t cut the edges too close so I am sure to keep a seamless edge. Do you have any recommendations for measuring to find what the end sheets should be cut to to keep the tile centered?
I recognize the advantage to interlocking tile is that the pattern can be pieced pieced in where necessary because of the size of mosaic tiles, I always try to avoid doing that however. I was hoping you might have some tips.
Thank you!
DIYTileGuy says
I had to read this a couple of times but I think you might be dealing with the random linear mosaics that are, maybe 2,4,6 inches long and maybe 1/2 inch in height?
If so, I’ve found the best trick is this: If you want a 4 inch strip you’ll cut the sheet into 3 pieces. Then all of the bottom pieces will interlock with one another. Same with the middle and top pieces. The only place where you will have to get creative is when transitioning from a middle to bottom piece and etc.
I don’t know if that’s helpful or not. If I’ve misunderstood the question please let me know. Thanks for checking out my blog.
Nick says
This is a great post. Thanks for sharing! I’m getting ready to tile my kitchen. I have 2 entrances to the kitchen. One is about 2 feet from the other on the adjoining wall. The tile will butt up to wood floors in both spots. I have a couple of issues here. 1) neither transition is perfectly square to the kitchen. 2) there is a peninsula in the middle of the kitchen that is not square with the parallel wall or the door way.
I wondering where to start my install. Should I square off of the main doorway or with the peninsula? I know that it will be off in one spot or the other. I would prefer to use one of those low profile metal transitions (looks like a small bead) over a wood transition that will leave a bump in the doorways. Is there a way to compensate for the lack of “squareness” in 2 highly visible areas?
Thank You!
DIYTileGuy says
Just so you know, this situation isn’t unusual. So most of the tile installations that you’ve seen have been off and you probably haven’t noticed. So the good news is that most people won’t notice in your kitchen either.
If the two entrances that you are referring to are the main entrances to the kitchen then usually I would start with a full tile in each of the entrances. So you want to start at one end of the entrance with a full tile and cut the other tiles shorter to fit into the entrance. That way the entrance looks like a full tile but some will actually have a small amount cut off from them.
Furthermore, I like to make the longest and most visible distance in the kitchen the straightest path. So the peninsula will be off a little bit. The entrances will be off a little bit. You may have to split some differences here and there but the longest run will look straight.
This is just the nature of things and the planning that you do beforehand will payoff afterwards.
David says
Joe knows his tile. I would check his idea out no doubt.
DIYTileGuy says
I just reread his comment and I agree with this layout. It must have been too many numbers the first time around. :-D
Lori says
In a powder room that is 41” wide by 55 deep with the toilet facing the entrance on the 41” side with the vanity off to the right. The door is positioned toward the left of the 41 inch wall with the vanity to the right running the length of the long wall. I am doing 18 inch square stone. I am fairly certain I want a straight lay. Would I Center the middle tile on the toilet which makes it very close to being centered on the doorway? To the sight line , this would result in equal parts on either side of the middle tile but in actuality the right side would extend under the toe kick. So I would have a 10 inch row, an 18 inch row and a and and 13 inch row (extends under toe kick). Please recommend any alternatives. Thank you.
DIYTileGuy says
That seems reasonable if I’m understanding the layout correctly.
I think you could also center the tiles in the space and that would be ok.
Either way, the toekick does disguise the vanity cut so even if it’s centered perfectly it still may not look centered.
That’s why the layout that you’ve described is quite likely the best layout.
Greg says
I am trying to decide if I should use full 6X36 tiles stacked on the two ends of my tub surround which measure 32″ so just a small cut off waste on each tile instead of trying to create a pattern, the 60″ back wall lends itself to a 3ft 2ft 1ft pattern but just seems not to make sense on the end walls are their rules on this and will it look out of balance to the eye not to have a pattern on the ends?
DIYTileGuy says
I’ve thought about this and you might be able to use the tile more efficiently if you did a quarters layout off of the back centerline.
So you would install one row 9 inches to the right of the center line and the next time would be 9 inches to the left. This is assuming you’re wanting to do a 50% offset.
I talk more about a quarter layout in my subway tile post:
https://www.diytileguy.com/ceramic-subway-tile/
Then you would use the cut off price from the back wall onto the side walk so it looks like the back row continues onto the side walk.
So it would go: 9 inches to right of center on back wall>21 inch cut to the right>15 inch cut on side wall>17 inch cut on the end.
You can get the 21 and 9 out of one tile and 15&17 out off another.
Greg says
Thanks for the response!!!!, the subway 25% sounds good but starting nine inches to the left of center at center means I will need a 38 1/2 ” tile to reach the corner or leave a 2″ cut the tiles are 6X36 unless I am missing something which is possible but alternating thirds on the back wall is the only way I can come up with that seems to work so I can turn the corner with, 12″ 24″ or full length and then finish the 32″ row with what is left 8″ +/-and 20″ +/-
DIYTileGuy says
Yes, I guess it would be a 2-3 inch cut on the back wall with one piece on the side wall. What your suggesting sounds like the best idea, though. :-)
Krista Schauffler says
The subway brick stacked tile is centered on the wall that you face when you enter the room. The full back wall is the shower wall. HEARS THE CATCH! There is a off centered window on that wall. I think the tile should have been centered on the window. What do you think. It looks disastrous to me. Especially when you add in the bull nose completely around the window. There seems to be no rhyme or reason to any of it!!!!
DIYTileGuy says
Sounds like you had a less than ideal installation. But things like layout can have more than one “correct” way of doing things. So a good installer will go over layout with you beforehand but if you have a particular way that you want the layout to go then that needs to be communicated to the installer prior to them beginning. Drawings are best.
Waiting for the installer to install the tile then telling them if you like it, or not, isn’t fair to the installer. Better leadership would be needed in this scenario.
Katie says
Hi there! What about subway tile layouts for the bath/shower. . Working with a tile guy that was supposed to use the rectangular niche along the large back wall to be centered this was the only direction we wanted that symmetrical because that is the focal point. He used the center line system. Now, we have different cut tiles within and surrounding the niche without a pattern! Telling us this is the only way to do it seems …wrong! Advice?
Thanks,
Katie
DIYTileGuy says
A centered niche is a nice idea but there a few more factors that happen in real life. Almost always there is a stud in the middle and rarely is it in the exact middle. For example, on a 60-inch tub surround it’s probably around 32 inches, so two inches off-center.
So if that’s where you want the niche then the framing has to be altered. Is this in the scope of work and, if not, is there a budget for it? Also, does the tile installer have the capabilities, both skill-wise and legally, to be able to perform the work? Does another trade have to come in and perform this task?
Additionally, a stud may not be in the way but it could be pipes, wires, or other things. So you can see that things get a little more complicated but anything can be done with a budget and communication. I don’t know what the original scope of work was but an experienced installer would see this coming and prepared you for the potential pitfalls.
But it’s rare that a niche can go exactly centered on the back wall of a tub or shower without prior preparation to the wall.
Cameron W, Olson says
Hi DIYTileGuy,
This has been one of those projects from hell. I’m tiling my bathroom. I layed out tile the length of the room. Tub is to the left and perpindicular I will have 10″ cut tile in front of tub and a 3″ cut on opposite wall from tub which is ok because toilet and vanity cover 85% of that wall. The problem is I started tile under half of the doorway runng tile to opposite wall and have only 1 inch of space. The width of baseboard I got is only 7/16 inch (not enough to cover gap). What do I do? Put partial tiles on each end (doorway and opposite wall)? Seems like the only thing I can do?
DIYTileGuy says
So you’ll want to put the little cuts in before the baseboard. The little cuts would then be about 3/4 inch and, with baseboard on top, maybe 1/2 inch exposed. That’s OK.
The tiles under the door would be bigger because you would cut those halfway under the door. So those cuts would be maybe 1.5 inches? That’s OK, especially if this door is a closet door. You want the big full tiles to be in the doorway that matters. Sometimes both doorways matter but not always.
Bill says
I’m tiling a feature wall in my bathroom. I’m using subway tile and I centered the tile on the wall. The issue I’m having is with the layout, I have pieces on the sides that are only 1 1/2 inches. Plus the vanity and sink are on that wall.
What’s the best way to avoid these small cuts without making the wall look odd?
DIYTileGuy says
With subway tile and an offset layout, it’s hard to avoid small pieces. My only other recommendation would be to look into a quarters layout and see if that works better for you. I discuss a quarters layout here:
https://www.diytileguy.com/ceramic-subway-tile/
Dennis says
I have a jack and Jill type bathroom. There is a shower wall that’s just slightly less than the halfway point between the 2 doors. My first thought was to center the tile between the thresholds, but this means that there will be a small (<2") strip of tile on the other side of the wall. Would it look better to have a full tile in the entrance from the main bedroom, leaving a cut (a little over 1/2 tile) in the doorway to the 2nd bedroom? Or maybe line up a grout line with the wall leaving different size cuts in each doorway?
DIYTileGuy says
You’ll have to figure out what the most important focal points are in that bathroom. How noticeable is it that the doors are different cuts? How noticeable is the wall with the small cuts?
With a Jack & Jill bath I don’t think it’s required that both doorways are the same. A layout is one big compromise.
SM says
Hi, your post is great!
what would you suggest for a bathroom floor that is 50″ in front of the tub with 24″ square tiles – laying 2 full leaves only 2″. Would you do 2 full tiles and then just 2″ cut in front of tub, use a different feature tile/schluter in front of tub or do 1 full and 2 approx 1/2 tiles?
DIYTileGuy says
Personally, I like the 2-inch cut in front of the tub. Usually, there is a bath mat that would cover most of it anyway.
Michael Zwier says
I have a bathroom in the exact layout as you showed above. Shower on the back wall, toilet and vanity. I have 18×18 tiles. Would you center a 18×18 tile in the door way and make your way to the shower base. Or would you start on the left wall notching the tile for door jam. I would have 1 grout line in the door way running to the shower. Do I need to worry about the tile layout around the toilet and where the grout lines end up there?
DIYTileGuy says
Personally, I would probably start with full tiles off the left wall as I think that puts the biggest tiles in the most view. You’ll probably have a small cut under the toe kick of the vanity which probably wouldn’t even be visible standing in the doorway.
You can center the doorway if you want but I think it makes the cuts in the room a bit odd. I’d rather center it in the room, which is the same as centering the tub, as a second choice but ultimately, it’s up to you and what you think looks best.
Joe Heyes says
Hi, So glad I found your site! Any advice would be really appreciated!
In my bathroom the wall facing the door has 2 windows of different size next to each other (originally there were 2 rooms – a small room with just a toilet and a slightly larger one with bath and washbasin. The wall between was removed and one door replaced the original two.)
The windows are of different height and width, and the space between them is central to what you see when you look from the doorway.
From left to right: wall to small window13″, width of small window 16″, wall between windows10″, width of larger window 29″, window to end of wall 21″.
The window sills are at the same height but the small window is 29″high whilst the larger window is 40″ high.
The wall between the windows is quite central to the doorway.
Barring tiling over the small window (my only solution so far!) and centering the tiles on the remaining window what might be a good way of centering the tiles. The ones for the job have been bought and are 50cm X 25cm (19 5/8 ” X 9 7/8″ ??)
DIYTileGuy says
This is an issue that only you will be able to make a decision on. You might look at centering the wall and let the windows be what they are. But you’ll have to play around with it and there will be compromises to make. It’s just a matter of what you think the focal point is and what is less important.
Felicia says
Hey! Great article. I am preparing for my first bathroom remodel, I will def be making sure I like the tile layout before they place them. It takes some level of common sense and perhaps an eye for design. Anyways, thanks for the info on a topic I hadn’t given much thought.
Brian Stump says
I personally think it looks less professional if it’s not centered in the room with equal sized cut pieces at perimeters. I notice it right away wherever I go (perhaps from laying so many floors or my OCD lol). I would give the customer the option in every case just to make sure we’re on the same page.
DIYTileGuy says
In an open room, I tend to agree. In a bathroom, I feel it’s much more about focal points. But, that’s just my opinion.
Cheryl says
Good morning.
I’m a 62 yr old female. I’m laying the shower and floor pebble myself. So far looks great. But how do I place the toilet? Someone suggested placing the toilet and tile around it . what is the best method? I’m not using sliced pebbles, so obviously the stones are uneven. Thank you!
Cheryl
Fontana, California
DIYTileGuy says
This is a good question. Normally, I think the toilet should sit on top of the tile. You may choose to grout around the perimeter of the toilet instead of using sealant as it may look better. But if the toilet were removed down the road then it would have to be cleaned off and regrouted.
I understand why some would say to tile around it but I still think putting it on top of the tile is best.
Adam says
Hi there,
Thanks so much for all your helpful info and kindness.
I am tiling my bathroom lengthwise with 12×24″ porcelain.
Unfortunately the framing for the shower pocket was 5/8″ out of square in 5′. I added studs and shimmed to square it up. Though, there was not enough wiggle room width wise to square the tub so the apron is parallel with the long walls. Everything is still down to the studs so my plan is to shim out the left wall so it is parallel with the tub apron. This way i can run full tile along the tub apron and not have to deal with angled cuts that highlight that the tub is out of square with the room. Running full tile along the tub puts the center of the tile 1/2″ off of the center of doorway. Not perfect but ripping 1/2″ off of tile with exposed edges in front of tub seems daunting to me.
By doing this plan it throws my layout line out of square 1″ in 10′. More than I am comfortable with but i think it can be hidden.
All the angled cuts will be behind the toilet and vanity (which floats off the floor so has no toe kick).
My main priority is to have the tile in front of the tub look square and parallel with the long wall adjoining to it since it is the most visible feature that cant be hidden. I do want the room to feel “right”. I think it may feel slightly angled because i am throwing it out of square for the tub, but does this seem like an ok compromise?
Any future homeowner of our house will then have to contend with tile intentionally slightly askew with the room and that left wall shimmed out of square.
Any thoughts or suggestions? I would greatly appreciate anything you have to share.
Here is an attempted sketch and key of the layout of the bathroom.
KEY:
= door
I long wall that i am shimming
O[] toilet
HH vanity
_______ end walls
_______
[ ] O[]
I HH
I_=____
Many thanks!
Adam
DIYTileGuy says
With any room, you have to figure out what the focal point is there will be sacrifices made with other parts of it.
In your case, I would recommend doing a dry-layout where you set the tiles over the floor with no mortar and just see how it looks. Additionally, you may consider compromising. So, instead of one wall being straight and the other crooked, maybe adjust both so they are both “crooked” but neither is taking the full brunt of it.
Ultimately, it comes down to a judgment call and what you think is best for the room. If the room isn’t perfect then there are decisions that will have to be made.
Adam says
Thank you so much for your reply. Wow that was incredibly quick and I really appreciate you giving the time and attention to share. I agree it’s definitely a compromise as in most things. I appreciate your feedback and offering an alternative approach.
Vaughn Gavin says
Hi, I have a small entryway.
I am putting large format tiles (24×24) into this space to look almost seamless.
Measuring the tiles ( great quality ) I can get away with 1/16th grout lines as cupping and dimensional errors seem fine on the dry layout.
The problem is on the left side of the room I am left with an 8″ cut tile if i lay them out from left to right entering the house. I have an aluminum strip between the tile and the wood in front of the entryway.
Putting a cut edge along the side seems to be the wrong thing to do ( so centering the tile ).
Any advice?
DIYTileGuy says
It doesn’t sound like centering would be wrong, in this case. So centering your tile in the space is an option. Another option is to put the cuts along the wall (assuming there is one) behind the swing of the door.
In general, for an entryway, if you choose not to center then you want the big tiles next to the other flooring and the cuts in front of the door and along the walls.
Jessica says
According to the internet, you are correct DIYTileGuy!
Based on what I’ve been reading, plumbers say to tile under the toilet or else the water tight seal of the wax ring can become compromised and cause leaks. The toilet flange should sit on the tile to ensure the wax ring makes contact correctly. Hope that helps…we’re doing our first bathroom remodel, too. When diving into something new like this I always try to think about things like, “What would plumbers want you to know about tile when you remodel a bathroom?” “What would an electrician consider before placing a fixture in a bathroom?” etc.
Some of it is obvious, but if I hadn’t considered the impact of tile on plumbing I wouldn’t have discovered that it is very important to mount the toilet flange ON the tile or you are inviting potential leaks at a later time. I hope this helps! :)
DIYTileGuy says
Yes, technically the flange is supposed to sit on top of the tile. In a renovation situation, this isn’t always practical but hardware stores sell extenders to solve this problem so people aren’t trying to double up wax rings.
Thanks for your feedback!