If I were to ask “what is one thing that every tile installation needs?” I would get answers like
- Tile
- Mortar
- Trowel
- Patience
Nobody would answer with “Movement Joints”. Nobody. Most people wouldn’t understand what they are. And installing them sounds like it would be technical and complicated.
Estimated reading time: 7 minutes

Good news! The majority of movement joints aren’t technical or complicated. In fact, you may have installed them without knowing it.
This post will discuss what movement joints are in the world of tile and how to install them. But first:
Frequently Asked Questions About Tile Movement Joints
(By the way, nobody frequently asks any of these)
- I’m tiling a small floor. Do I need movement joints? Yes!
- I’m using Ditra which is an uncoupling mat. Do I need movement joints? Yes!
- I’m tiling over cement board. Do I need movement joints? Yes!
- My concrete floor doesn’t have expansion joints. Do I still need them? Yes!
- I’m not tiling over a concrete floor. Do I need movement joints? Yes!
- I’m tiling shower walls. Do I need movement joints? Yes!
- Is a movement joint the same as an expansion joint? No
- Is it the same as a control joint? No
What are movement joints?
Also known as soft joints. Simply put- a movement joint is a gap, or space, next to a tile that lets a tile floor move a bit. There are two kinds of movement joints: perimeter and field.
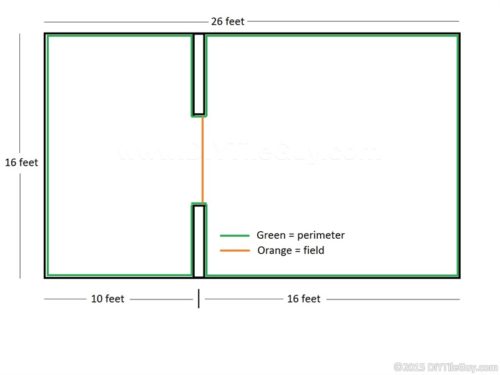
Perimeter movement
These are the kind that every tile installation should have. When you place a tile next to a wall it should have a gap between it and the wall.
That’s a perimeter joint.
There should be a gap around the entire floor (or wall). Typically this gap doesn’t get filled with anything. Typically it’s covered by baseboards around the room.
If you are butting up to another hard surface- like hardwood floors- then there should be a small gap between the tile and the hardwood. Then you will fill the gap with 100% silicone sealant. More on caulk vs silicone.
I know in some areas of the US that it’s a common practice to fill the perimeter gap with grout up to the wall and not have any baseboards. This is wrong and it’s not a good idea.
If you fill the gap with grout then you no longer have a space for movement. You then expose your tile floor to the danger of cracks and loose tiles.
Movement in the field
A field joint is usually a grout joint that is left ungrouted.
Usually, it gets filled with a flexible sealant that matches the grout color so that you don’t even see the movement joint. This ungrouted grout joint would have to extend from wall to wall to be effective.
In the drawing above I’ve drawn in the movement joints. The green color is the perimeter movement and the orange color is the joint in the field.
A common tactic is to place them in doorways (if it works out) so that they are as short as possible.
Where to place the field movement joints
Here are the industry standards for movement joints (ej171). They need to be placed:
- Around the perimeter: Always
- Indoors: Every 20-25 feet
- Outdoors or in direct sunlight: Every 8-12 feet
So if you are just tiling a small bathroom floor then you just need to make sure that you leave a gap around the perimeter of no less than 1/4 inch.
But if you have a floor that is 20ft by 30 ft. then you’ll need to break up the 30-foot run into two smaller sections that will be able to move and flex.
Keep in mind that direct sunlight is an interior area in the sun. So a sunroom needs movement joints more frequently than a normal interior.
But also if you have an area with French doors or a slider this can also be an area that is in direct sunlight.
How to install movement joints in tile floors
So we’ve covered what movement joints are, why they are important, and where to put them. So here’s how to install them in the field. Additionally, this is the same process used to create capillary breaks for curbless showers.
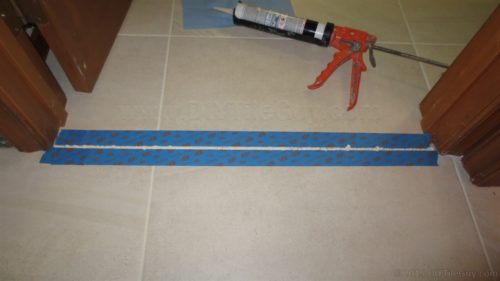
You need to leave yourself a gap that is ungrouted. This space needs to be clean down to the substrate. So you don’t want thinset or anything else in the joint.
Next tape off both sides of the joint. You are going to be caulking this joint so it can get messy. The tape will keep the clean-up simple.
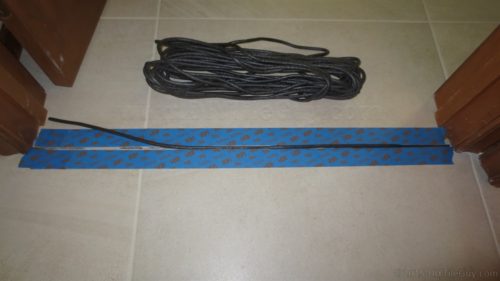
Backer Rod
Take some backer rod and stuff it in the joint. Backer rod is a stringy foam product. Typically it’s found in the door/window/insulation section at the big box store.
I use 1/4 inch which works for most tile applications but it does come in bigger thicker sizes.
Why use backer rod? Because it helps the performance of the joint. There is a reason and science behind why the backer rod is helpful but I want to keep this simple so I’ll leave it for another post.
Make sure you stuff the foam down so that it doesn’t stick up out of the joint.
Sealant for movement joints
You can use either 100% silicone sealant or another sealant meeting ANSI c-920 to fill these movement joints. The urethane sealants that qualify are heavier duty but trying to find colors that match the grout can be difficult.
For this reason, I prefer the 100% silicones that are color-matched to the grout. You are supposed to use silicone that meets Shore A hardness.
Custom Building Products 100% silicone caulk meets this requirement and comes in several colors. It’s even available at Home Depot in select colors.
However, not all manufacturer’s color-matched silicones meet this requirement.
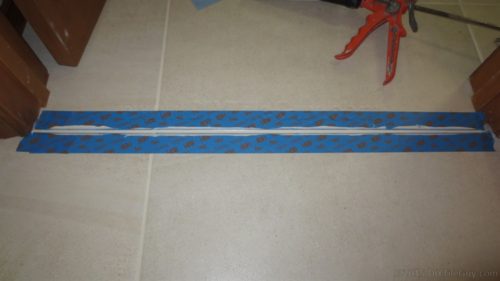
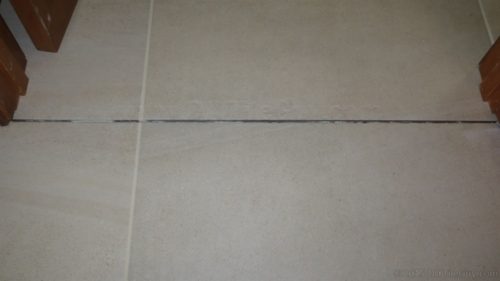
Apply the sealant to the joint and tool it down. You can use a specialized caulking tool or just use your finger. I wipe the excess off on a paper towel. You can now remove the tape on both sides and dispose.
For the final step, I use a bit of denatured alcohol (found in the paint section with paint thinner, mineral spirits, etc).
Just a few drops on the movement joint will help smooth out any unevenness from removing the tape. You can also put some on a rag to clean and detail around the joint.
More information, including a video, on how to install 100% silicone sealant.
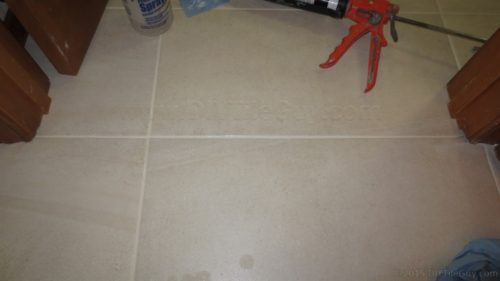
You can notice just a little bit of a different sheen to it in the photo below but most people would never know unless it was pointed out to them.
Profiles
If you don’t want to mess with caulking the joints they also make profiles that get installed as you set the tile. It’s a little different look- more commercial- but can look good in the right application.
The importance of movement joints I don’t feel is well known. However, installing them with every floor and wall installation can help prevent hard to identify problems and issues down the road.
So if have a 12 x 10 room with a 3 foot closet which all will be tiled, should I put in a movement joint?
You’ll need a perimeter joint but unless your room is outside or in direct sunlight then a movement joint wouldn’t be required.
You can put one in the closet entry if you feel that you need one.
So for a shower wall, would you just leave your corners as movement joints?
Yes. You’ll have a gap between the tile in the corner. Filling this with silicone instead of grout would make this a movement joint.
Would the grout caulk that the tile stores sell work for the movement joint. I have always used that for my inside corners and where wall meets floor or countertop.
The written specification calls for something called “shore a hardness”. Not all silicones meet the spec. I’m fairly certain the acrylic caulks at the box stores dont qualify.
But if it’s your own house and you want to try it then its up to you.
How would you use a movement joint in this case? A 20′ x 26′ room, no doors. Laying porcelain wood plank tile in an offset pattern.
There’s two directions the planks can run: either the 20 foot way or the 26 foot way. If you can break up the 26 foot dimension into two sections with a continuous soft joint that would be ideal. It’s recommended to install this joint somewhere in the middle of the room rather than break it into a 24 ft and 2 foot section, for instance.
We’ve just had a contractor install tile in a small entryway (4′ x 5′). Oddly, they installed baseboard first and then butted the tile right up to the baseboard (not even room for caulk). I raised the aesthetic issue as well as a concern that shrink/swell in the baseboard would cause loose tiles. I’m being told by the contract that it’s fine. ‘m far from an expert, and as an expert in other things, I know what it’s like to be questioned by people that have no clue what they’re talking about…I don’t want to be that clueless person. I’m right, aren’t I. It doesn’t matter how small the tiled area is, there should be some gap at the perimeter, which can be covered by baseboard or baseboard and shoe.
Yes. It should be tiled first, with a small gap around the perimeter, then baseboard over that. I know in some areas of the US they tile right up to the wall with no baseboard and no caulk but it’s still not the correct way.
I’m not sure if that’s they way your contractor would normally do it (baseboard first)? Maybe it worked out to be full tile by installing the baseboard first? But it is proper to have a gap all the way around.
What is your process for a wall to floor joint in a shower? I plan on installing the floor tile (small mosaic) first with a perimeter gap un-caulked. Then install the wall tile (3×6 subway) leaving a gap of 1/8″ (grout line width) and caulking. I think the wall tile over the floor tile will look the best and hide the movement joint the best since it is on the wall and not the floor. Thoughts?
I don’t think that there’s a right or a wrong on this. I usually do it the way that you’ve described though.
Not only do I think that it looks better but it’s usually easier to cut the floor tile into the wall and hide that joint with the wall tile.
I’m seeing some conflicting instructions. Reading Byrne’s Setting Tile book, and he says to create perimeter expansion joints by leaving a gap all the way down to the wood subfloor (cut the back board short as well as the tile), insert backer rod and caulk the gap. But in the same chapter talking about waterproofing wall/floor corners with liquid membrane, it’s trowel on the laticrete and embed fabric (and I’m assuming that’s over the backer board).
I’ll be doing a small bathroom with a tub and surround so I only need the perimeter moving joints and I would like to properly waterproofed floor. The big one is the floor to tub joint. So the questions are 1) what is the proper way to create a movement joint if the corner is to be covered with liquid membrane and 2) how would you set it up at the floor to tub joint where you don’t want to bring the waterproofing above the tiles? There’s radiator pipes coming up through the floor as well.
I would be grateful for your expertise. Thanks!
You’ll want to leave a gap in the corners no matter what. If you decided to waterproof the floor-to-wall joint then I personally would use something like Kerdi tape (or another brand). But if you had to do it with liquid then backer rod underneath drywall, or cement board, then liquid–>fabric–>more liquid would be the way to do it. You could indent the fabric a bit so that there’s a little too much fabric in the gap. This would give a little room for movement.
For the tub joint, I would just use backer rod and silicone/urethane. Do it after the floor is waterproofed.
We’ve got a hot water radiator inside a metal enclosure that’s built into the wall. The drywall is jointed to it. The enclosure edge is 5 inches from the tub so I was going to put cement board over that extra 5″ and tile up to the enclosure. But this would mean there would be both cement board and gypsum up against the hot radiator enclosure. Is this likely to cause extra flexing and cracking at the CBU/gypsum joint?
I wouldn’t think so if it’s just a matter of it being warmer than other areas. Although if the thinset used to mud the seam dries too quickly that would cause the mortar to be weaker than normal.
I’m a little late to the movement joint post but…..
I’ll be installing 12 x 24 ceramic in a 24′ x 11.5′ mostly open kitchen. One side of the 24′ length will continue straight down a 12′ long, 3.5′ wide hallway which will total 36′ in length. My guess here is that I should add a movement joint about where that hallway starts. The tile will be running in a 1/3 overlap the long way so any movement joint added will not be straight across but rather stair stepped.
Do you see any problem doing it that way if I make sure that joint goes both across and up/down the side of the tile to make a continuous movement joint?
Should a movement joint be included in the cement backerboard underlayment as well?
Thank you,
Mike
So the movement joint should only be in the tile part of the floor and shouldn’t extend down to the backer board.
But a stair-stepped movement joint doesn’t perform as well as a straight across joint. So while I don’t want to recommend that you do it that way it doesn’t mean that failure is guaranteed either. So you’ll have to weigh the circumstances. If you are doing it yourself and it’s your own floor you may decide to take the chance.
Thanks for the quick reply and the assistance.
It’s not my house otherwise I’d experiment.
I’m going to chance it and leave out the joint since at present, there’s no way to do a straight across unless I add some sort of design element, (which is not planned for at the moment), or cut across some tile.
Thanks again,
Mike
It’s my opinion that a zig-zagged movement joint will perform better than not having one at all. But I don’t want to mislead anyone into thinking it’s as good as a straight across joint.
All the best.
Mike,
Well, the nightmare has occurred in my 1445 sf house. Virtually our entire house is covered in the same ceramic tile that is no longer available. Several months ago, we began hearing “crunching” sounds in a few of the tiles. Then, several days ago on consecutive days in 2 different areas, tiles tented accompanied by a loud noise. I dug the grout out and removed the tented tiles. Approximately 40% of the entire area has some loose tiles, the other 60% has no loose tiles. The thought of replacing all these tiles in terms of mess and cost is overwhelming. Here is my question. Does it make sense to try and put several field joints in both the damaged area and the good area? It would be impossible to put perimeter joints in terms of the time it would take to dig out the old grout around the edges of the entire house. But adding field joints would be very doable, I just don’t know how effective it would be. I would also remove and reset the loose tiles. It would seem like I have nothing to lose other than the time to dig out a fairly limited amount of grout and replace it with the field joints like you instruct.
Having room for expansion is better than not having room. So if you want to put the effort in then I certainly don’t think it will hurt anything.
But I’m sceptical of how much good it will do. I have a hunch that once you get into it that a temporary fix just won’t be a very practical solution.
But I hope for the best and yours is an unfortunate situation indeed.
Our shitty contractor didn’t leave a joint between the tile backsplash and the countertop or between the tiles and the walls. Should we insist on a redo??
I think having a gap between the tile and walls is a good thing. With a countertop, the worry isn’t so much that the countertop will force itself upwards and crack the tiles. It’s more about the countertop flexing differently than the tile backsplash.
Both areas should be caulked because both are prone to crack- especially the countertop joint.
Hi Tile Guy
Have you heard of the ‘slipper joint method’ of floor tiling? We recently extended our dining room and added a rumpus room (both odd shaped extensions) lifted our old floor tiles, and now hope to engage a tiler who can tile our floors using this (or a better/similar) method. We have been advised (by a local tile company) that this method will (hopefully) allow for movement between old and new concrete slabs WITHOUT the need for unsightly ‘expansion joints’. The tile company said this method has been used in Britain and European for many years, but not used in Australia until very recently, so it is still largely ‘untested’.
Any reassurance and advice you can offer, will be greatly appreciated.
I’m not clear on what a slipper joint is but it’s very likely just a “translation” thing (I know, it’s all English but there are differences in the lingo). It might just be that they use silicone sealant as opposed to metal expansion joints.
Otherwise, I’m not really sure what is involved with it.
I have an balcony approx 22 feet by 9 feet that has 12 inch square terracotta tiles laid in a diamond pattern without any expansion joints. It gets very little sun during the day. When I consulted a local tiler he suggested I should cut an expansion joint along the long axis (through the tiles). I would rather cut through the grout lines, say two cuts in each direction, equally spaced, as this would look a lot neater. I know great care would have to be taken not to damage the waterproof membrane below. Would this be satisfactory? Thank you for your assistance
If you have a waterproof membrane below then I don’t know that I would risk adding a movement joint after-the-fact. For the movement joint to work ALL the grout has to be removed from the joint- down to the waterproofing. It would be very easy to damage the waterproofing at this point.
I’m not saying it can’t be done but it would be very labor intensive and have to be done like surgery- with someone on their hands and knees with small tools very carefully manually removing grout. Even then, there’s still risk of damage.
If I have a running bound pattern, do I provide a staggered control joint in the one axis?
Technically speaking, it’s recommended to have a movement joint go straight through a pattern and not zig-zag. But a zig-zag movement joint would probably perform better than not having anything.
Seems like using some backer rod in the future movement joint while grouting around it, to prevent grout in movement joint, then pulling up that backer rod and replacing it with new, might be a useful idea?
I understand what you are getting at but backer rod is made out of foam and can break rather easily. Just trying to pull it up past hardened grout will probably tear the backer as opposed to remove the grout. Rope could work but I think simply keeping the joint as clean as possible, scraping excess grout off, and vacuuming the joint might be the simplest way of going about it. Just an opinion.
Thanks! Having never met backer rod in the flesh, I did not know it was delicate.
My wife and I own a home that has a 14′ x 20′ screened in porch. We had the home built 7 years ago and the builder installed porcelain tile on the screened porch floor. The porch faces straight west and we have a beautiful mountain view. Unfortunately, when we have a high windy rain storm, the porch floor turns into a lake. I have to remove the water because it does not drain out. Several tiles when walked on move a bit. It is clear some of the grout has disappeared. Below the screened porch is an open deck that has a tongue and groove wood ceiling. Now when we have a lot of rain water on the screened porch, some of the water drips through the lower deck’s ceiling. Because of this, we are fearful of subflooring and joists getting damaged. Therefore, we are planning to re-tile the screened in porch.
Until someone pulls up some tile, we do not know how the builder did the subflooring. Probably we will have to totally replace the subfloor and make sure it is done correctly.
The builder installed the tile so the tile is actually under all the baluster floor railings To remove the existing tile, all the screening and railings have to be removed. Was this the smart way to install the tile or should the tile be installed up to the edge of the railing? If it should be installed up to the edge of the railing, I assume a perimeter expansion joint should be installed. True? If we do install the perimeter expansion joint, should there also be other expansion joints within the tile. If so, what should be the spacing of these on a 14′ x 20′ floor? I will appreciate any other recommendations you can provide for how this porch tiling should be done correctly to avoid future problems. Another thing we are doing is having Eze-Breeze installed to minimize the amount of rain that will enter the porch in order to protect the new tile floor.
These types of install have high failure rates because builders don’t understand the difference between installations exposed to the elements and indoor applications.
The ballasters can go either on top of the tile or tile can be cut around them. No matter how it’s done there has to be a great deal of care with waterproofing around those.
Attachments may be drilled through them or waterproofing will have to fold around them with flashing over the top of that.
Waterproofing is important. The product that I would use is Nobleseal ext and follow the instructions to a “T”.
Finally, you’ll need expansion joints in this install. Every 8-12 feet in every direction plus around the perimeter.
Hopefully, that helps. The main thing is to be careful with the products that you use and install them correctly.
If these tiles are set in random patterns how can you have a continuous joint? Can I create a movement joint where each tile ends?
The proper way is to cut a joint directly across in the appropriate intervals.
Supposedly a zig zag joint doesn’t perform as well. However, I would think that a zig zag would be better than nothing.
Hello
I have an expansion joint down the middle of my living room (really) in order to minimize cuts on the other side of the wall I am trying to lay out the tile with a movement joint on top of it. However in order to not make cuts, the tile actually overlays the expansion joint by 1.5” Tiles are 18×36”
( thank you for the challenge sweetheart wife) I have pics available but not sure how to post them to you
If you use an uncoupling membrane over the concrete then many of the manufacturers will allow you to “relocate” the expansion joint. The way of doing so would be in the manufacturer’s instructions. Also, it’s important to make sure that you actually have an expansion joint.
You might look into Schluter’s Ditra Handbook. I bet they address this very issue and they have excellent specifications.
Thank you for the response
I put Redgard down along with a 6” mesh. I was able to “push” the tile over so the overhang was about 1” . Hoping that will be enough between the three variables it will not crack.
Although “Hope for the best, plan for the worst, and Hope is not a plan”
Hopefully, that will work out for you. ?
Hello
I have 400 sq.meter floor and im tiling with natrual stone(3x2meter dim) . I have 2mm control joints around each tile and im filling them with 100%silicon.
Due to this installation, Do I need to use movement joints in every 5 meters with 9mm width too, or not?
If you are treating every grout joint as a movement joint then you probably have enough movement throughout. My opinion is that wider movement joints wouldn’t be necessary.
Hello.
Few days ago I installed a pebble shower floor 3ft x 3ft. After couple of days I grouted it with sanded grout. The shower walls are still not tiled but planning on doing soon.
For the shower I used Schluter/Kerdi products only (Schluter boards, Kerdi Bands, Schluter shower base and drain…)
I grouted the shower floor all the way up to the Schluter/Kerdi board wall, made it one solid piece of pebble floor.
After reading all this about the movement joints around the perimeter, do I have to take an angel-grinder now and take the grout around the perimeter out again to create a movement joint? The pebbles are not touching the Schluter board.
Or should I take the chance and leave it as it is now and keep puzzling those pebbles in as they might or might not pop out? Will leave space around the wall tiles.
Thank you for any advise.
On such a small shower floor, especially with Kerdi board, I wouldn’t sweat it.
Trying to cut a movement joint in after-the-fact is extremely dangerous as it needs to be clear all the way through to the membrane to be effective.
The foam board surrounding the pan will have a very small amount of give and with that small of a shower- you’re fine.
What would you use to install a backsplash in a toy hauler trailer?
Premium modified mortar? Not sure I understand the situation.
What is the difference between an expansion and movement joint?
From what you’re saying and if I understand right, a movement joint is a gap (either perimeter or field). Is an expansion joint the metal kind you put under tiles instead of leaving a gap?
Good question. An expansion joint is in the substrate, for instance, in concrete. It’s quite common to see controlled breaks in concrete and those are usually expansion joints.
A movement joint is in the tile only. It allows for movement in the tile.
If you tile over an expansion joint then you need to “honor” that joint in the tile as well.
Hey there. I’m installing 32×32” Porcelain tiles in a 1500sqft area over concrete.. Diamond pattern with very thin grout lines.. I’ve been trying to find articles about as to where to put movement joints in the field? Correct me if I am wrong, I’ll need to leave ungrouted grout lines every 20-25’ horizontally and vertically through out the field of the floor, fill with silicone and leave expansion gaps at perimeters? From my understanding and research, this is what is needed so the tile lays flat and not tent?
Yes and no. Continuous movement joints are supposed to be placed, as you say, every 20-25 ft in the field in each direction and around the perimeter for interior applications.
If the tile is in direct sunlight such as outdoors or in front of a big window, then it changes to every 8-12 feet.
Also, it should be mentioned that the size of the movement joint is supposed to be 1/4 inch.
So that’s what the industry standards are. If you cheat here and there you may not have any issues. Maybe you’ll decide to run a smaller joint but decide to place them more frequently?
I am about to undertake tiling job in 12’x33′ kitchen/dining room (36″ long wood grain tiles). This is 1936 house with 8″ boards, I have already installed 1/2 plywood (glued down with Subfloor Liquid Nails and screwed into the joist), this has made an amazing difference to the old floor! Next, I want to use ether 1/4″ Hardierbacker or Ditra (which one would you suggest for this application?).
Next question is about the movement joints. With 33′ long floor, I should definitely use a movement joint, but I am reluctant to put in the middle of the kitchen. Wooden tiles will have a small grout gap (under 1/8″), so joint will be noticeable. How would you handle it? Just make the joint and live with the larger grout cap?
Either Ditra or Hardibacker will work. I’d be inclined to recommend the thinner Ditra simply because you already have built up your floor 1/2 inch. But if floor height isn’t a concern then either will work. You’ll have to figure out if you want lighter but more expensive Ditra vs heavier and less expensive Hardibacker.
With movement joints, you can always exceed the minimum requirement. This could be an advantage if you don’t want one in the middle of the floor but wouldn’t mind two that cut the floor into thirds. The other advantage of this is that you may decide to run two joints at 1/8 inch thick vs one at 1/4 inch.
So I like to look at the layout of the kitchen and see if there are logical placements based on your space. Sometimes there is no good place to put them though.
Fireplace Caulk
I am going to put expensive glass mosaic tile around my fireplace. I am wondering if I should put silicone caulk between the fireplace edge and the tile, or just grout. My concern is that glass expands more than other tiles, and it is around the fireplace, which will get warm, 85 degrees or so, but shouldn’t get hot. I am leaving the outside edge of the tile ‘open’ (not sure how to describe) because it will be covered by the mantle. Because it will not be a ‘solid’ tile slab, is that good enough for movement and or expansion.
As far as an industry standard, I don’t believe this issue has ever really been addressed. Trying to adhere smaller tiles to the metal face of a fireplace. You might try a urethane caulk and stick the glass directly to that but I’m not comfortable that anything that I would recommend would be fail-proof. But I think urethane would be your best bet.
Thanks for explaining that movement joints are the space next to the tiles that allows them to move a bit. My husband and I are having a retail building with concrete floors constructed, so I’ve been doing some research online about the proper building procedures. I’m glad I read your article because it was interesting to learn about the role that expansion joints play in keeping concrete floors functional.
Ever since I read about movement joints here at DIY Tile Guy and at the Floor Elf site, I pay attention whenever I’m out and about. More often than not a tiled commercial bathroom does not have movement joints around the edges. Even my local hospital! — and as a result they have cracks.
I have a question regarding movement joints . I have two rooms to tile and at the door between the room the floor has a joint as they were built at different times and I cant change it. What would be the best type of joint to place here. I think there will be movement side to side and some up and down. Any suggestions. thanks
Hello,
First of all, very informative post. My question is in regards to a smallish porch and where you think I could put and expansion joint. The space is a screened in porch that does not get a lot of direct sunlight. 15′ x 9′. We are planning on putting a six inch border of river rocks around the perimeter, then another “border” of 12″x24″ slate tiles with the center of these tiled filled with a herringbone patter of travertine. There will be a perimeter joint and I can coat a joint both vertically and horizontally on the out edge of the slate, however, I am not sure what do do once I get to the river rock, which has a somewhat random pattern. I could continue the joint curved around the rock until I get to the wall, but not sure if that is the best approach. Thanks for the help!
You’ll need to have a joint exactly where that joint in the concrete is. This joint will need to be in the underlayment as well as the tile. You can use a metal profile, such as the ones Schluter makes, designed for a cold joint, or you can simply use a silicone or urethane sealant in the tile at that joint.
What you might do is have a joint completely around the travertine center as well as two diagonal “X” joints completely through the middle of the travertine. Then you still need one at the perimeter around the river rock. One way to handle it would be to put 1/4 inch of foam, or something, around the perimeter and later remove it and replace with sealant? Another way would be to do the same and cover it with some sort of wood trim. That’s just a few ideas.
I am unable to find a suitable caulk close enough in colour to the grout. What are the downsides to filling the joint with backer chord, a layer of caulk and then a thin layer of grout.
The downside is that you may lose the movement and the grout is likely to crack. If you search around on Google I think there is a way to make a silicone with your grout. You could also try Colorrite out of Oklahoma.
I am putting down tile with 1/8inc grout lines. my room is 28 foot long and I was wondering do I have to make the Expansion joint 1/4 inc grout line. I know I have to leave movement joints around the perimeter but this is down the middle. And do I have to place backer rod in my grout line before I can use silicon ?
So, the correct answer is that it should be 1/4 inch wide. If you want to cheat it then that’s your choice. It doesn’t mean that failure is imminent. You could also try putting in more frequent movement joints rather than just one if it’s something that you are concerned about.
If you are using silicone for the movement joint then you should have backer rod below it. If you are using a Schluter (or similar) movement joint profile then you wouldn’t need to add backer rod.
Very helpful post! We are tiling an exterior covered porch that is 8′ deep and 20′ wide. We are tiling a brick pattern. The porch has three sides where I can easily have movement joints at the ends along the two 8′ sides and the 20′ side, and easily the other 20′ side is along our siding.
The porch faces West (Seattle) but is covered. The first 3′ or so on two sides get sun and rain but the rest is pretty protected from the elements. The door is offset from the middle of the porch. The tiles are 12×24. Do I still need expansion joints in the center somewhere?
Any advise would be very much appreciated!
I would definitely install the movement joint and probably two would be necessary. Also, make sure to use a really strong thinset like Megalite (available at Home Depot) to adhere the tiles.
Hi I’m a little behind on this thread but I’ll throw my quandary out anyway.
I recently tiled a tub surround in a 100 year old house. I installed subway tile with a 1/16” grout line. I’ve got plenty of gap at my tub to tile merge but I did get a little too tight on some of my corner gaps, I plan to fill the gap with the matching grout colored caulk. My question is if there are just a couple tiles that veer into the 1/16” gap in a tub surround is the likelihood for renting rather low, can I chill out and stop worrying my job will fail?
In my experience, a tub surround isn’t going to move as much as 8ft of floor tile in direct sunlight. So, should you have a gap. Yes. Does not having a gap mean imminent failure? Not necessarily.
I’m installing large 8×80 wood plank tiles throughout my home. How should i handle the movement joints horizontally with a 1/4 offset? Zigzag ok? Just short sides soft joint?
Zig-zags I don’t think ever got officially approved but that doesn’t mean they don’t have a least some performance value. I understand the desire to zigzag but you may need them more frequently.
Very informative discussion! I am tiling a 4’ by 6’ shower with 8” by 24” wood plank porcelain tiles over foam Kerdi board walls and Kerdi shower pan. I would like to use Schluter profiles at wall corners and wall-to-floor transitions. If I use aluminum profiles, will the foam substrates allow for movement, or should I use PVC movement profiles in these locations? I am otherwise a little concerned about the durability of PVC. Thanks!
The aluminum works just fine with foam.
Hi. I am tiling the 13 treads and 14 risers on our stairs to the upper floor with porcelain tiles. I am using 3/8″ Schluter powder coated Rondec for the nose edging on the treads. The treads are 2×10, with double stringers, everything glued with PL400 construction adhesive. They were very strong before, but I have beefed them up even more with extra plywood, screws, PL400 and lathe sheeting. I have installed Ditra on each tread, to help deal with any movement that could possibly still exist. I have already installed the same edging and tiles on the wall, which fill in the riser/tread triangular area. The wall tiles are spaced at 1/16″. I have cleaned out the area between the edge of the stairs and the wall on both sides, to ensure separation. I will be using Mapesil T colored silicon to fill between the wall and stair tiles. I would like to keep the spacing between the wall tiles and stair tiles at 1/16″, the same as the spacing between the Rondec and front edge of the tread tiles. However, I’m not sure if 1/16″ spacing is sufficient enough for any movement between the wall and stairs or does it need to be 1/8″. Thank you in advance for your reply.
The proper thing to say is that more is better. But I understand trying to keep everything uniform. Typically, I would try for 1/16th or maybe stretch it just a little bit and go for a “big 16th.”
How do you handle movement joints in mortar bed installations?
You would still have a perimeter joint with the mortar bed. Usually, done by stapling foam around the perimeter. Then you would simply add movement joints in the tile assembly as needed. If the mortar bed, itself, needs expansion joints then those would have to be honored in the tile installation just like with concrete.
What kind of tape do you use/prefer for the masking?
Depends on what it is but I usually have blue tape on hand so that’s what I use them most
When doing a zig zag movement joint with wood planks, how would you get a silicone like Latasil to best match a sanded grout texture?
There isn’t really a way to do it. You can order sanded from ColorRite in Oklahoma but it’s a shiny sanded 100% silicone. I’ve heard of some guys sprinkling a little bit of sanded grout over wet silicone but I don’t really know if that works, or not.
Thanks. I called Laticrete and they suggested using the Spectralock Pro Part C powder sprinkled over the Latasil joint before it sets. Will try it out and see how it looks.
Hello there! A couple questions regarding pre-manufactured joints (i.e. Schluter).
Firstly, are there any advantages to using a pre-fab joints like Schluter? So far I have seen pro’s such as: A. the soft rubber insert can be replaced, and B. protecting the tile edges.
Does the silicone tend to wear down a lot more easily or more frequently and that is why these options are provided? Does the pre-fab joint really provide that much additional protection to the tile edges? I have been trained to always use trim pieces like this, but in some low-budget projects it seems like the cost outweighs the pros.
Also I was curious about your thoughts on cove profiles. Schluter makes cove profiles that are all metal as well as coves that are all metal with an integral rubber movement joint. If a movement joint should be installed at ALL perimeters, what is the point of an all metal cove piece? Can an all metal cove piece be used in conjunction with a silicone fill (such as the DILEX-AHK profile as an alternative to DILEX-HKS)?
Thank you for your time, a wonderful and helpful post for a professional designer to reference!
The movement joint profiles that Schluter makes are more durable than a silicone joint. So, they will stand out in appearance more and should last longer. If the rubber piece does wear out, the replacement should be easier than recaulking that joint.
The profiles tend to be used more in commercial environments and silicone joints are used more in lower-impact residential applications.
For cove corners, it’s my understanding that the metal profiles are used for specialty tiles that don’t blend well in the corner. Additionally, another use is that it makes cleaning easier and more sanitary. So, they would be used for the cosmetic appeal or for ease of maintenance.
For heavier-duty environments, you would want to use the rubber cove for both movement and ease of maintenance.
Thank you so much for responding quickly!
This is great to know about the silicone joints.
Most of my projects (light to heavy commercial) do request a cove for cleaning, but I found it odd that all this time we were specifying a regular metal cove along the perimeters even though they need a movement joint too.
One last question as well: do the guidelines you gave in the article apply to floors only or should silicone joints every be included in large spances of wall tile (other than along the perimeter)?
It applies to walls and floors
I’m tiling a small bathroom floor (8′ x 5′) with 24″x12″ tile and 3/32″ grout lines on top of Ditra. I read that the expansion gap recommendation for rooms is 1/4″ but for such a small room can the expansion gap be reduced? The reason I’m asking is there are places where the wall and shower curb are not completely flush, as well as typical walls that are not 90 degrees so I if I do 1/4″ for one place I end up with gap in another location that is either bigger or less than 1/4″. The less is my concern and the point of my question (and I guess bigger could become a baseboard selection challenge).
One correction, it is 3/16 grout lines (not 3/32) not that I think it matters in this discussion.
1/4 inch is what is specified. Can you get away with less? I would think so. But you might have to cut the pieces differently to match the wall. You don’t want to get too tight.
Shouldn’t matter but thanks for the correction
Hi again,
having a brain cramp. Do you recommend tiling the bath floor (not shower) first and then outside shower curb on top of bath floor, or the other way around (shower outside curb first, bath floor butt to curb)?
My shower curb is two walls, and both curbs end at right angles to drywall walls, if that makes any sense. My layout looks like an ‘L’ with shower located in bottom left of the ‘L’.
thx again,
Correction, ignore my comment about curbs ending at right angles to drywalls. The curbs are actually in-line with two of the drywall walls. Sorry for the confusion.
I like the curb tiles to set down on top of the floor tiles. So, the floor first or you could space it so that you can slip the floor in underneath later
Wow!! What an amazing post. Thank you for taking the time to write up a clear and easy to understand step by step process. On top of that you are still replying to comments 4 years later. As a DIYer with a lot of tile experience I’m actually about to do my first floor tile installation and your article answered my question and taught me a few things I didn’t know as well. Coincidentally I fabricate expansion joints for bridges.
Thanks!
When using a 1/16″ grout size, can movement joints also be 1/16″ to match and if so how often should they be? Else should movement joints be larger than that and just not match? Thanks!
Technically, movement joints are supposed to be thicker than 1/16th but I do understand not wanting them to stand out. Furthermore, I don’t know how to figure out how many you would need at a thinner joint. You may need to 1/16th at every joint and even then it may not be enough to compensate.
I’m not here to tell you that you have to follow industry standards to the “T”. You really need to allow movement in the floor. Following industry standards is a good way of staying safe and ensuring your floor is well-built. But if you want to push the limits, I understand but I don’t have a way of calculating how far you can cheat.
Hi, please may I ask for your advise…we have had an extension and I’m
Concerned about the fact that no expansion joint have yet been installed where there are different substrates though my builder has said they will chisel out the grout at the 3 points and leave it ungrouted… is this good practise or should they have installed a profile prior to tiling it’s a bit late now, unless it’s re done? Why is he going to leave it ungrouted as it will be an eyesore he’s not a professional tiler but I have no choice… could really do with some advise as once he’s gone I’ll
Have to live with it … hope u can help as I’m so confused as to a what to do… thanku in advance much appreciated
Expansion joints are different than movement joints. You’re concrete either has expansion joints, cold joints, or control joints in it already- or it doesn’t. If it’s new concrete, then maybe it should have control joints in it? But if they aren’t in it, at this point, then putting them in later does no good.
But for movement joints, those should be in the tile. For interiors, they should be in every 25 feet or less. For exteriors or interiors in direct sunlight, they should be in every 12 ft. or less. That’s probably what the contractor is trying to add by removing grout. Once the grout and mortar are removed from the grout joint, they should be filled with a 100% silicone sealant just like this post talks about.
Thanku for that very helpful can I ask is it necessary to use a profile or is silicone just as gud? Thanks
Profile isn’t necessary and would be difficult to install if the tile is already in. Silicone works just fine
I made a walk in shower from scratch, using a Kerdi shower kit, 48×46 with the kerdi bench and two 12×12 inch niche shelfs. Did the flood test, now on to tile. Opt for a texted porcelain 6mm thick tile for the floor and a 10×20 subway 8mm thick tile for the wall. I’m pricing everything for wall to floor joints and edging etc, I’m around 400 dollars in joints and trim. Does that sound about right or know of any other options besides schulter brand. Everyone is telling me I’m going overboard and just grout or caulk the joints. First time doing any of this kind or work.
I’m a little confused on what exactly you are purchasing. It sounds like you are purchasing edging material and inside corners like Dilex? If so, you don’t have to purchase the inside corners. You could just run the tiles together leaving a small gap and silicone the inside corner. That would probably save you some money as the corner pieces can be pricey.
Not sure if that answers your question, or not. Let me know if I’ve misunderstood.
Your following me :) so what about the floor to wall transitions, fine to grout or caulk as well? If there was a way to post a picture of it I would if that helps.
You only have to use the Schluter transitions if you like the look of them or maybe if it’s a commercial project. Otherwise, just having the two tile surfaces meet with a 1/8 inch gap in-between and filling the gap with silicone is the way that most people do it here in the USA.
The metal trim pieces should still be used to cover any tile edges that would be visible once the project is finished
Hi there,
Just wondering if I need to caulk the perimeter joints of a room.
And would you caulk first or grout first?
Thank you,
Kevin
Hi. Not sure if you can help me. I purchased a bunch of glass mosaic tile from a box store. It’s distributed by MSI inc. and has a mesh backing but it also has a hardened glue like substance between the tile and mesh. some tiles fell off the mesh as i cut the sgeets to fit around outlets & window frames. The harened layer stays and is like a plastic or glass barrier. So if i was to push the sheet into a layer of thinset there will be no contact between the tile and adhesive. I siajed a few spare tiles in water fir a few hours to see if this barrier might disolve but it doesn’t. I comtacted the distributor will no response. The product is made in China so I’m kind between a rock & a hard place. Any advice on how to maje sure the tile gets goid adhesion without pulling all the small tiles iff and installing 1 by 1?
I should have added the mosaic tile is being installed as a kitchen backsplash.
You don’t need to caulk the perimeter, it just needs to be gapped. I usually grout first and keep the silicone joints clean or clean them out after grouting
Unfortunately, this is quite common, and as long as this type of tile is purchased, the manufacturers keep making it and the stores keep selling it. An epoxy mortar may grab onto the back of the mesh and adhere the mesh to the wall. Then an epoxy grout may help hold the front of the glass together.
An epoxy grout is probably the best bet for the front of the glass as it will help hold things together in a way cementitious and other grouts won’t.
Hi Jim! Two rando questions for you:
1) have you done any posts on tiling around a window in the side of a shower? (The window of concern is wood… and 100 years old. It’s not historic per say but I’m trying to avoid the expense of a new window, especially because a vinyl one might make the most sense and I hear they’re usually garbage.)
2) do you know of any examples where someone’s used milled woodwork instead of bullnose? obviously this wouldn’t work along a tiled floor, but possibly at the top of the shower, 6 or so feet up and above the shower head?
Thanks!
Betsy
1. I understand not wanting to change out the window but a wood window in a shower is not something I would recommend.
2. I’ve seen it on stairs before and I don’t see anything wrong with what you are proposing.
thank you for this article.
during research i’m grateful to find it just before my tiling job of
bedrooms & corridor.
applied the perimiter joints around the walls and movement joints at the doors as well as every 8 feets as bedrooms are sunny.
would like to make sure i got it right through the article.
perimiter joints around the walls are left empty before covering the baseboard (made of tiles too)
or backer rod is to be fitted around the walls in this gap like the movement joints at the doors & at every 8ish feet?
ps.
the movement joint at the doors in my house case isn’t wall to wall .. its 20 inch posponed than the wall to wall perimiter.
thanks for sharing such great knowledge
Good! The joints don’t need to be filled to allow for movement. They just need to be kept clear so that the movement can happen.
I just tiled my shower pan (shower walls are not tiled yet). Would you recommend a perimeter bead of silicone in the gap between walls/curb and tile? I used the Schluter Kerdi waterproofing system if it matters.
Yes, I think it’s a good idea to seal the shower pan to the wall prior to installing the wall tile. Good question!