It’s difficult enough just selecting your tile let alone a tile mortar.
Now you walk into the thinset aisle at the home improvement store and there are eight different choices of thinset mortar.
Suddenly, questions start furiously bouncing into your head:
- What’s the difference between the $6 bag of thinset and the $40 bag?
- Do I go with gray or white thinset mortar?
- What about the premixed mortar in the buckets?
- How do I know if the thinset is unmodified?
Finally, your answers are here!

This post is divided into 3 sections
Best thinset for what you are installing ↗
You are installing [blank] over [what surface]. Which thinset do you need?
Thinset terms guide ↗
Modified, unmodified, LFT, ANSI, etc. What do these terms mean?
Thinset Mortar FAQ ↗
What’s the difference between white or gray thinset? What is unmodified mortar?
Estimated reading time: 16 minutes
Disclaimer: This post is to be used as a general guide for mortar selection. It’s up to you to make sure the product that you are using is proper for the application. Always read and follow the manufacturer’s instructions on the product(s) you are installing.
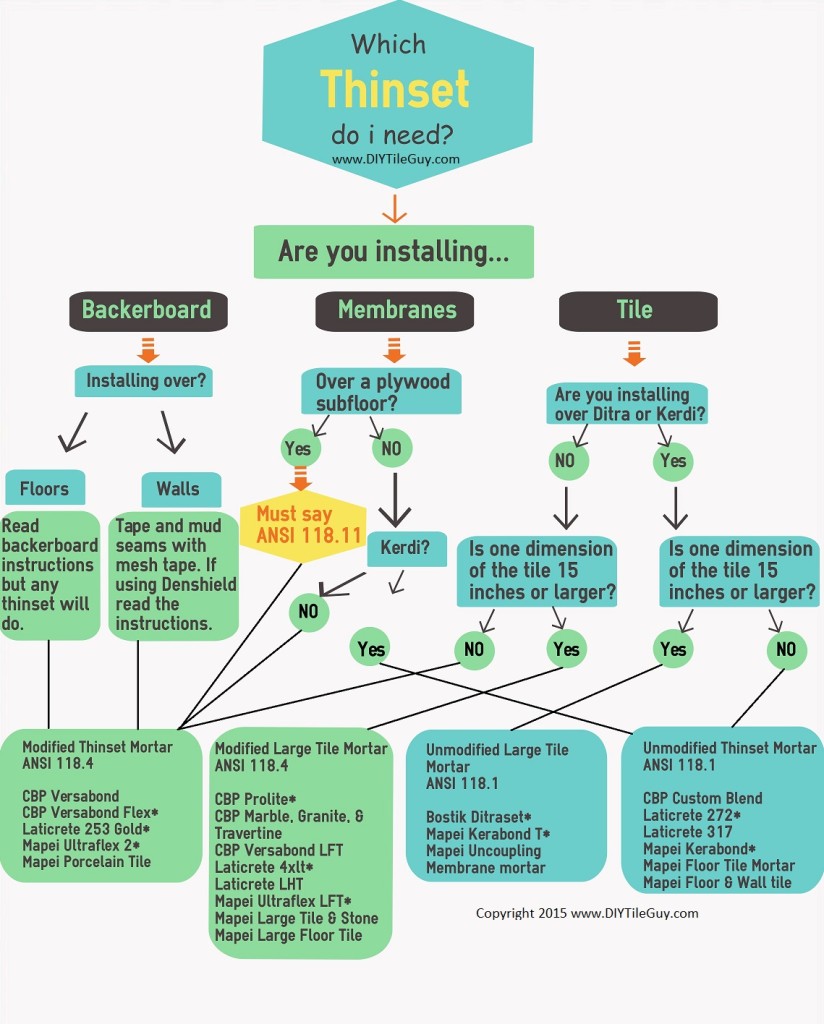
Applications: “I am installing ______ over _____. Which thinset mortar do I buy?”
Below is a list of products and applications. Two things to keep in mind:
- These brands are typically found in retail stores.
- In fact, I have a post that deals specifically with Home Depot thinsets
- Schluter products are their own thing and are mentioned in their own category below
- How to mix thinset is covered in a separate post as is mixing small batches of thinset.
Installing cement board over a wood subfloor
The good news is that, basically, any thinset mortar will work for this. Some manufacturers’ instructions say to use a modified mortar and you should follow those instructions. More on modified mortars below.
However, it’s my understanding that the mortar doesn’t need to adhere to the plywood. Rather, the system of a mortar bed underneath the cement board and fasteners above holds the material properly in place.
Installing cement board over a concrete subfloor
Short answer is: Don’t do it.
Longer answer is: Cement board shouldn’t be installed over concrete
Installing uncoupling membranes over concrete
Most manufacturers, including Custom Redgard Uncoupling Mat and Laticrete Stratamat, will want you to use an ANSI 118.11; 118.4; or 118.15 mortar and the products listed below meet this standard. [More on those numbers in the Terms section]
However, if you are installing Ditra then scroll down to the Schluter section below.
- Ardex: X5, X77
- Custom Building Products: Versabond Flex; FlexBond
- Laticrete: 253 Gold; 254 Platinum
- Mapei: Ultraflex 2; Porcelain Tile Mortar
- TEC: Sturdi Flex; Full Flex
Installing an uncoupling membrane over a wood subfloor
For this, you want to use a thinset mortar meeting ANSI 118.11 and it should have this number on the label.
ANSI 118.11 means it’s approved to go over exterior grade plywood. That’s what you want. It doesn’t have to be an LHT mortar. Specific products include:
- Ardex: X5, X77
- Custom Building Products: Versabond Flex; FlexBond
- Laticrete: 253 Gold; 254 Platinum
- Mapei: Ultraflex 2; Porcelain Tile Mortar
- TEC: Sturdi Flex; Full Flex
Ditra users: scroll down to the Schluter section below
Thin, waterproof sheet membranes over backer board
Most manufacturers want a modified mortar used to install their waterproof sheet membranes. Sheet membranes such as: Hydro Ban Sheet Membrane, Ardex SK 175, Mapei Mapeguard WP 200, Redgard Fabric Membrane, Wedi Subliner Dry
- Ardex: X5, X77
- Custom Building Products: Versabond Flex; FlexBond
- Laticrete: 253 Gold; 254 Platinum
- Mapei: Ultraflex 2; Porcelain Tile Mortar
- TEC: Sturdi Flex; Full Flex
Kerdi users: scroll down to the Schluter section below
Tile under 15-inches over cement board
- Ardex: X4, X5, X77
- Custom Building Products: Versabond, Versabond Flex; FlexBond
- Laticrete: 253 Gold; 254 Platinum, 272*
- Mapei: Kerabond*, Floor Tile Mortar*,Ultraflex 2; Porcelain Tile Mortar
- TEC: Full Set Plus*, Sturdi Flex; Full Flex
*unmodified ANSI 118.1 mortar
Tile under 15-inches over uncoupling or crack-isolation membranes (CIS)
Uncoupling membranes such as: Flexbone, Stratamat, Mapeguard UM, Redgard and CIS membranes like Nobleseal CIS
- Ardex: X5, X77
- Custom Building Products: Versabond Flex; FlexBond
- Laticrete: 253 Gold; 254 Platinum
- Mapei: Ultraflex 2; Porcelain Tile Mortar, Uncoupling Membrane Mortar*
- TEC: Sturdi Flex; Full Flex, Uncoupling Membrane Mortar*
*unmodified ANSI 118.1 mortar
Ditra users: scroll down to the Schluter section below
Tile under 15-inches over waterproof membranes on walls in wet areas like showers (note: includes waterproof foam boards such as Wedi and GoBoard)
- Ardex: X5, X77
- Custom Building Products: FlexBond; Versabond Flex; Prolite
- Laticrete: 253 Gold; 254 Platinum; Tri-Lite
- Mapei: Ultraflex 2; Porcelain Tile Mortar; Ultralite
- TEC: SturdiFlex; SturdiLight; 3N1; Ultimate 6 Plus
Kerdi users: jump to the Schluter section below
Large Tile Thinset Mortar (LFT, LHT, etc)
Now for the tile adhesives that are specifically for large format tiles.
Large Tile (at least one side is 15-inches or longer) over concrete or cement board
- Ardex: X5, X77
- Custom Building Products: Versabond LFT; Natural Stone & Large Tile Mortar, Prolite
- Laticrete: LHT Plus; Tri-Lite; 4-XLT
- Mapei: Large Tile & Stone Mortar; Ultraflex LFT, Kerabond T*
- TEC: Ultimate Large Tile Mortar; 3N1; Uncoupling Membrane Mortar*
*unmodified ANSI 118.1 mortar
Large tile (at least one side is 15-inches or longer) over uncoupling or crack-isolation membranes (CIS)
Uncoupling membranes such as: Flexbone, Stratamat, Mapeguard UM, Redgard and CIS membranes like Nobleseal CIS
- Ardex: X5, X77
- Custom Building Products: Versabond LFT; Natural Stone & Large Tile Mortar, Prolite
- Laticrete: LHT Plus; Tri-Lite; 4-XLT
- Mapei: Large Tile & Stone Mortar; Ultraflex LFT, Kerabond T*
- TEC: Ultimate Large Tile Mortar; 3N1; Uncoupling Membrane Mortar*
*unmodified ANSI 118.1 mortar
Ditra users: scroll down to the Schluter section below
Large tile (at least one side is 15-inches or longer) over waterproof membranes on walls in wet areas like showers (note: includes waterproof foam boards such as Wedi and GoBoard)
- Ardex: X5, X77
- Custom Building Products: Versabond LFT; Prolite
- Laticrete: Tri-Lite; 4-XLT, 255 Multimax Lite
- Mapei: Large Tile & Stone Mortar; Ultraflex LFT, Ultralite
- TEC: Ultimate Large Tile Mortar; 3N1, Ultimate 6 Plus
Kerdi users: See the next subheading below
Thinset Mortar for Schluter Products like Kerdi and Ditra
When installing a Kerdi Shower, Ditra uncoupling membrane, or Ditra-Heat they want you to use Schluter’s own branded tile adhesive mortars such as: [11]
- Schluter Set (unmodified)
- Schluter All-Set
- Schluter Fast-Set
- OR an unmodified ANSI 118.1 mortar
In all situations EXCEPT:
- Ditra products over a plywood subfloor.
In this case, you would use an A118.4 mortar such as: [4,11]
- Ardex: X5; X77; X78
- Custom Building Products: Flexbond; Versabond Flex; Complete Contact
- Laticrete: 253 Gold; 254 Platinum; 255 Multimax Lite
- Mapei: Ultraflex 2; Porcelain Tile Mortar, Ultracontact
- Schluter: All-Set (Schluter’s preference)
- Tec: Full Flex; Full Contact Mortar
For more on modified mortars, unmodified mortar, and using them with Schluter products like Ditra and Kerdi see this post.
Tile Adhesives for Specialty Tile Situations:
Glass tile
When installing glass tile, better manufacturers will often list the thinset name and type that’s to be used with their products, so make sure you check the instructions. Be sure to check out my post and videos about cutting glass tiles, as well.
In general, these thinsets work well with glass: [5]
- Ardex: X7 Plus
- Custom: Megalite; Glass Tile Premium Thinset mortar
- Laticrete: Glass Tile Adhesive, 254 Platinum
- Mapei: Adesilex P10; Mosaic and Glass Tile Mortar
- Tec: Super Flex Ultra Premium; Ultimate 6 Plus
Exterior Tiling
Exterior tiling is something that needs to be taken very seriously. It’s not the same as tiling indoors. For exteriors, you’ll want to use tile adhesives such as these: [10]
- Ardex: X90 Outdoor
- Custom: Megalite; Megaflex
- Laticrete: 254 Platinum; Multimax Lite
- Mapei: Ultralite Pro; Keraflex Super
- Tec: Super Flex Ultra Premium; Ultimate 6 Plus
Natural Stone
Natural stone is another application that has its own quirks and special details. In general, you want to use WHITE tile mortars and ones that will hold the weight of natural stone (look for an “H” grade next to the ANSI number). Mortars such as:
- Ardex X4; X5; X77
- Custom: Natural Stone and Large Tile mortar; Prolite; Versabond LFT
- Laticrete: LHT; Multimax lite; Select Bond with non-sag additive
- Mapei: Kerabond T*; Large Tile & Stone mortar; Ultraflex LFT
- Tec: Uncoupling Membrane Mortar*; Ultimate Large Tile; Ultimate 6 Plus
*unmodified ANSI 118.1 LFT mortars
If you are installing natural stone in a wet area like a shower you’ll want to make sure that you understand what you are getting yourself into.
Moisture Sensitive Natural Stone- Important!
Some natural stones are considered “moisture sensitive” and need to be installed with special adhesives like epoxy mortars. Many green marbles fall into this classification and other stones as well.
Check with your supplier to see if your natural stone falls into this category.
Thinset Terms & Buzz Words
Unmodified
An unmodified mortar doesn’t contain polymers. Rather, it’s simply made up of cement, sand, and lime [1,2]
Modified
Modified mortar contains polymers. Can be latex or otherwise. [1]
ANSI 118.1
ANSI A118.1 is the lowest grade for thinset mortars. Generally, it’s used to determine if a thinset is unmodified. Mortars must meet or exceed 150psi with the porcelain tile shear bond test. A118.1 Section 7.2. [1,2,4]
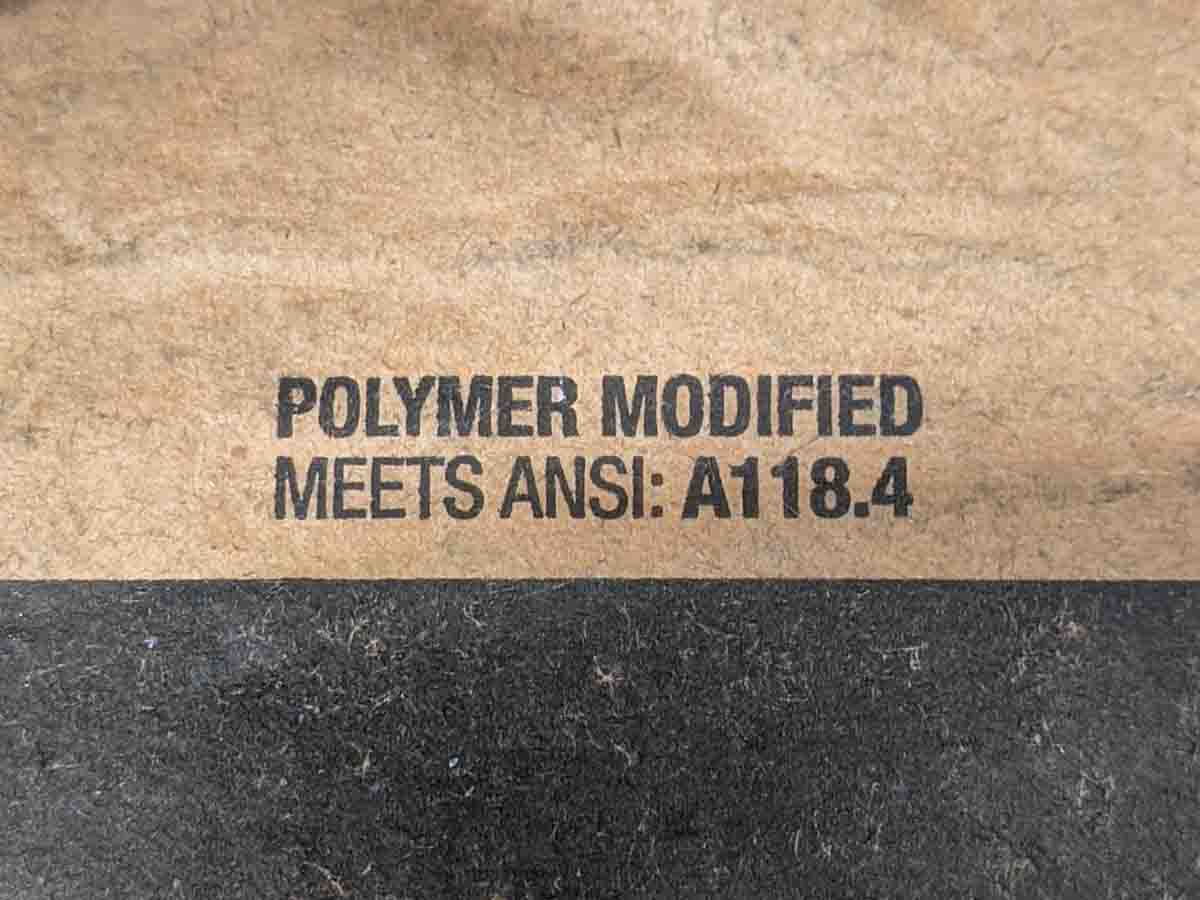
ANSI 118.4
Generally, ANSI A118.4 mortars are considered to be modified mortars. Thinset mortar must meet or exceed 200psi with the porcelain tile shear bond test to meet this standard. A118.4 Section 5.2.4 [2,4]
ANSI 118.11
The ANSI A118.11 standard means that a thinset mortar is suitable to bond to exterior grade plywood. These are modified mortars. [4]
ANSI 118.15
ANSI A118.5 is the highest mortar rating. To meet this standard thinset must meet or exceed 400psi in the porcelain tile shear bond test. These are modified mortars. A118.15 Section 7.2.5 [2,4]
Dryset mortar
Dryset mortar is another term for unmodified mortar [1,2]
LFT
LFT is an acronym meaning large format tile
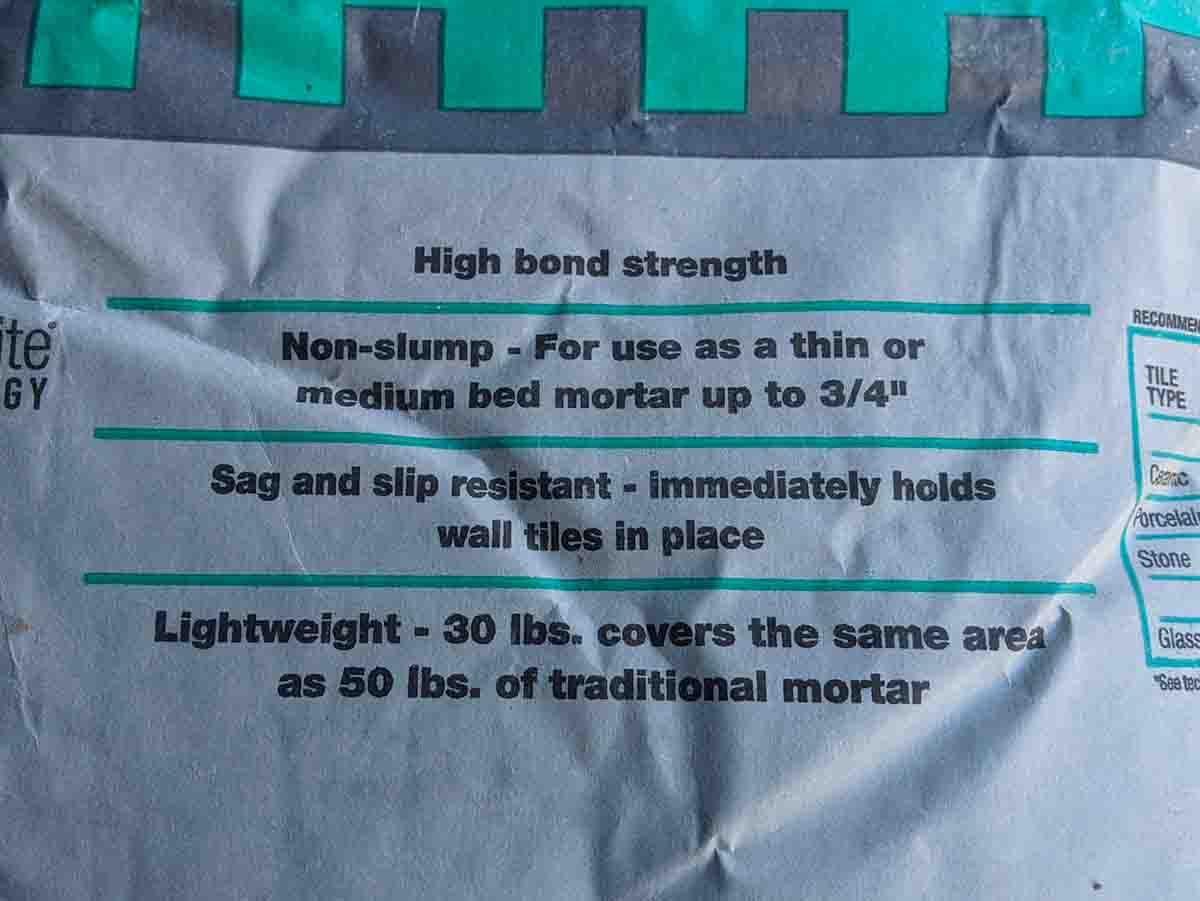
Lightweight
If a mortar is marketed as lightweight it’s probably not using traditional sand as a component. Lightweight mortars typically weigh 25-30lbs compared to their 50lb counterparts. These mortars would likely be marketed as non-sag mortars.
Mastic and premixed mortars
Tile mastic and premixed mortar is an adhesive for tile that comes in a bucket. Generally, they have very limited uses but they are OK to install smaller ceramic tiles over drywall. [5]
Medium Bed
Medium bed mortar is usually intended to mean large format tile mortar [5]
Non-sag
Non-sag describes a mortar’s ability to hold a large format tile on a wall. Your mileage will vary and, frankly, you shouldn’t rely on tile adhesives to hold a tile on a wall. That’s why they make tile spacers. [2]
Non-slump
If a mortar is non-slump this means that it can hold the weight of a large format tile on a horizontal surface (like a floor) without it sinking. [2]
Polymers
Polymers are added to mortar to increase such characteristics as adhesion, flexural or tensile strength, and alter working times amongst other things thereby making the thinset ‘modified’. [1]
Rapid Set
Rapid set mortars are thinset mortars that cure at an accelerated pace. Typically, OK for foot traffic in under 4 hours. These are definitely modified mortars. [2]
Slake
In the world of tile, thinset mortar is thoroughly mixed with liquid, then there is a waiting period before it gets remixed.
Slaking takes place during the waiting period and you are allowing the chemicals to hydrate and react with one another before mixing again. [7]
Most, but not all, mortars require a slake time during the mixing process.
Thinset
Thinset is a type of mortar that is used to adhere tile to a substrate like a floor or a wall. It is in contrast to the thicker set applications that used a thick mortar bed underneath tile. Thick mortar beds were much more common decades ago. [1,5]
Thixotropic
Thixotropic is a liquid or gel that has “body” to it but becomes more liquid if it’s agitated. Ketchup is an example of a common thixotropic liquid.
They have tile adhesives with thixotropic properties that are designed for large tile or porcelain panel applications. Sometimes referred to as full contact, flowable, or high transfer mortars. Typically, back buttering is not necessary. [2,4,8]
Interested in my thoughts on thinsets from Home Depot?
Thinset Mortar Frequently Asked Questions
Basically, the difference between white and gray tile adhesive is just color.
In general, you’ll want to use white mortar with white and light-colored grouts and gray mortar with darker and gray-colored grout colors. [9]
However, if you are installing a see-through tile, like glass tile, or something that has some translucency, like natural stone or glass, then you almost always want to use white mortar. 
Unmodified mortars are made up of sand, cement, and lime. Modified mortar contains polymers that affect the strength, flexibility, and dry times of the thinset. [1,2]
Thinset is a type of mortar that is tile-specific and is sort of becoming a slang term. Mortar is a much broader category than just tile and is used for a variety of building materials. [1,5]
No, grout and thinset are two different things. Grout goes in the gap between the tiles and is part of the finished tile installation.
Thinset is an adhesive that attaches tile to the substrate and is not part of the finished appearance of the tile installation.
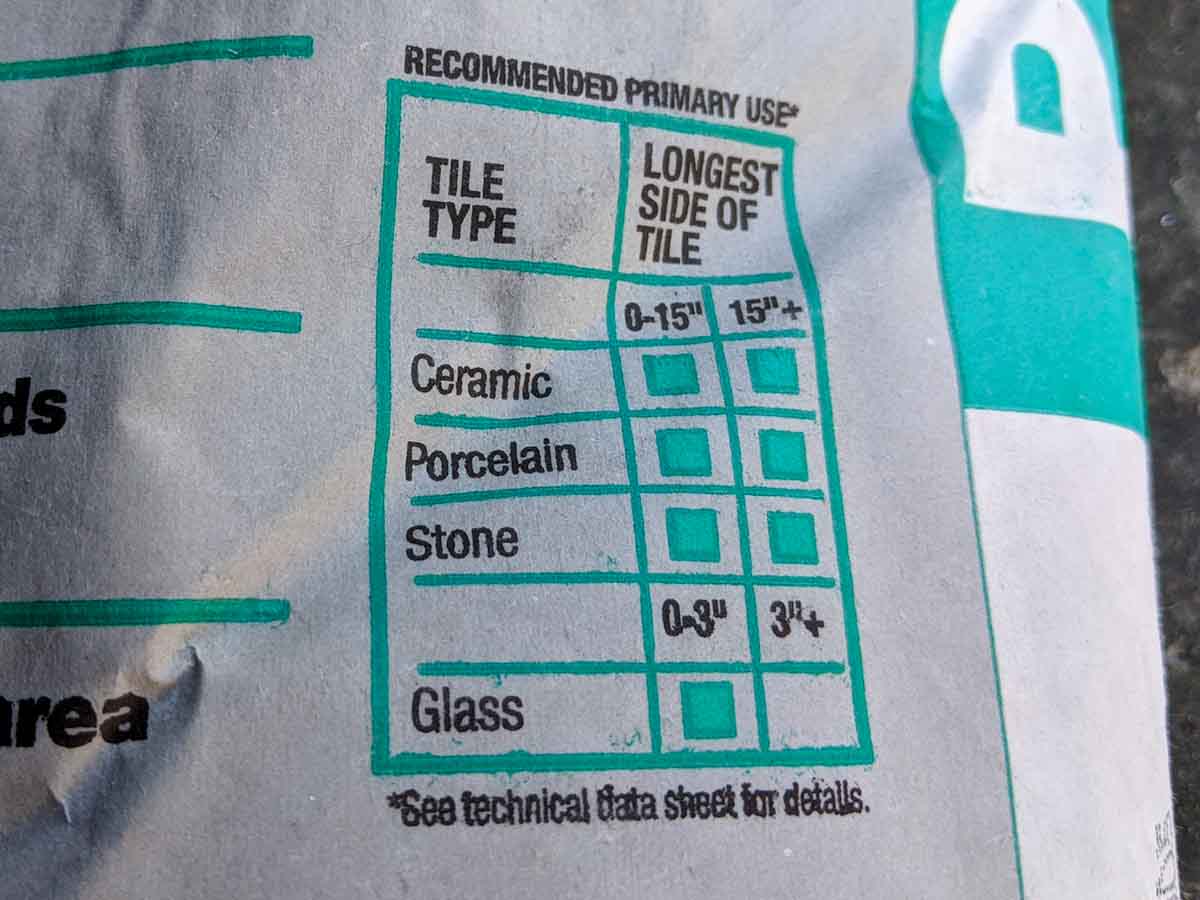
LFT stands for Large Format Tile. Large format tile has at least one dimension that is 15-inches or longer. 12×24 tiles are an example of large format.
You are not supposed to. Most product manufacturers will tell you to flatten the floor first with the proper floor flattening products and then tile over it using an appropriate thinset mortar. [6]
The real answer is “it depends” but generally 24-48 hours is a suitable amount of time to wait for light foot traffic on a tile floor.
Usually, yes, you can use an LFT mortar for small ceramic and porcelain tile. Make sure to check the manufacturer’s instructions to be sure.
Yes, but you can’t use just any thinset for outdoor installations. See above for more details on outdoor tile installations. [10]
The letters next to the ANSI standards are additional indications of the use of the tile adhesives. The “H” means the mortar can be used for large or heavy tile. The “E” indicates extended open time. The “F” is fast or rapid setting. The “T” stands for thixotropic and indicates a non-sag thinset. See the terms and buzzwords section above for more details. [2]
LFT or LHT mortars are designed to hold the tile in place while it dries so that when the thinset dries it doesn’t shrink and move the tile in the process.
If a non-LFT mortar is used then you may find that your tiles have moved after they’ve been set and the corners and edges are uneven the next day. [5]
The best thinset for shower walls depends on the products that you are using on the walls and what kind of tile that you are installing. All of this information is found by scrolling up to the above post.
Most any thinset mortar will do as it isn’t required to adhere to the subfloor. However, always check the manufacturer’s instructions as some have specific mortar requirements. For more on this subject see this post.
The best thinset for a shower floor depends on what products you are using (for example: Kerdi, Wedi, mud pan?) and what you are installing (porcelain tile, large tile, marble tile, etc). There’s a lot more information if you scroll up.
The best mortar for a backsplash depends on what kind of tile that you are installing. This information is found by scrolling up to the above post. Many backsplashes are tiled over drywall and most mortars will work for that substrate.
To find out the best thinset for large and porcelain tile, look on the packaging for terms like large tile, LFT, and LHT. Additionally, look for an “H” or “T” rating next to the ANSI number. This blog doesn’t favor particular brands. See the terms section above for more details. [2,5]
I’ve answered that question in the FAQ section of my trowel post.
Versabond LFT is designed to install large format tiles that have at least one edge 15 inches or larger whereas Versabond should only be used for tiles smaller than 15 inches.
Both mortars meet ANSI 118.11 and 118.4. However, Versabond LFT has an additional HT designation meaning that it meets the requirements for heavy tile and won’t sag. [12,13]
Both Versabond and Prolite are products made by Custom Building Products. Prolite is a lightweight, heavily modified, large and heavy tile mortar that meets or exceeds ANSI 118.11, A118.4, and A118.15HTE.
Versabond meets or exceeds ANSI 118.1, 118.4, 118.11 (plywood) but not ANSI 118.15. Additionally, it is neither lightweight nor an LHT mortar. See terms section above for more on the ANSI ratings. It’s also less expensive than Prolite. [12,14]
Mapei Ultralite Mortar is the superior thinset compared to Ultralite Pro. While both mortars meet or exceed ANSI 118.11 and A118.4HTE only Mapei Ultralite Mortar meets A118.15HTE requirements.
Further, Ultralite Mortar has a 450psi porcelain tile shear bond strength to Ultralite Pro’s 300psi. [15,16]
This isn’t to say that Ultralite Pro is a poor thinset. In fact, Ultralite Pro is well qualified to be used in a large variety of tile installation applications.
References
- https://www.tcnatile.com/about-us/2-main-content/208-ansi-standards.html
- https://laticrete.com/~/media/press-releases/new-ansi-standards-for-thinset-mortars.ashx
- https://www.tcnatile.com/faqs/68-dryset-mortar.html
- https://www.schluter.com/schluter-us/en_US/faq/difference-between-the-ANSI-standards
- https://mapeihome.com/faqs/
- https://www.mapei.com/us/en-us/training-and-technical-service/tech-talk-blog/detail/mapei-blog/2020/08/03/can-mortars-be-used-to-patch-or-level-floors
- http://laticrete.blogspot.com/2015/05/what-is-slake-time.html
- https://en.wikipedia.org/wiki/Thixotropy
- https://www.schluter.com/schluter-us/en_US/faq/difference-between-grey-and-white-mortar
- https://www.tecspecialty.com/product-support/blog/4-ways-to-avoid-mortar-missteps/
- Schluter Kerdi and Ditra Handbooks download link
- https://www.custombuildingproducts.com/TDS/TDS-119.pdf
- https://www.custombuildingproducts.com/TDS/TDS-132.pdf
- https://www.custombuildingproducts.com/TDS/TDS-114.pdf
- https://cdnmedia.mapei.com/docs/librariesprovider10/products-documents/1_3000138-mapei-ultralite-mortar-en_ca721c84eee6486585452ddb29b06a7b.pdf?sfvrsn=6f646d5_0
- https://cdnmedia.mapei.com/docs/librariesprovider10/products-documents/1_3000135-mapei-ultralite-mortar-pro-en_2b4b71075b4345779afab9379a3912a4.pdf?sfvrsn=fcd5bcf7_0
Sources for mortars mentioned above can be found here:
- https://www.ardexamericas.com/products/tsis/adhesives-mortars/
- https://www.custombuildingproducts.com/product_categories/setting
- https://laticrete.com/en/tile-and-stone-installation/adhesives-and-mortars
- https://www.mapei.com/us/en-us/products-and-solutions/lines/tile-and-stone-installation-systems
- https://www.tecspecialty.com/products/mortars-additives/
- https://www.schluter.com/schluter-us/en_US/Setting-Materials/c/SM
