You want to install glass tile but you know that cutting it can be a challenge. Yes, more of a challenge than cutting regular old ceramic tile.
Additionally, the average DIY’er may not have the right equipment and may not know the tricks for how to cut glass tile.
But, alas, I’ve assembled some pointers on how to deal with the quirks and challenges that cutting glass tile presents. These tips- how to cut glass tile- are assembled below and demonstrated in the video (also below).
Why cutting glass tile is more difficult
What makes glass tile hard to cut is that you can see through it. Hence this makes any imperfections plainly visible.
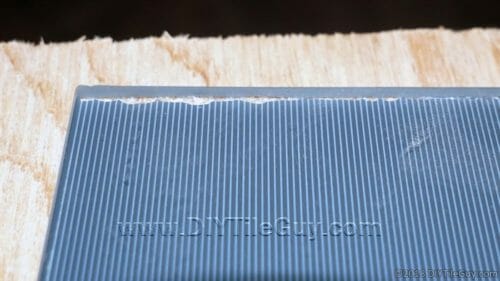
Many glass tiles are clear throughout and have a coating on the back which gives them their color. This coating can chip off and become jagged from cutting on a wet saw (tile saw). Commonly, this will show when viewed from an angle.
Below are 7 tips on how to cut glass tile. You will have to pick and choose which ones are applicable to your scenario. For example, many tile saws don’t have the plunge feature which will limit some of the options.
Additionally, many DIYers have the more budget-friendly “table saw” type tile saws and will have to adjust the concepts to fit.
For example, Tip #1: Cut the glass tile upside down will mean cutting it right-side-up on a saw where the blade comes up from below.
Bonus! Check out my bonus video at the bottom which shows a new technique not included in this video!
So, let’s get into it! Here are the 7 tips on how to cut glass tile.
How to Cut Glass Tile
1. Cut upside down
The rationale for cutting glass tiles upside down is that the glass tile blade will cut the coating on the back first. Since the rotation of the blade means that it’s entering through the coating the “blow out” would be on the glass side.
Yes, I understand that this means that the front side of the glass will have the rougher of the two cuts. But if the front side can be sanded, or filed down, so that it’s smooth then this will provide a better-looking cut.
If you’re cutting glass tile that is a solid color with no backing you’ll want to ignore this technique and cut it the “normal” way.
Thinset Decoded: Which Thinset to use | Infographic
2. Don’t drag the rolling saw cart back through the glass tile after cutting
This is a similar concept as above. The more that the blade comes into contact with the coating the more likely you are to chip the coating and have flaws show through to the front of the tile.
When cutting glass tiles, it’s common to push the tile through the saw blade and then pull it back before shutting the tile saw off. But, using this technique, you would only push it through and then turn the saw off and/or separate the tile before pulling the rolling tray back.
This prevents the saw blade from coming into contact with the glass tile and helps to prevent further chipping of the glass.
3. Use a glass blade
It’s common for people to think that a glass tile blade is simply slick marketing. Oftentimes, people wonder whether, or not, a glass blade is necessary.
Well, I’ve tried cutting with and without a glass tile blade and I will vouch for the usefulness of a glass blade for cutting glass tiles.
It’s absolutely true that you may not need a glass blade for your purposes. A regular porcelain tile saw blade will cut glass tile and some even do a pretty nice job with it.
However, my personal experience is that a glass tile diamond blade does a nicer job than a regular tile saw blade. Glass tile blades have finer and softer diamonds that make for a smoother cut.
Hence, it will take longer to push the tile through the saw with a glass tile blade but the results are usually for the better.
What kind of grout do I need? Stain Proof edition
Let me throw a disclaimer in here: As always, your results may vary and will depend on which material you are cutting and which glass blade that you’ve selected.
Glass tile blades can be priced anywhere from inexpensive to $300+. Currently, the most expensive blades are resin-based and produce good results but are usually quite finicky, wear out quickly, and are fragile.
4. Cut beginning and end before the middle
This technique not only works for cutting glass tile but will work with any porcelain or ceramic tile. If you find that you are having an issue cutting through the tile only to have it break at the end- this technique is for you!
The idea is that you start the cut, then skip to cutting the very end of the tile- closet to yourself. Finish by cutting the middle.
Typically, when cutting a tile, the blade puts a bit of stress on the tile- which can lead to uneven chipping of the tile at the very end of the cut. By cutting the end before the middle you can reduce the stress and better control how, and more importantly where, the tile breaks.
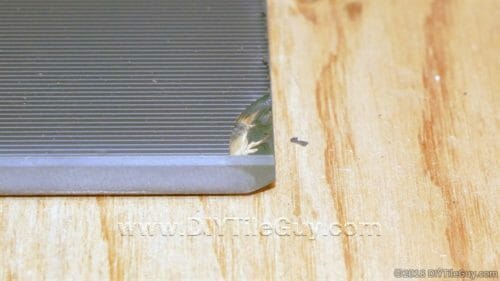
It’s not unusual for a tile saw to cut a little out-of-square nor is it unusual to have a blade wander, or pull, in the cut. This creates pressure on the tile which causes it to break at the very end of the cut and chips the corner.
Watch the video to see how to execute this technique.
Trowel Size Matters: Which notched trowel do I use for…?
5. Score upside down; then turn over and cut
This technique produces the best and most consistent results for clean, chip-free cuts in glass tile. However, it does require a plunge feature with a tile saw.
You’ll have to set the guide (sometimes called a fence) so that you can ensure that you cut in the exact same place on the tile.
Start placing the tile upside down on the rolling cart then loosen the knob on your tile saw that allows it to plunge up & down.
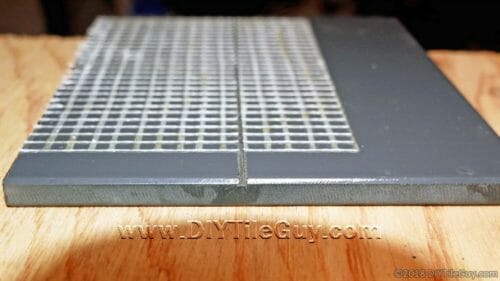
Next push the glass tile through the saw while allowing the blade to lightly score, or almost “float”, over the back of the tile. This will allow the blade to score through the coated backside of the glass tile.
Then flip the tile over and set it next to the fence again. Secure the plunge feature on your tile saw so that it’s permanently plunged.
Then push the tile through so that it cuts in the exact same place as the original score cut from the backside.
This gives a nice, clean result.
6. Score & snap
This may seem low-tech and maybe even outdated but cutting glass tiles with a snap cutter yields fantastic results! The jagged edge seen in the photo above doesn’t happen. What you’ll get is a clean cut.
However, the score & snap method has its major drawbacks: you can’t trim a sliver of glass off the edge. In general, the cut needs to be about an inch or more in width. Another drawback is the inability to cut a notch out of the tile. If you need to do anything besides a straight cut then this isn’t the tool for you.
Additionally, snap cutters are a you-get-what-you-pay-for item. Good score-boards can run as much, or more than a tile saw. And they don’t even have a motor. Nonetheless, these are a good option for limited uses.
7. Round your notches
It’s almost inevitable that you’ll have some sort of notch cut to make. Especially if you are installing a kitchen backsplash. Trying to navigate through the myriad of cabinets, windows, and outlets makes for plenty of notched cuts.
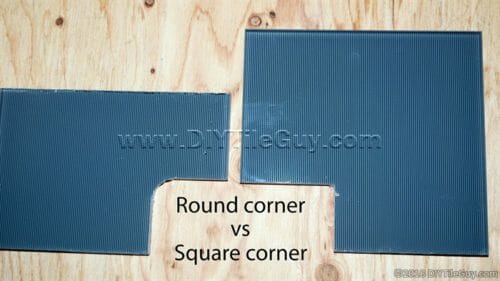
The problem is that a notch, or L-cut, is a crack waiting to happen. I would encourage you to avoid these types of cuts if possible. But if an L-cut (or U-cut) is necessary my advice is to round the inside corner(s) as much as possible.
A squared 90 degree inside corner is highly likely to crack. Any flexing of the wall makes that corner a weak point. It may not crack when it’s installed but it oftentimes will crack down the road.
Rounding the inside of the notch isn’t guaranteed to prevent a crack but it does lower the chances of it happening.
Bonus Video
The above video shows a combination of techniques that were all required to get a good cut with the particular glass tile that I was cutting.
So that’s my 7 tips on how to cut glass tile. If you’ve got some tips for cutting glass tiles that you want to share please leave them in the comments.
vince says
good info, how do you round the notch ? I have an idea but would like to hear what you have to say. Thanks
DIYTileGuy says
There are a couple of different ways of doing it but to round the inside corner of a tile with a wet saw you have to hold the tile in you hand and put the corner right up to the saw blade.
It should be mentioned that this isn’t the way a wet saw it meant to be used although one might be surprised how commonly it’s done.
It should also be mentioned that a wet saw for tile is much different than, for example, a wood chop saw and this “technique” will probably put you in the hospital if you try it with the latter saw.
They also make small 4 inch glass blades for handheld grinders, specialty diamond bits that mount in drills, and tile nippers that could also accomplish a rounded corner.
D. Rodgers says
Dremel tool with a diamond blade…grinds like a champ…can polish the edge of a glass tile with it also…not recommending, just saying it has worked well for me…wear face shield and particle mask…no need to lose a eye or inhale powder glass.
jerry says
Using a drill bit meant for glass, first drill a hole in the inside corner of the area to be notched. Then use the tile saw to cut each side of the notched are that you want to remove. The drilled hole leaves you with a radius on the inside corner of the notched area, which will be less likely to crack in the future.
Darla Gaylor says
I wish I had found this before I did a white glass subway backsplash for a client!
I knew some, but not all of this. My previous experience with glass had only been in mixed mosaics. After the subway tile, I vowed to never do another glass anything again. I just don’t have the patience! Had to use my grandma (Skil table top) saw with a glass blade & a dry cutter (score & snap), which was a God send, when it could be used. In the end, however, I just decided there wasn’t enough money to induce me to set a product again that took me 3 minutes to rip cut through 6″… And I had to do that for every piece directly under the cabinets.
Thank you so much for sharing your knowledge!
DIYTileGuy says
Thanks for sharing your experience.
Matthew Behlen says
In regards to step 6 (score and snap): Is there a way to get rid of the sharp edge that’s left over, and still maintain a consistent looking finished product? I haven’t personally done a lot of glass, but the few times I tried the score method it left a sharp edge that I wasn’t particularly pleased with. I think if I can give it a few dozen more tries, I’ll be able to add this as a service. Thanks for the informative post.
DIYTileGuy says
You want to ease the edge with a diamond pad. You may even want to use several different grits and polish the edge similar to the factory edge. If you have a variable speed grinder and a polishing set up it works great for this
Sean says
I have experimented with this method… Brushing super glue on the colored foil on the back of the tile, prior to cutting. I’ve found that with many glass materials it reduces back side chip out significantly. It’s not perfect, and works better with certain materials than others. Used in conjunction with some of these other methods, I usually won’t switch to my glass blade unless doing a lot of glass… Switching blades back and forth takes time, and setting up a second saw takes space I usually don’t have
Thanks for the tips
DIYTileGuy says
Good input! I’ve heard that some paints will work but haven’t experimented too much with that sort of thing.
ulli thompson says
Subway Tile glass shower 3×9 is being installed tomorrow
my tile guy says the tile can be butted together and there are no spacers needed
the tiles themselves have no spacers built in
he says the grout lines will still show
im worried he doesn’t know what he is talking about
DIYTileGuy says
Minimum grout joint is 1/16th of an inch. If the manufacturer says it’s ok to go tighter then maybe you choose to do that. Otherwise, no way.
MRD says
Id like too know how that turned out Also…NO grout line, …????….Mainly grout lines , other than decorate, view are for expansion……????
Steve says
Looking for advice to cut glass tile in backsplash. We need to cut a larger opening from a single gang outlet box to be able to install a double gang outlet box. I’ve seen angle grinder and dremmel advice.
Any thoughts? Angle grinders using a diamond wheel or dremmel using glass cutting wheel
DIYTileGuy says
I would use the angle grinder with a glass tile blade on it. I’ve also seen a diamond hole bit used and two holes drilled. What’s nice about that is the angles stay rounded as opposed to square.
Steve says
Thanks! We did get it done this past weekend. I ended up using a diamond wheel on Dremel for cutting the tiles, a composite blade for cutting some of the reinforcement and even took a stab at the angle grinder, but it was throwing up too much dust. I ended up cutting the mortar and backer with a recip blade in a single handle tool…old school.
DIYTileGuy says
Good! I’m glad the Dremel worked. It doesn’t work on a lot of tiles but it’s a nice tool for the ones that it works on. Thanks for following up!
Christopher Brown says
Awesome video on glass cutting! Thanks! I’m planning on doing a 4×12 white subway 1/2 off-set glass wall installation in a 30x60x30″ shower wall surround w/ a pre-fab shower pan. I’ve previously done an entire bathroom and backsplash in ceramic and porcelain tile so I’ve got some good experience with tiling. I’m real concerned about the fragility of glass and don’t want it to break after installation. I’m using Wonderboard Lite which is 7/16″ with Redgard membrane.
My framing on the side walls will be completely rock solid with 4 vertical studs total (2 centrally spaced 10-13″ o.c.) with plenty of horizontal blocking in between. The existing back wall is a firewall in (new construction) with doubled, side by side 2×4 vertical framing 16″ o.c. covered with a sheet of 5/8″ drywall. Over this drywall, I’m planning on screwing 7/16″ Wonderboard Lite on which I will set the tile.
Some questions for you:
1.) Do you think my back wall be strong enough for glass?
2.) Should I additionally a.) glue or b.) thinset my Wonderboard to the dry wall for added strength for the back wall?
3.) I plan 1/8″ foam rod and silicone expansion joints at all tile corners and perimeters top and bottom. Do you think I’d get a more flexible expansion joint if I DID NOT fill the backer board corners with thinset but instead with foam rod and then mesh tape and then a thin layer of thinset followed by Redgard ? I realize this decreases strength and may threaten moisture barrier at the inside corners.
4.) Can I cut glass 4×12″ tiles without a plunge cut wet saw? This tile will have a white backing almost opaque. I could always get a glass blade. Do snap cutters work well for glass? Can they cut slivers off the short and long ends or do I need a wet saw for that?
5.) For glass what are your recommendations for thinset and grout?
DIYTileGuy says
The back wall sounds like it’s built well enough for most tile installation, including glass. With the double layer drywall, I’ve thinset the backer board layer on before. But I really don’t know if that’s recommended, or not. It might be a good question to ask Custom Building Products (makers of Wonderboard Lite) to see what they think.
I’m not really clear on how you are intending to use the backer rod. Backer rod is intended to fill the corner after tile is installed. The backer board corners should mesh tape installed with thinset over them followed by Redgard over that. That’s as per Wonderboard Lite installation instructions. At the tile layer, however, there should be backer rod installed in the corners with 100% silicone installed over that.
The plunge feature isn’t required to cut glass but it is nice to have. I would definitely use a glass tile blade and you might experiment with cutting upside-down vs right-side up. Sometimes one way will work better than the other.
Snap cutters work excellent for glass tile. But you get what you pay for. The cheap cutters at the box stores are nearly worthless. Even the best cutters won’t cut 1/4 inch off the edge typically. Also, no notch cuts with a snap cutter. So, if you need one saw, a lot of times a power saw would be the way to go.
Check the instructions for your glass tile. Some of them have instructions with specific product recommendations for grout and thinset. Otherwise, the glass tile thinsets and some of the really strong thinset mortars, like MegaLite at Home Depot, are typically fine to use. You’ll probably want to use non-sanded grouts for most glass tile installations. Permacolor Select NS is my favorite non sanded grout.
Christopher Brown says
Thanks for the feed-back! What I meant with the inside corners on the backer board was to not fill them with thinset so I have 3 movable planes on the shower surround to help ensure no breaking pressure on the glass tile. I’d fill the corner voids of the backer board with foam rod and put tape over the corners and then a thin coat of thinset to form a foundation for the Redgard. The inside corners of the tile would receive the foam rod and silicone caulk as you instructed. This would extend the expansion joints all the way through from tile to stud. Just an idea. Wonderboard recommends completly filling joints with thinset and taping.
Do you think this is crazy? Should I just follow Wonderboard’s instructions?
Christopher Brown says
Thanks for all of you help! I have a couple more questions on my glass 4×12 shower surround install.
1.) Do I need a glass blade on my snap cutter?
2.) Wonderboard recommends sleepers (does this mean 2x4s turned width-wise?) to support backer edges parallel to the joints. They also make the statement that, “It is recommended that blocking be installed between the studs to support the ends of the backerboard.” I understand that free board ends need additional blocking support when parallel to the studs, but what about free board edges that run perpendicular to studs set 16 o.c.? That seems like it might be over-kill, even for a glass tile installation. What do you think?
3.) The tile manufacturer recommends a grout release applied to my polished glass tile before installing. Two questions here: Is that an unusual recommendation because I thought polished glass would make grout removal easy, not requiring a release application? Second— with a grout release unavoidably getting into the edges of the tile during application, won’t that impede grout adhesion later?
DIYTileGuy says
Either way should work. It’s two schools of thought. Usually, not filling with thinset is the way to do it but if the instructions specifically say to fill then obviously that is a legitimate option.
DIYTileGuy says
No, to the glass blade on a snap cutter. For cross blocking, it’s probably a good idea to block the seams on Wonderboard specifically for a glass tile installation. I think it’s overkill for most porcelain tile but it’s not a bad idea for glass.
Finally, I’ve never heard of grout release being used prior to installing tile. I don’t even know how that would work However, I have a hunch they are referring to a sealer being applied. If this is the case, I would look into a water-based sealer being used for that purpose. My favorite water-based sealer is Sealer’s Choice Gold (affiliate link). Make sure you test it first as that’s a bit of an unusual requirement. You may find that glossy glass tile doesn’t require a sealer prior to grouting.