Subway Tile Installation: Three Basic Tips
Subway tile- what’s not to like? It’s classic and timeless. Even in 2024, subway tile is a staple in tile design trends.

In this post, I will talk about three things that can help to get you started with your subway tile installation. These things will work for any application, whether it’s a shower, bathtub, or kitchen backsplash.
Ceramic Subway Tile: 3 Pro Installation Secrets
Layout Lines
When it comes to laying out subway tile, I always draw two vertical lines – one for each offset row.
If I were to tile the back wall of a shower or a kitchen backsplash with subway tile I would generally start with a vertical centerline.
Then off of the centerline, I would draw the offset line. So for a typical 3×6 subway tile, these two lines will be 3 inches apart.
However, for 3×6 subway tile, I usually draw the lines either 9 or 15 inches apart. Why? So I can get a trowel in between the lines.
This allows me to trowel thinset on the wall without covering up the lines with the mortar. You can draw your lines 3 inches apart but you’ll have to back butter thinset on half the tile before you install it.
Further, if your centering layout just isn’t working out then check out my post on quartering tile layout. That might be just what you need to make your subway tile work out properly.
Finally, if you want a real challenge, consider laying them out in a herringbone pattern.
Bullnose Trim for Subway Tiles
edit: As of the original writing of this post, Home Depot now carries the “Restore” line which is exclusive to their store. I compared tiles from each line and found the shading to be slightly off which means it’s probably not a good idea to mix & match them any longer.
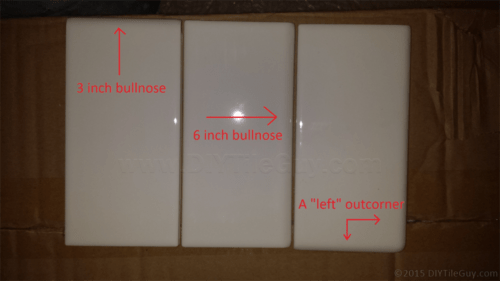
Many people buy their white 3×6 subway tile at big box stores where the trim options can be limited. For instance, the 3×6 subway tile that Home Depot carries only comes with trim tile in a 2×6 bullnose tile and a 2×2 out corner.
However, Daltile makes some other options (“Trim” tab at the bottom of this page) in a similar 3×6 white tile (color 0100).
They make a 3×6 tile where the three-inch end is bullnosed. They also make a 3×6 tile where the six-inch side is bullnosed.
This allows you to keep the pattern going out to the edge of the wall rather than break the pattern with a 2×6 bullnose tile.
Tired of Bullnose Tile Trim? Here’s 5 Tile Edge Trim Alternatives
I don’t think Dal sells to the general public so you’ll probably have to order from a specialty tile store or maybe special order from Home Depot. But the 3×6 white subway tile is very popular and comes with many different trim options.
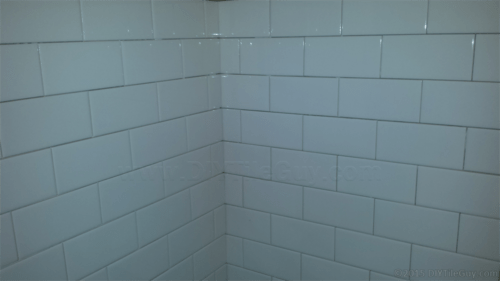
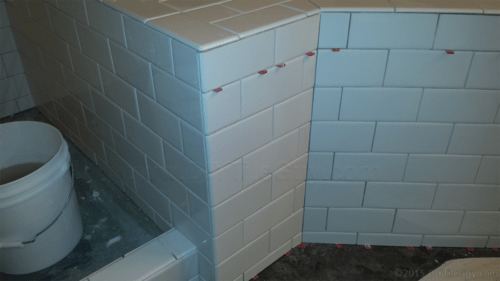
Carrying the Pattern Through a Corner
Generally speaking, when you come to the end of a wall and you want the subway tile installation to look like it “wraps”, or “folds”, onto the next wall.
A 3-sided shower for example: You would typically center the back wall so the cuts are even on both sides. Then you want the inside corner to look like the tile “continues” onto both side walls.
One way of doing this is to take the actual pieces that you cut off and put those on the next wall. Then the cuts would be exactly like the subway tile pattern continues.
Most of the time you’ll want whole/half bullnose tiles on the exposed end of the wall. So you can layout the rows so that the big tile from the end wall meets up with the small tile on the back wall and vice versa.
Lay it out ahead of time and choose whichever way looks the best. Sometimes it’s right in the middle so that neither option looks good. We’ll cover that problem in the next post.
This post is just to offer some basic subway tile installation tips. The next post will cover some pro tips for subway tiles. Let me know what questions that you have in the comments below.
Ceramic Subway Tile: 3 Pro Installation Secrets
To know how to calculate the square feet for tile needed check out this post.
