Self-leveling underlayment. It sounds soooooo easy, doesn’t it?
You simply pour the leveling cement over the floor and the product then just levels itself all on its own.
Sort of like…magic, right?
Self-leveling underlayment is not what it seems
Self-leveling underlayment is, quite likely, the worst named product in the world of tile. Why?
What I can tell you is that self-leveling for tile floors takes a good deal of planning and preparation.
I include myself in the many installers that have simply “moved lumps around.” This means that the pour didn’t go well and that we simply made a new high point in the floor without actually flattening anything.
However, there is a need for these products and they have a place. In fact, with some advancements in technology, I expect them to become more and more popular.
This post contains affiliate links. The site owner may earn a commission should you click on an affiliate link and make a purchase. Read more
Table of Contents (click to expand)
Table of contents
- Planning for a self-leveling underlayment pour
- Preparing the floor prior to a self-leveling underlayment pour
- Preparing to pour self-leveling underlayment
- Pouring the self-leveling underlayment
- After your self-leveling underlayment pour
Self-leveling underlayment has a bright future
Tile keeps getting bigger and bigger. Where a 12×12 (30cm x 30cm) used to be big now it’s quite common to deal with wood-look tile that is 48 inches long (120cm) and installed in a random offset pattern.
As a result, bigger tiles require flatter floors. Additionally, being able to use these over structurally sound wood-framed subfloors is going to increase their usage. More on this later in the post.
With this post, I’m going to share what I know. I don’t consider myself an expert at self-leveling but I have learned a lot.
And it all starts with knowing what you are getting yourself into.
Planning for a self-leveling underlayment pour
So, how complicated can it be? Why not just mix the product and go?
For starters, simply selecting the product that you want requires some consideration.
For example, I looked at the sites of Mapei, Ardex, Schonox, Uzin, and Custom Building Products and counted no less than 9 different self-leveling underlayment products on each site. On one website, I counted 16!
Some self-leveling underlayments are cementitious while others are gypsum-based. Additionally, some are rapid-setting, some need metal lath reinforcement, etc.
Consequently, each product has its own purpose. So, let’s get into why you would pick one over another.
Note: rather than spell out “self-leveling underlayment” all the time I will use the industry-accepted initials of SLU at times throughout this post.
Substrate
First things first, what is the substrate that you want to flatten?
Substrate is a technical word that refers to the surface that is being built over. Typically, it will either be concrete or wood.
If it’s wood, it should be either plywood or OSB if you are planning on pouring an SLU over it.
The second thing to determine is what flooring, if any, will you be installing on top of the leveling compound? For this post, we will obviously assume tile.
So, just having those two pieces of information will narrow down the choices quite a bit.
Concrete
Having a concrete subfloor opens up the most self-leveling underlayment choices and that means more affordability, as well.
Below is a list of widely available self-leveling underlayment products that can be used over concrete. I consider them to be widely available because they can be purchased through many of the retail hardware store chains.
- Custom Building Products LevelLite
- Custom Building Products LevelQuik RS
- Mapei Self-Leveler Plus
- Mapei Ultraplan 1
- Tec 567 Contractor Grade Self-Leveling Underlayment
Wood subfloors
Up until recently, structurally sound wooden subfloors, either plywood or OSB, were not common to pour self-leveling over.
Lath
When it was done, you would need to install a metal or plastic lath product over the floor for reinforcement first. Additionally, there were minimum thickness requirements. Anywhere, from 1/4-1/2 inch and more.
But now they have self-leveling underlayments that can be poured over a wood subfloor without any additional lath reinforcement. Plus, they can be poured as thin as 1/4 inch and, depending on the product, even thinner.
Self-Leveling Underlayment for Wood Subfloors
Below is a list of self-leveling products that can be poured over wood subfloors. This list does not include all products in this category but these are the ones that I am aware of at the time of this writing.
These products are not readily found in retail stores and would have to be ordered in.
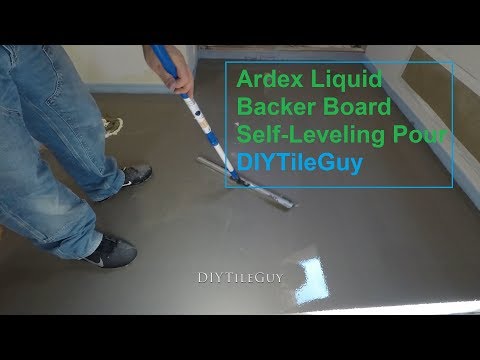
- Ardex Liquid Backerboard
- Henry’s 542 Liquid Backerboard (Ardex owns Henry’s)
- Custom Building Products LevelQuick Advance
- Custom Building Products LevelTech WSF
- Laticrete NXT Level Plus
- Mapei Planitex SLF
- Schonox APF
- Uzin NC 174
Rapid setting self-leveling underlayment
Yet another way of categorizing self-leveling underlayments. Some set up quickly and give you, maybe, 20 minutes of working time. While others can set up much more slowly.
The rapid setting self-levelers can put you under a bit more pressure as your doing the pour but the advantage is that they are ready to tile over in a matter of just a couple of hours, in some cases.
On the other hand, the slower setting SLU’s can take more than a day before they’re ready to tile.
It seems to me that most of the self-leveling underlayments that can be applied over wood subfloors are of the rapid setting variety.
Flat or Level?
Now here’s the question: Do you want your floor to be both flat and level or is it OK if it’s simply flat and maybe out-of-level?
Well, in a perfect world the answer would be “both flat and level!” But we know that we don’t live in a perfect world. Houses settle and some were never level, to begin with.
With this in mind, if you can get a flat floor then you need to consider that a win. Level is nice but flat is necessary.
However, when we get into the method and techniques for flattening a floor you’ll have a much easier time if you can set it up to be a level pour.
How flat does it need to be?
The whole reason for using a leveler is to get things flat. After all, with tile getting bigger and bigger the consequences for not having a flat floor keep increasing, as well.
It just so happens to be that there is an independent body of experts that have set the standards for how flat a floor needs to be.
The name of these standards is American National Standard Specifications for the Installation of Ceramic Tile. We’ll shorten this to ANSI for, what I think are, obvious reasons.
Additionally, there are actually two different answers on how flat a floor needs to be and they depend on the size of the tile.
Floor flatness requirements for tiles under 15 inches
If your tile is under 15 inches on all sides then here is what the ANSI standard for floor flatness is:
For tiles with all edges shorter than 15 in. (0.38 m), the maximum allowable variation is no more than 1/4 in. in 10 ft. (6mm in 3 m) and no more than 1/16 in. in 1 ft. (1.6mm in 0.3 m) from the required plane, when measured from the high points in the surface.
ANSI A108.02 section 4.1.4.3.1 Sub-floor surfaces
So, basically, it’s 1/4 inch of deviation in 10 ft. for tiles like 12×12’s, 8×8’s, 6×12’s, etc.
And what if your tiles are bigger than that?
Floor flatness requirements for tiles with at least one side over 15 inches
Here’s what the ANSI standard has to say in this case:
For tiles with at least one edge 15 in. (0.38 m) or longer, the maximum allowable variation is no more than 1/8 in. in 10 ft. (3mm in 3 m) and no more than 1/16 in. in 2 ft. (1.6mm in 0.6 m) from the required plane, when measured from the high points in the surface.
ANSI A108.02 section 4.1.4.3.1 Sub-floor surfaces
So, if you are installing 12×24’s, 16×16’s, 6×24’s, or other large format tiles, then you’ll want your floor to be within 1/8 inch in 10ft. That’s a pretty flat floor!
Well, at least you know what you’re shooting for with your self-leveling underlayment pour so you can plan accordingly.
Special Circumstances
Before we get into the next section, I want to quickly address some circumstances that are important but are out of the scope of this already-lengthy post.
Pouring over existing flooring
There are reasons to pour self-leveling underlayment over existing flooring. It might be attached to the concrete really well, it might be a commercial application where this is the decision, or maybe it contains asbestos.
If you find yourself in this situation, I recommend you contact the technical departments of the products that you are working with and get some guidance from them on how to handle things.
Asbestos
This is always a tricky one. If you find yourself in a situation where there is older flooring it’s important that you get it tested and find out if it contains asbestos.
A lab can oftentimes have an answer for you within 24 hours and it’s not even that expensive to do.
If you find out that the flooring does, indeed, contain asbestos then you won’t be able to just rip out the floor. You may have to hire an abatement company.
Link to information on Asbestos from the Environmental Protection Agency.
However, many manufacturers have special primers that will allow you to go over non-standard, troublesome substrates without removing them.
Examples of these products are:
Please contact the manufacturers to find out how to proceed without removing the existing flooring.
Moisture
Moisture can cause problems for self-levelers and if you have some issues in this regard then you’ll have to do some additional research on how to proceed.
If you are tiling a basement floor or are in an area with a high water table then you’ll want to make sure that you are doing things the right way.
A lot of times there are products recommended for sealing moisture prior to self-leveling a concrete floor.
You’ll have to perform a couple of tests and see what you are up against. Again, this type of situation is outside the scope of this post.
Preparing the floor prior to a self-leveling underlayment pour
Hopefully, you now have an idea of what products to choose for your application. Now we are going to take our focus to the actual floor that you want to flatten and prepare accordingly.
Cleaning the floor
For starters, every self-leveling product requires that the floor be “solid, structurally sound, load-bearing, clean, free of oil, wax, paint, grease, asphalt, and other contaminants that might act as a bond breaker.”
All of the manufacturers have a way of saying that exact same thing. So what does this mean for you?
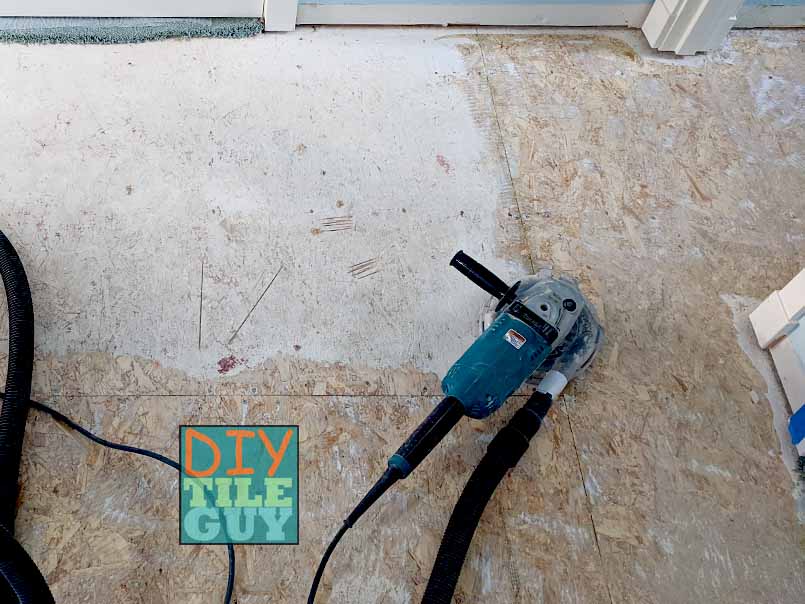
Grinding
The best way of preparing a floor to accept a self-leveling underlayment is by grinding the surface. I grind the surface of nearly every floor that I tile.
No matter if your floor is wood or concrete, there is going to be paint, drywall compound, and whatever else on the surface.
Plus, it’s really important that the leveling compound bonds to the substrate.
Simply going over the floor with a grinder is going to help ensure that the two surfaces bond like they are supposed to.
Floor grinding tools
Depending on the size of the floor, there are different size grinders. On large commercial jobs, they have ones that you can walk behind or even drive around.
But most DIY’ers are going to have smaller floors to grind. Here’s what I use:
- Electric circular grinder (7-inch, or 4-5 inch)
- Grinding disc (7-inch; 4.5 inch)
- dust shroud (7-inch; 5-inch)
- Vacuum
- Dust Deputy
I understand that as a DIY’er you’re not going to have all of these specialty tools. Especially, the dust control measures.
The good news is that many more places nowadays are renting them out because of the recent tightening of laws in regards to both lead paint and silica dust. So check with your local tool rental stores first.
You might also consider that some of these tools will have multiple uses. For example, a 4-inch grinder with a diamond blade is a must-have tool in every tile installer’s toolbox. In fact, most tilers carry more than one.
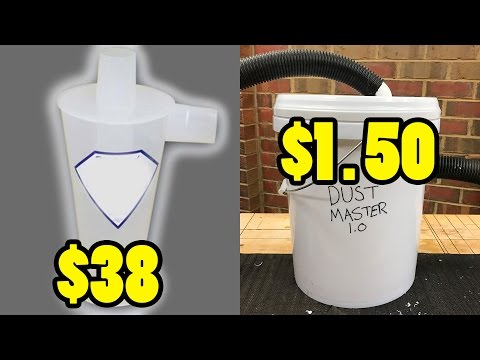
DIY dust shroud
In the event that you can’t rent the proper dust equipment, some have turned to making their own dust shroud for a grinder.
Here’s an example of a guy that made one for under $5.00 using a Tupperware lid, pipe insulation, and duct tape.
Keep in mind that you still need to wear a dust mask and proper protective equipment.
DIY dust collecting cyclone
Just like you can make a DIY dust shroud you can also make a DIY dust collector
The reason for the dust collection is because it keeps the filter in the vacuum from frequently clogging and filling the room with dust.
So, I’m featuring this video below that shows how to make a DIY dust collector. I actually like the one that Chris Notap makes better but it is more work and more parts.
Electric Sanders
Electric sanders are another option but more geared towards wood subfloors. In fact, I used to use a belt sander before purchasing my dust control equipment.
You’ll want to use very coarse sandpaper in the 30-40 grit range if you can find it.
A simple test
Here’s a very simple test that you can perform that will tell you if your floor is ready to accept a self-leveling product over the top of it.
Drip some water over the floor and see how quickly it absorbs into the substrate. If it takes a minute or longer then it’s not ready.
Here’s a video from my Instagram that shows this process. Sorry, Facebook doesn’t allow these videos to be embedded in the post any longer:
If it absorbs quickly then it’s time to move on to the next step
How to treat seams and cracks prior to a self-leveling pour
Before a pour, it’s important to treat cracks and seams prior to self-leveling.
As a side note, I was disappointed with how vague some manufacturers were/are on this topic. I don’t know how it helps their customers to have their lawyers write the instructions.
Concrete
For cracks in concrete, most manufacturers will want you to fill the crack with a floor patch product prior to pouring your SLU.
It should be mentioned that self-levelers are not a crack-isolation solution. So if you have cracks that you would normally treat with a crack isolation membrane then that should now be done on top of the self-leveling layer.
Furthermore, any control, movement, or cold joints will still need to be honored all the way up through to the tile.
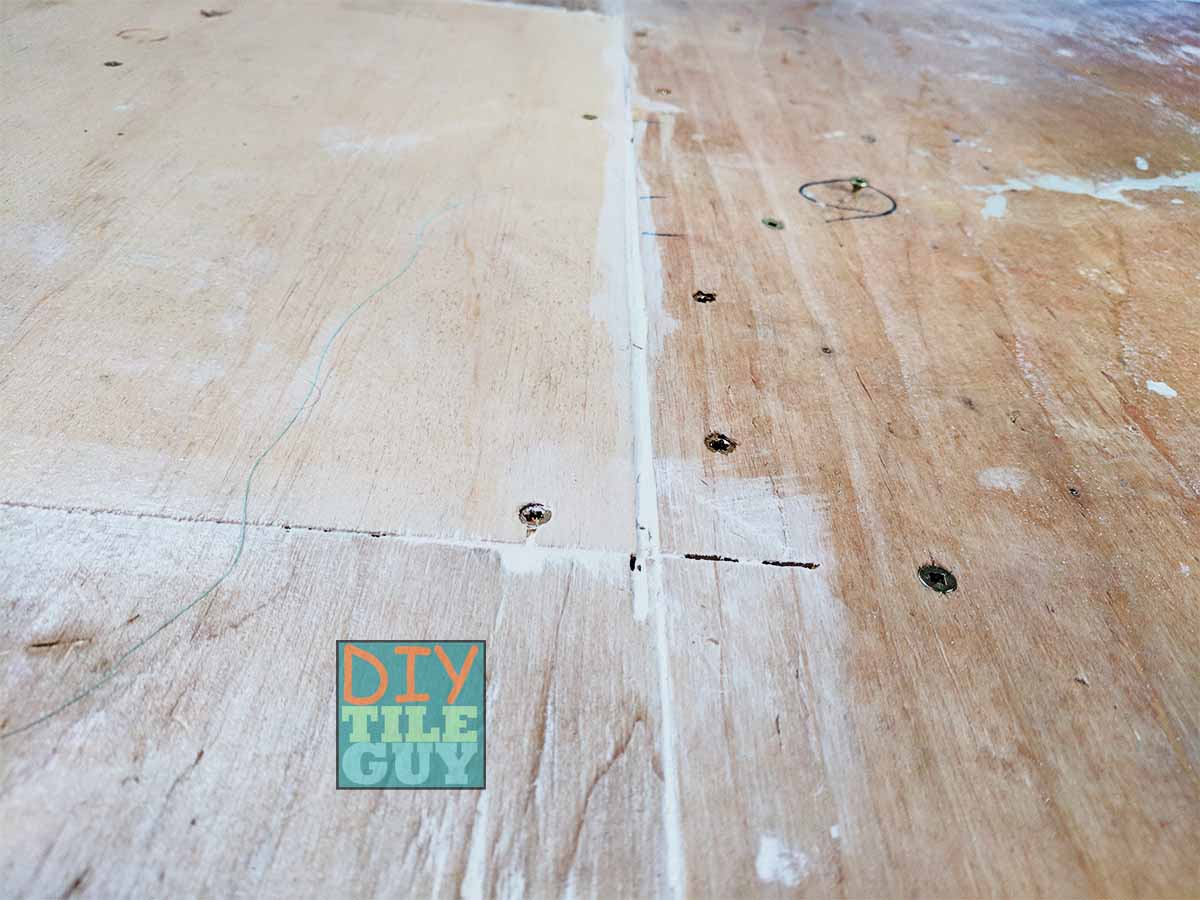
Wood
Seams in plywood, or OSB, should be filled the way the SLU manufacturer specifies. Some manufacturers want them filled with a floor patching compound while others want an acrylic caulk.
Keep in mind, if you have a wood-plank subfloor you need to have plywood installed over the top of it.
Under no circumstances, should you be sealing the seams and pouring SLU directly over the top of the wood planks.
Toilets, vents, and other holes and gaps
Look around for other holes and gaps. If you don’t find them the self-leveler will.
Around the toilet flange is a common culprit for SLU to leak. Additionally, heat vents are always tough to seal around.
One way to handle these is by using spray foam to seal around these areas. Spray foam is easily available but can have a bit of a learning curve if it’s something that you aren’t used to.
Another option is to purchase a specialty product like these circular toilet seals from a company called Edgeban. They are designed to seal around the toilet flange and keep self-leveler from flowing under, or over, the toilet flange. Additionally, this company also makes one specifically designed for heat vents also.
I really can’t stress this enough. Any hole, crack, or gap that remains will be seen in the self-leveling layer. If it’s small then it shouldn’t be a big deal. But SLU will run down larger holes much like water would.
Years ago, my friend and I were pouring self-leveling over some heat wires and didn’t realize there was a hole around the toilet flange. The SLU ran straight down onto the washer and dryer that were in the basement. We never realized it until we arrived the next day and the homeowners brought this to our attention.
Some lessons are learned the hard way.
Perimeter and Doorways
If you’ve read my post “The One Thing Every Tile Installation Needs: Movement Joints” then you’ll understand the importance of perimeter movement joints.
Not only do we need this movement in the tile layer but we also need it down at the underlayment level which, in this case, is the self-leveling layer.
After all, what good does it do to allow your tile to move when they are installed over an underlayment which can’t move?
So here are a few different ways to ensure movement around the perimeter of the room:
- Spray foam: Just like above, you can spray a line of spray foam around the perimeter of the room.
- Sill Seal: Found in the window & door section of the hardware store, sill seal is economical and simple to install. Just staple it to the wall and/or floor around the room to provide a barrier to the SLU from running all the way to the wall.
- EdgeBan: This company, mentioned above, makes a product for going around the perimeter as well.
- Edge Strip Kits: Another product for going around the perimeter of the bathroom.
Both of the last two companies that I mentioned were started by fellow tile contractors.
All of these products above can be used as a dam across the doorways also although the sill seal can be more challenging to install over concrete.
Mapping out your floor prior to self-leveling
Now that you’ve sealed everything off it’s time to start figuring out how bad the floor is and what you have to do to it to make it flat.
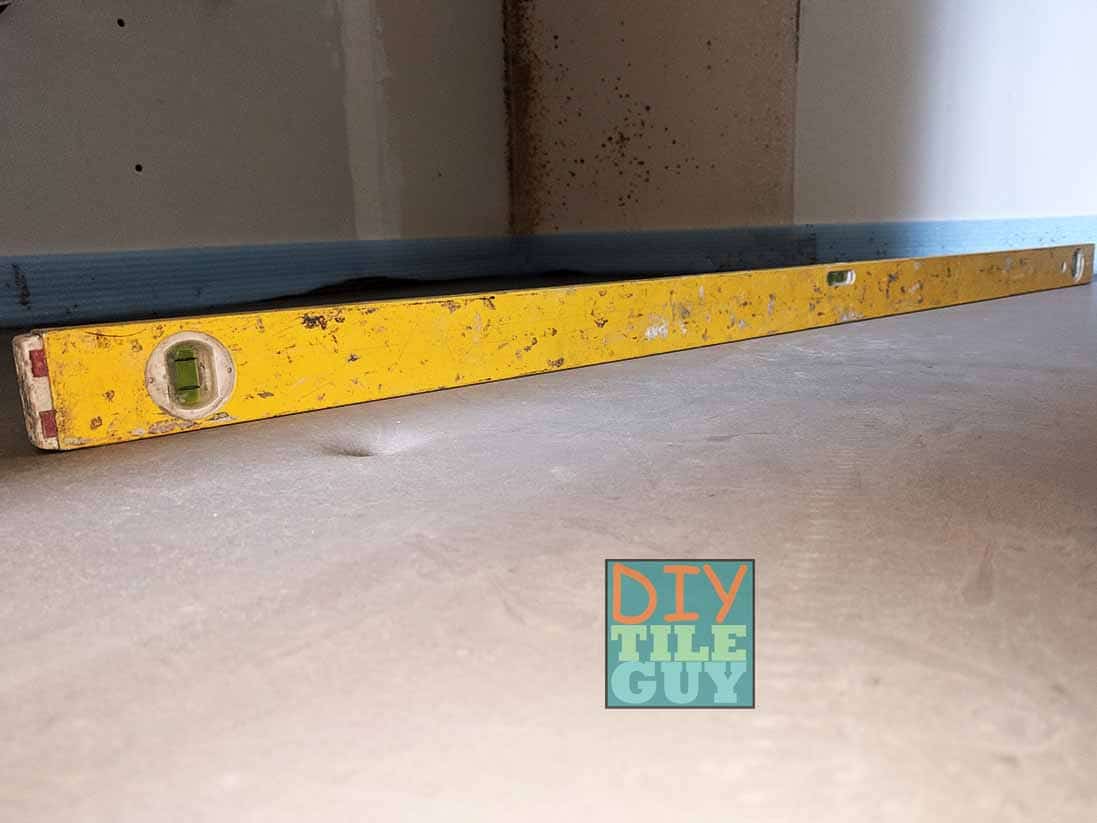
First, locate the high point in the floor
This all begins by finding the high spot of your floor.
The easiest way of finding the high spot is to use a laser and measure from the floor to the laser line. The shortest measurement wins.
Another way of doing it is to use a longer level, or straight edge, to find out where the humps are.
Once you figure out what spots are high and where they are in the room you’ll then be able to determine if your goal is to have a flat and level floor, or simply one that is flat.
Flat or flat and level?
Back to this question again.
What determines whether you can make your floor level is:
- Where the high point of the floor is in the room
- How bad the floor is in terms of flatness
- The thickness of the material in the adjoining room(s) that you are wanting to meet up with
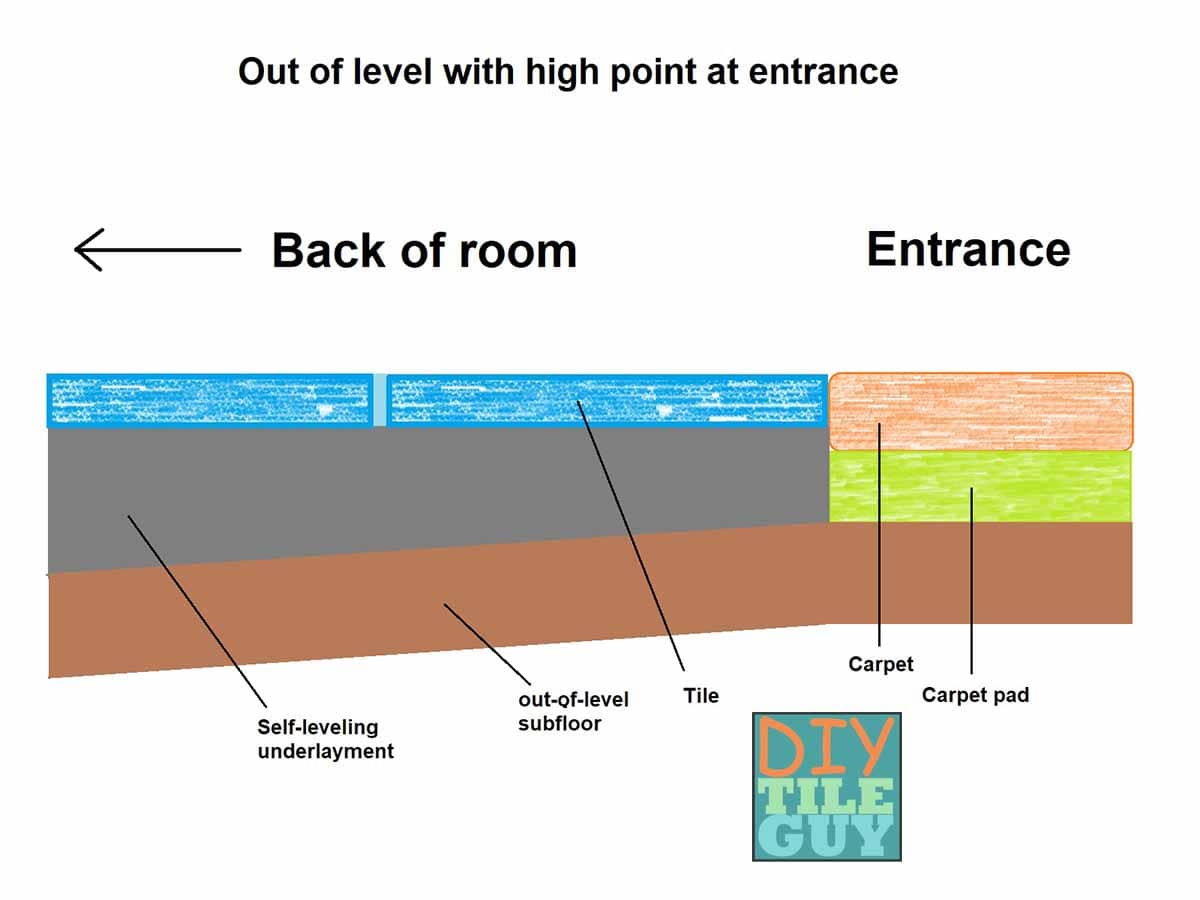
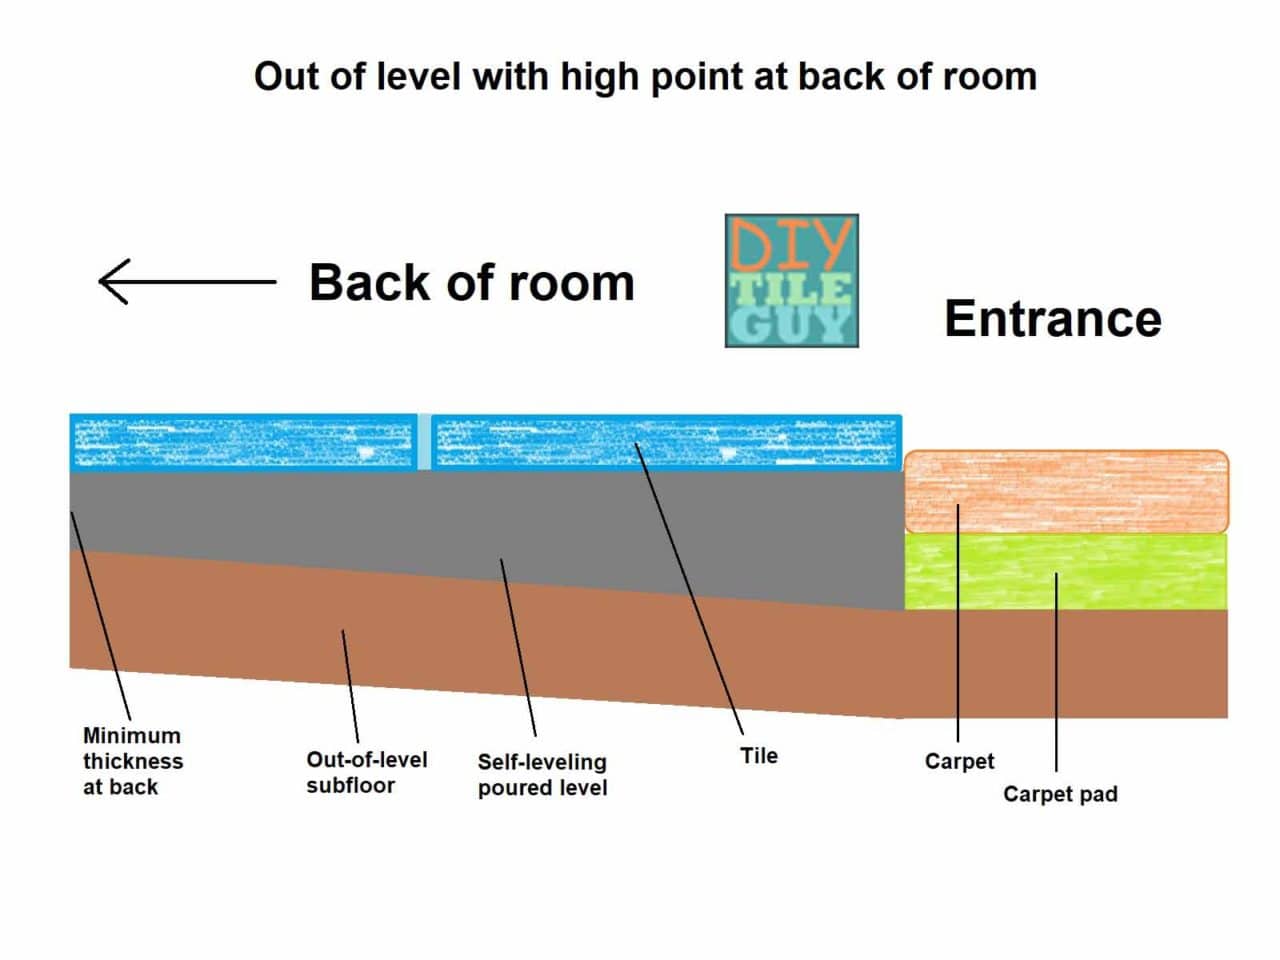
For example, take a look at the image above. You’ll have the best chance of having a level floor if your floor is reasonably flat or the high point is in the doorway.
However, If your high point is away from the door then most likely you’ll have to settle for a flat and unlevel floor.
Leveling pegs for self-leveling floors
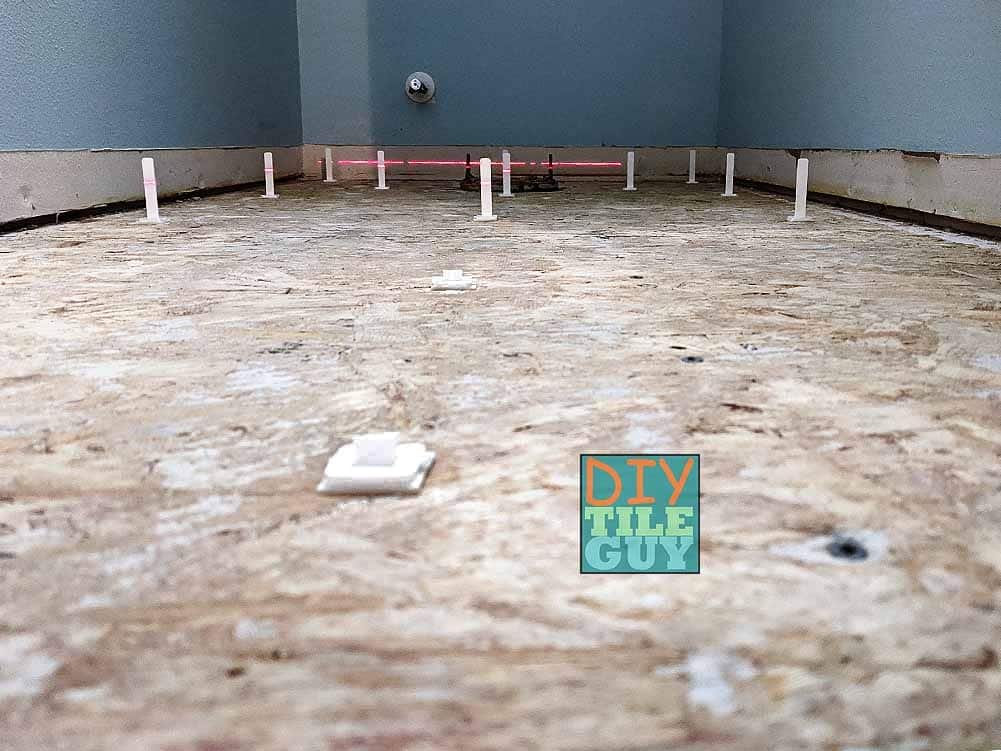
Next, it’s time to put leveling pins, or markers, over the floor and set them at the proper heights. These markers tell you how thick to pour the floor at any given spot.
Personally, I use these plastic adhesive markers. I glue them to the floor and cut them to the right height.
You can also use screws. This is the cheapest way and you can adjust them up and down if you don’t quite get them set right the first time.
However, the screws obviously won’t work over a concrete floor. You’d have to go with the plastic adhesive ones for that situation.
Where to place the pins
For starters, I like to map out the floor in a grid. I place the pins about every 18-inches apart, or so, and about 2 to 6-inches away from the walls.
The reason for setting them 18-inches apart is because that’s narrower than my smoothing tool which is about 21-inches long. That way, when I’m smoothing the floor I’m also hitting two pins with every pass.
I want to credit Jamen with Icon Tile & Design for that particular tip. It’s been useful.
We’ll get more into the different tools down below.
Setting the heights of your leveling pins
Once you have a grid and know where you’ll be placing the different pins it’s then time to set the heights. And the heights will depend on if you are leveling, or not.
Setting the height for a level floor
Like I mentioned earlier, you are going to have an easier time setting your heights if you are able to level the floor.
Start at the high point
The first pin that you set should be at the high point of the floor.
For starters, you want to know how thin your self-leveling product will go. Is it 1/4-inch? 1/8? Whatever it is, that’s how thick you want to cut the first peg.
The SLU that I usually use can go as thin as 1/8-inch. Furthermore, the base of the plastic adhesive pegs is about 3/16- thick so that’s how thick I usually set the height for.
I just cut the pin completely off and stick the base of it at the highest point of the floor.
This is, of course, assuming that you want the SLU as thin as possible over the high point of the floor. If you need to raise the floor up higher then you would set the heights accordingly.
Leveling the rest of the pins
Once you have the height determined you will then set every other peg level with that height.
The easiest way of doing this is with a laser.
Self-leveling Lasers
I’m a big fan of the PLS 180 cross-line laser. I’ve had mine for years and it’s quite durable and broadcasts a nice thin and level line. But it goes without saying that this isn’t the cheapest option either.
But a quick look through Amazon shows several affordable models including this one that is under $35.
If a laser is out of the question then you’ll have to use a level and level off of the high point of the floor.
Here are the steps I take to set the height of the pins:
- First thing is I set my laser of the floor near a wall.
- Then I take the pin that I cut off and set it on top of the high point so that it sticks straight up and down
- Next, I use a Sharpie and mark the line where the laser is. This is now your master marker. (This is seen in the gif above)
- Go to the next pin and hold the sharpie line of your marker on the laser line (gif below)
- Finally, trim the pin at the bottom of your master marker.
- Repeat
If that sounds a little confusing there is a quick video of the process posted above. It works whether you’re using plastic pins or screws.
Setting your height for an out-of-level floor
For a flat, yet out-of-level floor, you’ll still need to determine the high point and go as thin as you can over this spot.
Additionally, you’ll also want to take into account how high you can go in the doorway.
For example, let’s assume the flooring outside the bathroom is hardwood that is 3/4 inch thick and you want to have an even tile to hardwood transition.
If your tile is 3/8 inch and you need, say, 1/8 inch for mortar under the tile then that means you’ll have to be 1/2 inch below the hardwood.
So, you would then set the height of the self-leveling peg to be 1/4 inch off of the floor and that would leave 1/2 inch for tile+mortar.
If you will have a tile to carpet transition then you’ll want an overall height of 1/2-5/8 inch thick.
Setting the rest of the pin heights
Once you’ve determined the two points you’ll want to take a straight edge and set it across these two markers.
You would then trim all the markers in between these two points to be even with the bottom of the straight edge.
Furthermore, instead of a straight edge, you could use a string line. In this case, it might work better to tie the string to screws, if possible, even if you are using the adhesive pins.
This isn’t going to be easy doing it this way and I’m not going to pretend that it is. The more time you take getting the different pins lined up so they are in plane the better off things are going to go.
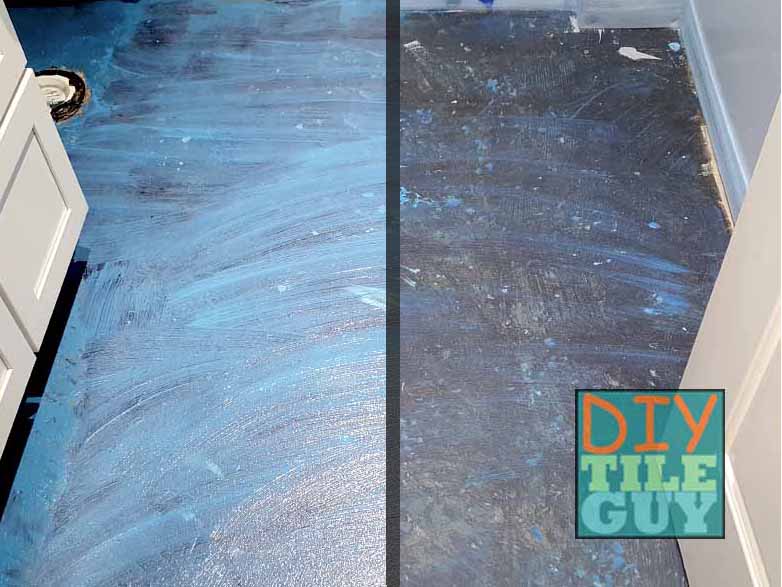
Primer for self-leveling underlayment
Finally! After you’ve got all of that done. With the filling of the holes, the perimeter movement, and setting the pin heights you are ready to move onto the next step! The primer
Yes, before pouring your self-leveling cement you will need a primer and every company has at least one that is to be used for their products.
There are almost no scenarios where you wouldn’t need a primer. Furthermore, if you don’t use one it’s nearly guaranteed that your floor is going to fail.
So, priming the floor is really important.
Read the instructions
Not only do you need to get the right primer but sometimes you need to dilute the primer and sometimes you don’t. Sometimes you’ll need to put on more than one application and sometimes you won’t.
Additionally, there are different ways manufacturers will want you to apply the primer. These can vary from a paint roller, sponge, paintbrush, broom, etc.
The self-leveling primer should completely cover the floor but not be puddling or too thick.
Once you’ve applied the primer over the floor, you’ll need to wait for it to dry. Then your floor prep is complete and it’s time to move onto mixing the self-leveler up!
Note: Pour the leveler right away after priming
It’s quite normal for manufacturers to have a time limit on when you can pour the leveler. For example, many will require the self-leveling to be poured within 24 hours of applying the primer.
Consequently, don’t put the primer on if you aren’t going to pour the SLU over it right away.
Preparing to pour self-leveling underlayment
You would think mixing the self-leveling underlayment would be pretty straightforward. However, I can tell you that you need to do some planning in this department also.
Once you start pouring, there is no going back. You’re committed and the easier you make things on yourself the better off your pour is going to go.
Time is everything!
This is especially true of the rapid setting SLU’s which many of them are. So you need to have the mixing station ready to mix bag-after-bag as efficiently as possible.
What you don’t want to happen is to pour your first batch THEN go and get more water for the next batch, THEN have to walk out to your truck and get another bag of self-leveling, and so forth.
As a result, I’m going to give you some tips on how to set up your mixing station, what tools you’ll need, and how to plan for your pour.
First up, is to plan how you’re going to get from your mixing station into the home or building.
Plan your Path
There are a few basics that you need for a self-leveling pour. They are:
- A staging area outside the room
- Mixing station
- A path between the two
Let’s start with the staging area
Staging area outside the room being poured
Once you are inside the room and in the process of pouring, you’ll need to keep some tools within reach.
Did I mention that someone will have to actually be inside the room where things are being poured? Once you are in there, it’s not easy to move in and out of the room that’s getting the self-leveling.
The tools obviously can’t be in the room the entire time because you won’t have anywhere to put them once the leveler is covering the floor.
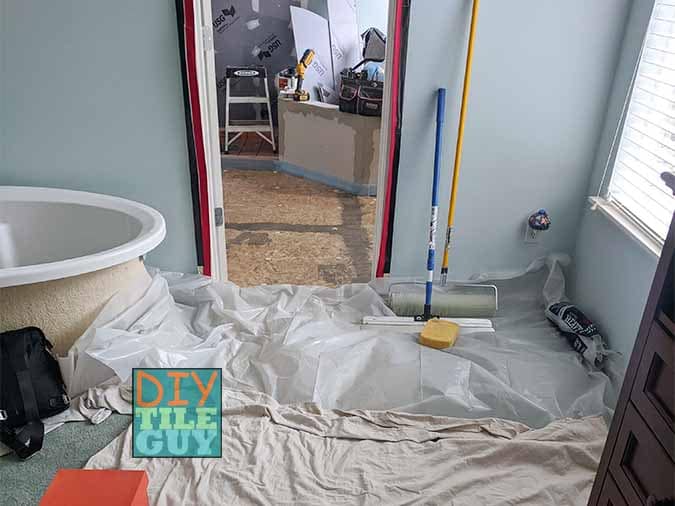
So, I always put down some drop cloths outside the doorway and then cover them with plastic.
It’s nice to have an 8ft x 8ft space for this but you’ll have to work with what you can get. A lot of times, there just isn’t that much space to be had.
You need to be able to keep the different smoothers within reach. Also, you can put the bucket or barrel down out here and it gives you a place to change your footwear. More on this later.
Mixing Station
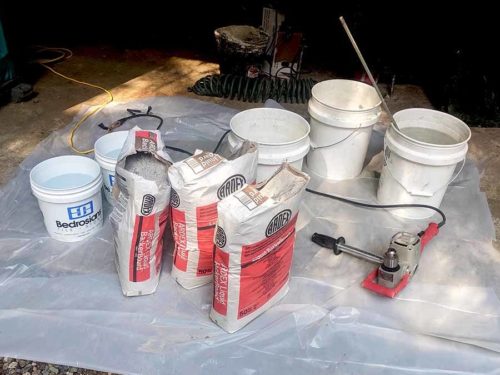
Next, you need a place to be able to mix the bags of self-leveling. This area will need to be big enough for:
- A mixing bucket(s) or barrel
- A mixing drill
- Several buckets of water
- All the bags of leveler
- A bucket of water to spin-off the mixing drill
What I do is place a tarp underneath all of those things. Keep in mind, you’ll be in a bit of a hurry and things can get just a little messy.
I think about a 6×8 tarp for smaller jobs and a larger one for larger pours.
Location of the mixing station
Ideally, the mixing station would be right outside the room that’s being poured.
However, because of dust, mess, and space, this is not often possible, especially with a renovation.
So, you want the mixing station to be as close to the pour as possible. Additionally, the amount of help that you have can factor into this. More people assisting with the pour can overcome greater distances to and from.
The path in between
You’ll have a plastic tarp down for the mixing station and plastic down immediately outside the pour. It only makes sense to have a covered path in between the two.
Anywhere that needs protection in between these two areas will have to be addressed. It’s not difficult to track things from the mixing area or drip leveler from carrying the bucket to and from.
Personally, I work in remodels on a regular basis and I usually have a completely covered plastic path between these two areas. Make sure that it isn’t slippery though.
Now that you’ve figured out where you’re mixing let’s figure out what you’ll need.
Tools for mixing self-leveling underlayment
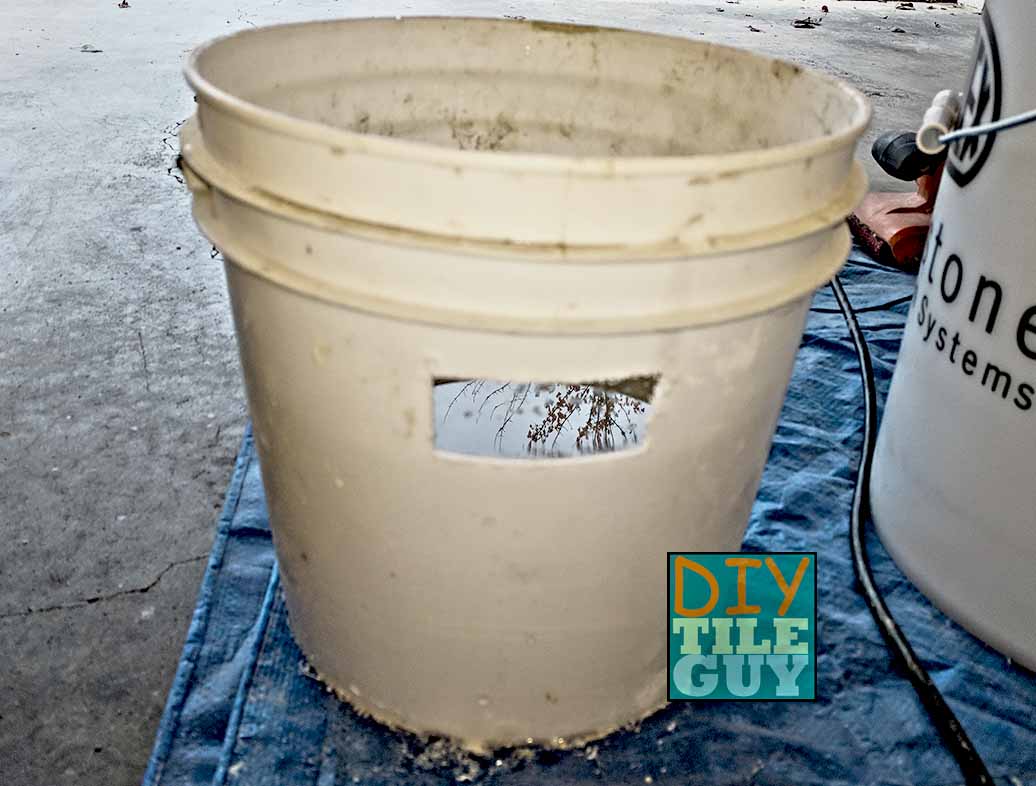
First things first, you need to have something to mix in. The typical choices are a bucket or a barrel
Mixing bucket
A mixing bucket is fine for smaller pours and pours where there isn’t a lot of help. One person can carry the bucket back-and-forth,
You’re going to want one of the heavy-duty buckets. Sometimes these are called food-grade buckets. Self-leveling is heavy and the last thing that you want is a bucket splitting or breaking on you in the middle of a pour.
If you can find yourself a 6-gallon bucket then that is what I recommend.
A full bag of self-leveler will fit inside of a 5 gallon but it will be right at the top. Also, it will overflow when you are mixing the leveler with water until you get it mixed.
If you can find a 6 or 7-gallon bucket that is the way to go, in my opinion.
Mixing bucket (barrel)
There are many mixing barrels designed just for self-leveling and they are what’s recommended by people that do a lot of this.
You can mix 2 bags at a time and pour both at once. There’s a big advantage to being able to mix and pour multiple bags that I will get into in the “pouring” section below.
DIY mixing barrels
I’ve seen some guys use a large garbage can for mixing self-leveling underlayment.
Sometimes they put the can on wheels and mix several bags at once. I saw one contractor put a PVC pipe out of the bottom with a valve to turn it on and off.
They wheeled the can inside the room and opened the valve so that the SLU came pouring out as they pushed the garbage can around the room.
So it doesn’t hurt to think outside the box when it comes to this.
Mixer
You’re going to need a heavy-duty electric mixer for this project especially if you are mixing multiple bags at once.
I’ve used a cordless drill to mix many bags of thinset but I burned up this same drill trying to mix self-leveling underlayment. So, unless you have one of the newer heavy-duty 1/2 inch drills I would stick with something corded.
I’ve had good success with this Milwaukee hole hawg and you should probably be able to rent something like this for a day. Whatever you get, it’ll have to spin at a minimum of 650 RPM.
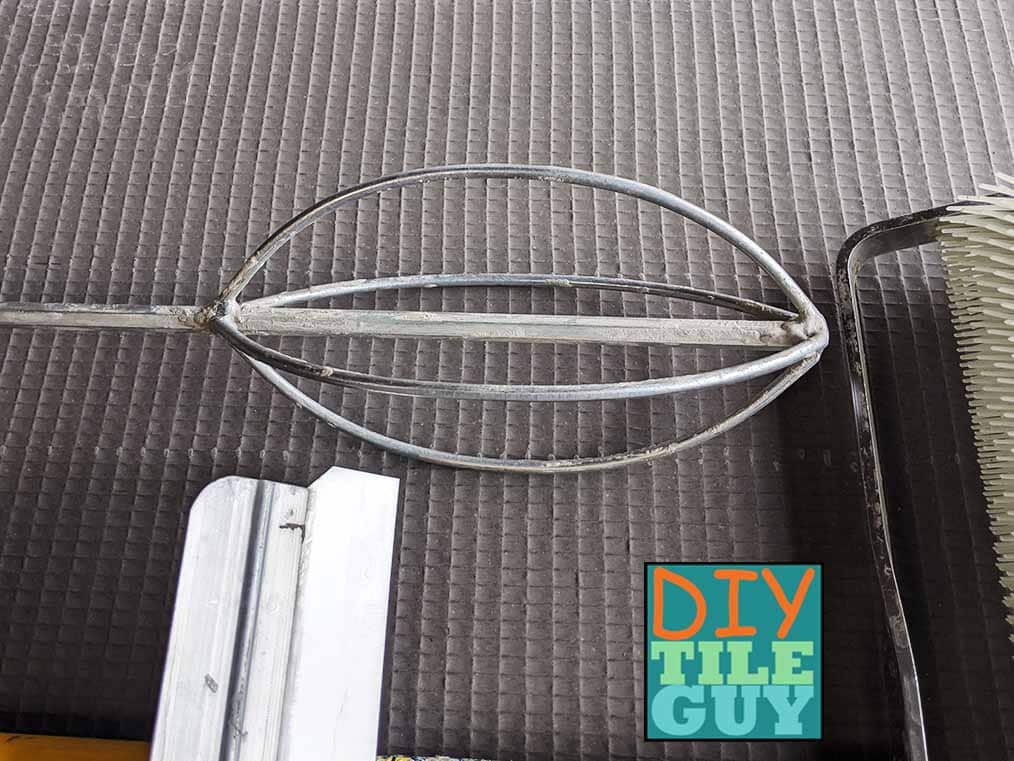
Mixing paddle
The mixing paddle is important also. The “egg-beater” style is what I’ve seen recommended and the oval shape if you are using a mixing barrel or if the bottom of your bucket isn’t flat.
These types don’t let a lot of air in while mixing. You’ll need one long enough to touch the bottom of your mixing container.
Note that this is different than the ribbon style mixing paddle that I recommend for mixing thinset.
More buckets
You’ll also need several more buckets and a measuring container for water
This covers the tools required for mixing. We’ll get into the pouring and smoothing tools later.
Set up your mixing station for success
The final thing that I want to cover for preparations is how to set up your mixing station as it’s critical that this area runs smoothly and efficiently.
It’s important that you have everything staged and ready so you don’t waste time mixing more leveler while you have part of the pour already spread out on the floor and setting up
So it all begins with the water
Prepare your water
For smaller pours, I like to have the water all ready measured into several different buckets.
For example, if I’m pouring 4 bags of self-leveling underlayment, I will have 4 buckets of water ready to go with the proper amount of water already premeasured in each bucket.
Then, as soon as I’m done with the first bucket, I bring it out to the mixing station, dump the premeasured water in, dump the bag of leveler in, and start mixing the next batch.
On larger pours, it’s more common to have a large barrel, or garbage can, full of water. Then, you want to have a designated container to dunk in this barrel that will quickly be able to figure out the correct amount of water.
One tip that someone gave me was to have a bucket with a hole cut in it so any excess water will rapidly spill out leaving you with a proper amount of measured water remaining.
Why it’s important to measure the water
What I do is find out how much water the manufacturer recommends for their leveler. If it’s a range, then I go with the high end of the range but not over.
If the leveler has bubbles, or foam, at the top then that means that too much water was added.
Too little water means that the product won’t flow and flatten out.
Basically, you want to spend as little time as possible fetching and measuring your water. The more you can save steps in this regard the better your pour will go.
Furthermore, the last thing that you want to do is add some water, then the leveler, then mix, determine it needs more water, add more water, more mixing, etc.
Doing this will give you inconsistent batches of self-leveling and they won’t flow together properly. Also, it takes more time to mix in this manner.
Prepare the self-leveling bags
In addition to having the water ready to go, you’ll also want the bags of self-level staged at the mixing station.
On a smaller pour, I will have each bag nearby with the top already cut off of the bag. As a result, all I have to do is grab the bag and pour it into the bucket.
For bigger pours, you’ll probably have the bags stacked to save space but they need to be nearby and, hopefully, you’ll have the manpower so that you aren’t waiting for the bags to be readied.
Watch the temperature
One final thing to account for is the temperature. You can’t have the bags sitting out in the sun getting hot as this will cause them to set up even more quickly.
So keep the bags out of the sun and away from heat vents, etc. The same goes for monitoring the temperature of the water. You want clean and cool water for your mixing station.
Pouring the self-leveling underlayment
Finally, you’ve cleaned your floor, plugged any gaps and holes, figured out the heights that you want to hit, and have a way to mix and transport the self-leveler into the house, or building, quickly.
Let’s go over the tools that are used to gauge and smooth the self-leveling underlayment out.
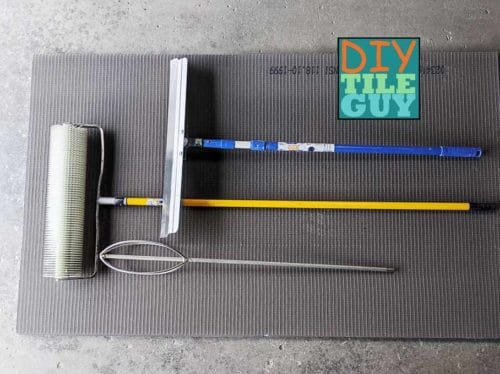
Tools for smoothing and gauging self-leveling underlayment
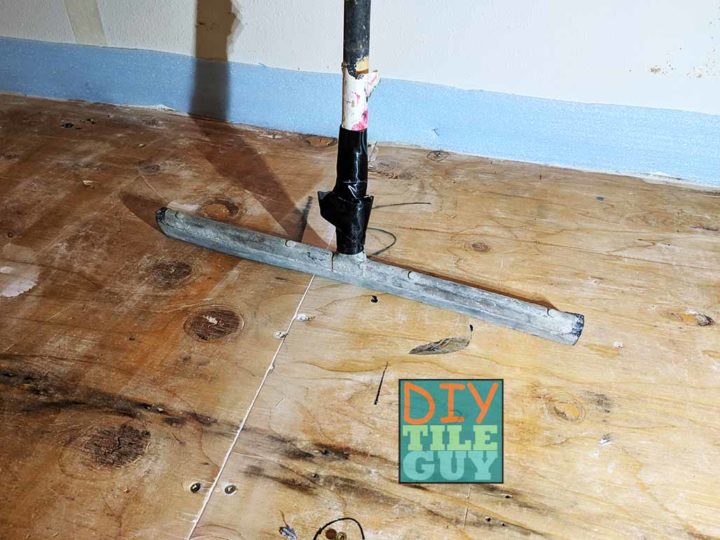
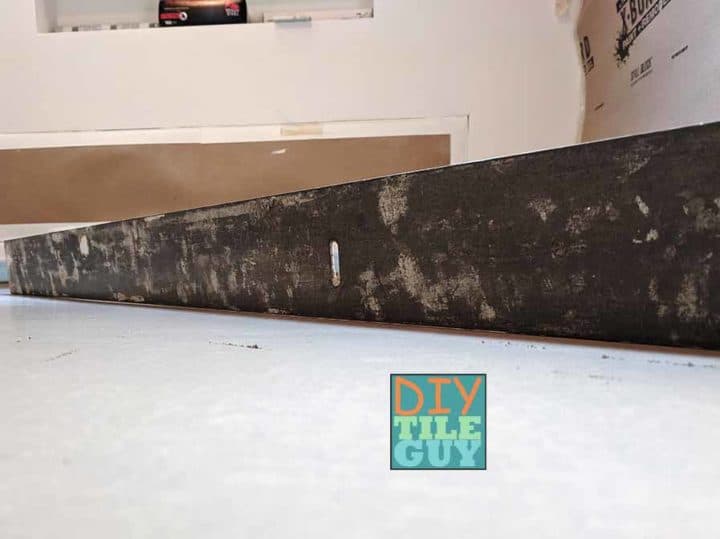
Smoother
A smoothing tool is probably the one must-have tool that you’ll need.
Once the leveler is poured over the floor, you have to be able to push it around to the areas that need more leveler and remove it from areas that have too much.
This is one of the tasks of the smoothing tool. The other task is to go over the top of the leveler and smooth out any lines or inconsistencies.
Before I purchased a proper smoothing tool I used to use a floor squeegee. This worked to push the leveler around but didn’t work as well at the smoothing part.
Gauge rake
Basically, a gauge rake for self-leveling underlayment is a tool that has a crossbar, usually 24-36 inches, or so, and lets a certain amount of leveler pass underneath it.
It does this by having an adjustable bolt on each end. Typically, these bolts will adjust anywhere from 1/16 inch to 2-inches.
I don’t have a lot of experience with a gauge rake because I map out my floors with leveling pins.
It’s kind of a nice tool if you are not using leveling markers. You can spread out about the right amount of leveler over the floor and fine-tune it afterward.
Spiked roller
The spiked roller is my favorite self-leveling tool. It’s exactly what it sounds like. A roller, like a paint roller, with plastic spikes all over it.
How could this be a helpful tool? What it does is breaks the surface tension of the leveler. Doing this helps even out the seams between the pours. We’ll get into more about how to use, not only this tool but the others later.
One thing about this is if you have a deeper pour, one that’s deeper than the spikes, then this tool won’t help you.
So, if you’re roller has 3/4 inch spikes but you’re pouring 1-inch deep then this tool is going to be ineffective. You’ll be better off with a gauge rake and smoother.
Spiked shoes
The last tool that I want to cover is spiked shoes. Why would you want spiked shoes? Because you’ll get the best results if you can walk around in the room.
Spiked shoes are, simply, shoes with spikes on the bottom. They make slip-on spike shoes that you can slip on over your existing shoes.
The advantage of this is that you can slip them on and off with little effort.
However, most of the spiked shoes that I see that are made specifically for self-leveling underlayment, or other types of coatings, are steel spikes.
If you are pouring over heat wires then you can’t wear these. I went out and bought actual cleats that athletes would wear. I just looked for rubber cleats and a design that had as few spikes as possible.
Pouring
We’ve arrived at the section that covers the actual pouring of the self-leveling underlayment.
Furthermore, as I mentioned previously, there’s more to it than simply pouring the leveler over the floor and watching it “seek its own level.”
Mixing the self-leveling underlayment
We’ve already covered how to set up a mixing station and preparing to mix.
When it comes time to actually mix the product and pour, you’ll want to add your water, already premeasured, into a mixing bucket or barrel first.
Once the water is added, go ahead and add the entire bag of self-leveling underlayment to the bucket.
Then mix it with your electric mixer and egg beater-style mixing paddle. Most manufacturers want their product mixed for 2-3 minutes at a minimum of 650 RPMs. That’s considered high speed.
More than likely, you’ll be pressed for time at this stage. But I want to discourage you from cutting the mixing time short. Two to three minutes of mixing can seem like a long time.
However, in addition to the strength of the product, mixing it for this long makes the self-leveling underlayment flow smoother and you’ll have an easier time with it.
I highly recommend mixing for a minimum of two minutes and moving the mixer around the bottom to get make sure every part of the bucket gets mixed.
Pour IMMEDIATELY after mixing
Once the product has been mixed for the proper amount of time it’s time to pour. Make sure that you pour it immediately after mixing.
Don’t let the leveler sit in the bucket. Don’t mix more buckets and then come back and remix just prior to pouring.
Once it’s mixed, bring it into the room and start pouring. Time is not on your side at this point.
Pouring self-leveling underlayment onto the floor
Typically, you’ll want to start pouring towards the back of the room and work your way towards the door
Move the bucket, or barrel, as you pour. Don’t just dump it all in one spot and figure on moving it later.
Rather, move the bucket as your pouring around the room.
Wet edge
In general, you have about 10-20 minutes of working time with self-leveling underlayment.
Furthermore, each batch is going to be drying and setting up on its own schedule. So, if it takes you two minutes between batches, the first batch is going to be two minutes ahead of the second batch.
This is why it’s important to make sure that when the second batch of self-leveling is poured that it completely meets up with the edge of the first batch.
This is what it means to maintain a “wet edge.”
You don’t want batch number three, or four, to meet up with the first edge as they can be 5 minutes apart in their dry times or more.
So, maintain a wet edge at all times. The edge of the pour should always be from the most recent batch
Larger Batches
Making larger batches isn’t just for larger pours. Another reason is so that you don’t have to deal with keeping a wet edge.
If you can mix up the amount of self-leveling cement that you will need for the entire room in one batch then that’s a big advantage over having to marry two, or several, batches together.
This is one of the pluses behind mixing multiple batches in a barrel.
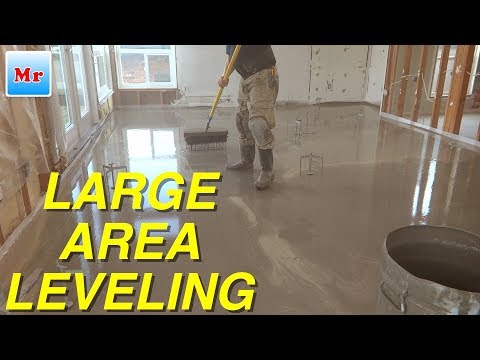
Smoothing
Once you start getting the leveler poured on the floor you’ll want to start moving it around over your height markers and smoothing it out.
Hopefully, you have the manpower to have one person smoothing and another bringing the self-leveling in and pouring.
If you don’t, we’ll assume it’s a small pour, and you’ll just have to mix and pour the buckets as quickly as you can then spend the time to smooth and flatten.
Once the product is spread out at approximately the right height (according to the leveling pins) then it’s time to smooth things out.
Anywhere you’ve moved the leveler around is a place that is likely to show some unevenness. This is where you’ll want to smooth things over by lightly gliding the smoother over the surface.
The seams between batches
Another area that’s common to get unevenness is in the seam between two different batches.
So you’ll want to make sure to pay attention to these areas too. This is also a good spot for the spiked roller.
Spiked roller
Once you’ve spread the leveler around at the right height and smoothed over the entire floor, I like to run the spiked roller over everything.
Some people can get everything with the smoother but I’ve found the spiked roller to be a valuable tool for evening things out.
I find that the roller can help blend the uneven areas that I might have missed with the smoother.
I simply wheel the roller over the entire surface of the freshly poured self-leveling underlayment paying special attention to the seams of the pours and other areas that I may have moved around.
Problem areas
There are always certain areas that can create problems. Typically, it’s tight areas where it’s difficult to get tools behind to smooth.
Areas like between the toilet flange and the wall. Also, behind a heat vent.
I’ve found that if I placed a leveling pin in these areas that it’s easier to gauge the height of the leveler.
Also, having a small blade, like a 4-inch flexible taping knife, to smooth over tight areas by hand can be valuable.
These are areas that are commonly hard to gauge the height of and it’s easy to get them too high or too low.
If it’s going to be one, or the other, you want these spots to be too low as opposed to too high. You can always fill in too low using the procedure below
Additionally, I think smaller areas, like a bathroom, could be better served by having a smaller spiked roller, like the paint roller size, rather than the larger ones like I currently own.
After your self-leveling underlayment pour
Clean up
Clean up your tools quickly as the leveler will dry fast. It’ll take a bit of time to clean up your tools, mixing station, throw everything away, etc.
Checking the floor for flatness
Once the self-leveling underlayment is reasonably dry, you can check the floor with a straightedge and see how flat that you got it. Hopefully, it’s perfect but commonly it will need a little fine-tuning.
As good as it looked when it was wet, once it’s dry it will start to show its imperfections.
Low spots
Low spots are the easiest to accommodate and you can mix up some a fast-drying patching product and fill these in. Something like Feather Finish from Ardex or Mapei’s Planipatch works great for this.
High spots
If you have any high spots you might be able to scrape them off if you get to it quickly enough. Even if you scrape them too low you can always fill them in using the procedure above.
Otherwise, grinding is always an option. It’s no fun to grind at this point in the project but you need to get rid of the high spots.
Tying it all together
Hopefully, I’ve helped to dispel the misconception that working with self-leveling underlayment is easy. It doesn’t do all the work.
In fact, the more work and preparation that you do prior to your pour the better things will go. For information on other types of floor preparation options, see my post on tile underlayment.
I hope things go well and please ask any questions in the comments below.
This was fantastic! I have stopped social media, otherwise I would share. Thanks so much for providing clarity on some technical issues. Kudos!
Thank you!
Hi DIYTileGuy,
I read your SLU guide, and while QUITE informative, it would be too much work for just me in a 94 sq. ft. bathroom. So, I have been trying to use Mapei Planipatch for ‘level’ up some of my uneven areas for my DITRA-HEAT install. Planipatch sure sets up quickly, and I may have made some additional high spots unintentionally,
Can I switch to something else like LevelQuik to speed things up or is that not something you recommend?
My other challenge is that now I have some areas with Planipatch exposed and some areas with plywood OSB, Can I put a plywood layer over my leveling ‘efforts’ so I can have a clean DITRA-HEAT installation, or is that unacceptabl? Otherwise, will I have to cover the whole floor with Planipatch so I can use unmodified to adhere my DITRA-HEAT floor mat? Help!
I have read online that I should have at least 1 1/8″ thickness for my eventual tile install. My subfloor is 23/64″ tongue and groove, plus Planipatch and some additional plywood I have added as there was a good 1/2″ dip from the joists sagging due to I am guessing hasty craftsmanship when built.
LevelQuik is just a self-leveler and you would have to use lath with it over a wood subfloor. So, that doesn’t really solve your problem. What you could do is use a self-leveler like Ardex Liquid Backer Board and simply use it to fill in the low spots and use a straight edge to screed them off. It does have a 1/8 inch minimum thickness so you’d probably have to use Ardex Feather Finish (they would prefer their brand) or Planipatch to transition and smooth the edges.
As far as the second layer of ply, I’ve never installed it over a leveling compound so I don’t know if that would work, or not. Maybe you hear a crunching sound? Maybe it’s OK? The only reason that you would need a second layer is if you’re installing natural stone.
Thank you for the honest answers. I am going to pass on the second layer of plywood. I have 12″ x 24″ porcelain tiles that I plan to install over DITRA-HEAT mat. I found a couple of forums in US that say don’t ‘sandwich’ SLU between plywood, and one from Canada who mentions doing it.
I don’t really have any way to get the Ardex products other than Amazon, and they are too pricey on that site. I am going to use Planipatch to fill in the gaps and ‘flatten’ as best.as I can. It may take several applications.
So, once I get done and all my plywood covered with PlaniPatch, can I still use the Mapei UltraFlex 2 Modified Thin-set I have to install the DITRA-HEAT or should I use unmodified thin-set to install the DITRA-HEAT over the Planipatch?
thanks in advance,
You want to use the Ultraflex 2 because you might be going over areas that still have plywood. Don’t use unmodified to stick Ditra-Heat down.
I am helping on a remodel job. We were thinking about using the schluter ditra system to help prevent cracking. The subfloor is 3/4 inch particle board over 3/4 inch pine boards. The tile underlayment looks like hardi backer. the schluter rep said that we need to remove the backer board and the particle board and replace with 1/2 inch OSB in order to get their lifetime guarantee. i don’t really care about the warranty. do you think it’s necessary to do all that work. the rep figures that the particle board absorbed water from the thinset used under the hardi backer.
Yes, I think the rep is right. What are you hoping the outcome would be? To go right over the particle board? If that’s what you are wanting to do I would use a peel & stick underlayment rather than an uncoupling membrane, like Ditra, that is adhered with thinset. But that’s not a very good way of building a tile floor.
What I would recommend is to remove every layer, including the pine, and install 3/4 inch ACX plywood subflooring. Then you can use Ditra over that and have a solid floor that isn’t built up in height unnecessarily.
i might try using some wooden wedges to drive between the particle board and the pine boards that are under that. it looks like the house was framed on top of the boards and the particle board added after. i saw a vid about using the wedges and it looked doable. btw. thanks for the reply. it’s above and beyond.
the rep recommending using 1/2 inch osb. would the 1/2 plywood be a better way to go? not sure that i want to go as far as tearing the pine boards out.
I’m not sure why he would recommend OSB as plywood is a better choice. But if your subfloor boards are tongue-and-groove then 1/2 inch ply over the top (or OSB) would be fine. If they aren’t attached to each other then I think you have to go with 5/8 ply or 3/4 inch OSB.
i don’t think the pine boards are tongue and groove. i think i like the idea of 3/4 inch over the boards. is the acx plywood t and g? and is 3/4 inch available. and is the cost much higher than osb.
If the pine boards aren’t t&g then they really don’t have much structural value by themselves. So you need to put down an appropriate subfloor. Minimum is 5/8 inch AC plywood or 3/4 inch OSB subfloor. It should be t&g otherwise the seams need to be supported. Not sure on pricing but the plywood is probably more money.
we are going to go with the 3/4 t and g osb. the finished subfloor won’t be any thicker than what was originally there. using the wooden wedges worked pretty well to take up the backer board and particle board.
Im wondering if I am missing something. If you use SLU, then the tile goes directly onto the SLU (with a proper adhesive). I took a class on tiling and was told to use cement board. I am assuming the cement board is in place of the SLU and provides the flay (not necessarily level) surface.
Cement board and self-leveling are just two different types to tile underlayment. If your tile floor isn’t already flat, which a lot of them aren’t, then using SLU is a good option. If your floor is flat and you want to install cement board then that’s perfectly fine too.
THANK YOU FOR FANTASTIC ARTICLE !
I HAVE ONE BASEMENT BEDROOM TO MAKE , CONCRETE FLOOR 150 sq ft ,
NEVER MADE IT BEFORE , AND ALL REGULAR INSTRUCTIONS ARE MORE ADVERTISING THAN INFORMATIVE . THE B.S. KIND OF : “SELF LEVELING LEVET IT SELF ” YOU ARE FIRST TO ADMIT THAT IT DOESN’T !!!
THEY SKIP REAL INFO ON LABELS AND ADS . FOR PEOPLE LIKE ME WHO MAKE IT FIRST AND LAST TIME IN LIFE IT IS USLES . I ENDED UP WITH FLOOR JUST IMPROVED , HARD COMPOUND IN THE MIDDLE , AND SOME HIGH POINTS . IT IS SO FRUSTRATING , WHEN AFTER IT DRYED IT IS SO WAVY . I JUST WAS WAITING THAT IT WILL “LEVEL IT SELF” , SHOULD MAKE MORE WORK ON SPREADING THIS THING OVER WHOLE ROOM !
NOW : THE WORST SPOTS ARE 1/4″ DEEP , AND SOME AIR BOUBLES HERE AND THERE .
CAN I JUST LAY VINYL 5 mm FLOOR , WITH PLASTIC UNDERLYMENT
SUGESTED FOR VINYL , WATERPROOFED BOTH .(IT IS BASEMENT )
IS 1/4 OK , OR SHOULD I TRY TO POUR SECOND LAYED +- 3/16 ” ALL OVER , WITH 1/4″ IN SOME PLACES ?
PETER
CHICAGO
You can go over it with more self-leveling if you want. You need to prime it again before pouring. You can also fix spots with Mapei Planipatch or Ardex Feather Finish. Or you can go over with vinyl. I don’t know anything about vinyl but it won’t have the flatness requirements that tile has.
I also did lots of research and watched many how-to videos and read many articles that said self leveler is mix and pour, WRONG! The timing was critical it’s a very narrow work time window and the difference in batches/flow was a surprise, it’s something that you have to definitely get a feel for. Your’s was the most informative, I am going to use the leveling pegs in my second attempt, luckily I was too low than high and my one high spot is at the height the floor should be at, you said the smoothing tool can hit 2 pegs at one time could you elaborate on that should I just eye it up or watch the pegs snap back up? What do I do with the pegs when the floor is where I want it pull them out as I go or leave them in there, thanks for the great info!
You want to leave the pegs in there and they will dry in the self-leveler. The pegs are just a way to gauge the height to make sure that you aren’t too high or too low. It’s hard to know how deep it is once you pour the leveler.
When I use the pegs, they are typically cut on the shorter end so they don’t really flex up and down. If you do have longer pegs they may move a little bit. The smoothing tool you eventually want to just glide over the top so it won’t really be moving the pegs very much.
This was an incredibly helpful article. We are looking at using a “liquid backer board” that self-levels over particle board. I imagine it is similar in application. First, do you think that is an appropriate substitution for backer board? Second, I know we need to prime, but apart from the priming and liquid backer board, do we need to do anything else before laying our tile? Also, you just leave the cut off pegs in the floor and then place your surface over them? If we used screws, would we just screw them to the required height and leave them in as well? Thank you again for your helpful website. I appreciate the access to such important information.
Keep in mind that particle board and orient strand board (OSB) are two different things. OSB is OK to level over and particleboard isn’t. And, yes, I leave the pegs, or screws, in the floor after the leveler is poured.
Read more about particle board on Wikipedia
Read more about OSB on Wikipedia
Are there tolerances for hand trowel floor leveling? Is hand trowel only recommended for localized leveling i.e., at door thresholds, below equipment and/or where a floor is visibly not level? When specifying hand trowel floor leveling, should a tolerance be enforced i.e., 1/4″ in 10 feet?
Presumably, a self leveling compound can provide 1/8″ within 10 feet, or better.
I’m not sure what you mean by hand troweling. Are you referring to a technique or a product?
There’s nothing wrong with hand troweling (technique) a self-leveling compound. The issue is that it’s presumably difficult to reach the entire area that is self-leveled.
You can also spot patch small areas with floor patching products. This would typically be accomplished by hand troweling.
No matter what you do your goal should be to get the floor to within a minimum of 1/4 inch in 10 feet and possibly flatter depending on the tile.
hi, first thanks for all the info. your instructions have reassured us we can do this, though I had to read the info about the pegs 3 or 4 times. my husband and I are about to use a slu on our 30sq ft bathroom floor. it has two layers of exterior grade plywood installed with a previous remodel. height variation is up to 5/8″. we are using the pegs and mapping it out first.
my question is about using lath. both the Henry and Level quik product advised applying lath. I do not seeing any mention of this in your information.
we are adverse to this as it is yet one more thing, but mostly are trying to avoid excessive height variation at the threshold. currently the sub floor is level with the hardwood floors in the adjoining bedroom. we are also laying an electric heat mat and don’t want excessive height buildup.
is the lath crucial. there is no movement in the floor. thanks so much for all your help.
mth
Some levelers want lath used. You can use a leveler that doesn’t require lath but you have to be careful which one that you select. I have a short list of levelers that you can check out and see which ones interest you towards the beginning of the post. Some will allow you to go as thin as 1/8 inch.
Ive torn out my 100 year old bathroom tile, due to leaking lead pipes. I managed to save most of the subfloor by chipping the old tiles off one at a time. the passage way for the new drain however I have buried in quickcrete. I was going to use self leveler for this area, some is 1/4 inch some is 1 1/2 inch. the product says up to 2 inches. is this. a good move or should I be using a different approach/product
I think you just want to flatten your floor? As long as your within the tolerances self-leveling is a good way to flatten some wildly out-of-level floors.
Sorry, I thought you had commented on my GoBoard post. To answer your question: Yes, you want gaps with cement board, or at least they shouldn’t be fit together tightly. Then fill the seams with mortar. Then Kerdi the whole thing.
Thank you for following up with a clarification question.
yes some of the floor is the original concrete subfloor and some of it is newly installed quickrete – as a result the texture of the floor is dry rocky but solid.
Really appreciate this guide and the helpful answers you have provided to questions. I am planning to put in a lot of tile in our new house (https://i.imgur.com/h02FD5S.png) and the inspector said the concrete slab at the front of the house is an inch higher than the back of the floor, probably from the time it was build. I will get a more detailed idea of what it is like shortly.
But what will a self-leveling compound do for something like that? I am planning on your “mixing barrel” suggestion for the main area, about 30×40′, but if it just slopes downward in one direction will it work as expected?
I’m not really clear on what you want to do. Do you want to level a sloping slab? Do you want to just flatten out a sloping slab? Or is the issue that the front is a different level than the back and where they meet there is a ledge?
Thank you for the terrific article. We had new drains and configuration installed in our basement bathroom. After the concrete dried completely, we have spread 2 coats over 3 days of Mapei Self Leveling Plus (using Primer T before each coat) on the bathroom area floor. When I put a level on it today there are some lower “valleys” between the high spots. Most 1/8-1/4 very sloping dips. I am thinking I should put Planipatch over this area and screed it with a long straight edge to make it flat. We will be laying Luxury Vinyl Planks on the entire basement floor, about 375 SF, and want to include the bathroom. I want a flat surface in the bathroom but do not mind a gentle slope to the doorway. Please advise if you think this will work or can recommend another product or technique.
Planipatch sounds like the perfect product for what you are doing. It dries fast and is fairly easy to work with so it should go pretty well.
Hi DIYTile Guy,
Many thanks for your answers. I understand having read through your post on SLU, that SLU is not a solution to filling cracks.
The thing is I have only the odd hairline crack (<1/16” inch) in my mechanically resurfaced (grinder+Diamabrush) basement concrete floor to remove carpet glue. I have some low-lying ducts in places, so I would prefer to minimise any loss of height to the ceiling. Also, the previous owner also had thinner tiles laid directly on the concrete floor in an adjoining laundry room and bathroom, which I’m leaving in place. So I’d like to minimise any height difference between new and old tiles.
1) Do I have to worry about these hair line cracks? I have a hard time seeing them now that I've ground the concrete down. I'd have to rewet the floor to find the cracks if I needed to fill them.
2) What are my options for dealing with these cracks? Ditra everywhere seems like overkill given how thin and infrequent they are. And there is no moisture under a piece of plastic over 24hrs. Even Redgard on the cracks with six-inch fibreglass mesh seems excessive? Lowes here has Mapei Planipatch, which you mention above, while Home Depot has Sakrete Fast Patch. I assume I can use either regardless of the mortar I end up going with? I also need to fill gouges left in the concrete on the periphery of each room after removing nailed carpet strips.
3) If I were to use Redgard only on the cracks, would 2 to 3 coats be enough? Can I then apply mortar directly onto the Redgard?
4) It's about 1/8 inch difference between the old and new tile at the door threshold. Any suggestions as to how deal with that difference?
Thank you in advance,
Kevin
I think having a membrane over everything is good insurance. It’s hard to know if the cracks will transmit through and maybe they won’t since you have an existing slab. So you might be fine.
An inexpensive way to adding a membrane is to use Redgard or other similar products. I think it’s 2-coats but I would double-check that. You can use the floor fillers to fill the gouges that you mentioned.
For the height difference, You’ll just need to keep the tile at the entrance as low as you can. Leave at least a 1/8 inch gap between the tile and the other flooring. You might try to put a slight bevel on the edge of the tile. But if you have 1/8 inch to work with then I think you should be able to make it work if your floor is flat.
This was incredibly helpful. As is typical of Middle East immigrant, floors and tiling/ mosaics are a trade my family excelled. I’ve learned a lot from childhood to now about renovating. I am, however, a wife, mother of 4 *ages 11, 10, 3 and 1. (So you can see, i have some environment challenge). I run a small kosher specialty cleaning service as well as make jewelry, so time is scarce and I often find myself working overnight on renovations. I’m finally finished everything and I’m avoiding the kitchen floor, because I have been lost on what to do. I have a 1/4 inch and up to 1/2 inch disparity between the start of the slope of the floor to its lowest dip.i have to completely replalce subfloor and I do not have time to handle this task as meticulously as I normally work. Do you have any tips that can help me to get through this in 2 to 3 nights? I hope my comment is make sense. I am so completely exhausted of this endeavor so I actuallyam falling asleep as I’m write this. Lol
I also mean to ask; what do you think of Henry brand product? I see premix patch and level and then the type of level that you would mix with water.
Henry’s products are fine. The patch might help with what you are doing. It’s fairly easy to work with and drys quickly.
I replied to your other comment. The patching product might be a good way to handle this. It’s hard to know without seeing your floor. Otherwise, it sounds like self-leveling would be a good way to go but I think that’s a bigger job.
DIYTileGuy – thank you for your thoughtful responses. They’ve been really helpful and the detail on this SLU page is exceptional.
Concrete Prep/SLU/Primer Questions:
Cleaning/Grinding
1) Water absorbs very quickly into our concrete floor, except within 2-3 inches of wall, where I guess the grinder didn’t get close enough to the wall. I scraped the perimeter with a metal brush instead to remove the mastic. But in places it still takes over a minute for water to soak in. Should this be a concern?
2) Having mechanically resurfaced my basement concrete floor, do I still need to apply a degreaser/cleanser?
Perimeters and Doorways
3) What about using caulking with sill seal instead of the spray foam?
4) I assume these barriers could also help with establishing movement joints, and so I shouldn’t remove the caulking or foam in the perimeter until after I lay the tile?
Mapping Out Floor
5) The marker pegs method you highlight seems great for jobs that require more SLU depth, presumably >3/16” of depth across the entire floor given the peg base sits 3/16” above the concrete. In our case, our floor might be off at most 3/8” to 1/2” in patches. How do you decide between whether to use SLU versus a patching product like Mapei Planipatch?
6) As an alternative to identify low-lying spots, I’ve seen a tiler shifting a straight edge across the floor in a perpendicular direction to the intended orientation of the tiles (so perpendicular to the 36” length vs the 6” width of my 6×36-inch porcelain tiles) and then marking the edge of any gap below the straight edge with a pencil (https://www.youtube.com/watch?v=Zm2itxPgtOc) to map out the low patches. They then use a sponge or hand-held concrete grinder blade to smooth the SLU edges after about half an hour (not sure how this works given the SLU’s 1/8” min thickness). Is this a reasonable method using an 8’ straight edge?
Primer for Self-Leveling
7) You’ve noted that SLU primer doesn’t act as a bond breaker for tile mortar. So I needn’t worry about overspreading the primer and letting it dry fully outside of my SLU patches. But might it actually help the tile mortar adhere to the concrete?
Preparing to pour the SLU
8) Is the type of tile, in my case porcelain LFT, a constraint on the type of SLU I can use?
9) Here in Canada, Home Depot has Sakrete which claims to set in 15-20 mins vs the faster setting LevelQuik Rapidset (and Mapei Self-Leveler Plus at Lowes). Beyond using colder water (some have suggested using ice cubes), can you recommend a slower setting SLU?
10) I’ve never used SLU before and given that I’m doing this solo, I’m terrified it will set too quickly. So if I go with SLU vs a patching product, I’m trying to manage this not only by targeting the SLU to low-points only vs the whole 870 sq ft of floor, and by using a slower setting SLU, but also by prepping and pouring smaller amounts of SLU and letting that set. In other words, taking a slower approach of intentionally applying the SLU in layers or I suppose apply a patching product to remove any remaining gap. If I need to apply more SLU or patching product because I didn’t get it flat enough the first time, should I reapply the primer?
11) How do you dispose of excess SLU??
Tiling
12) There’s quite a cost difference between Ultraflex LFT on one end (about 2.5x Versabond more expensive), Mapei Large Tile and Stone (about 50% more), and Versabond on the other. If I’m tiling porcelain LFT, does the quality difference of these mortars justly their cost difference?
Many thanks again for the excellent information on SLU.
I won’t copy your post here but will reply with numbers:
1. It’s probably not a big deal but you could also choose to go with Mapei Eco Primgrip for the edges. You can also use that for all of the priming if you want but it’s probably cheaper to use the SLU primer in the field. Other companies make products similar to Eco PrimGrip also so you might look for the equivalent product in a different brand if you are using a different brand of SLU. Also, double check that you can use these types of primers in place of normal primers on the manufacturer’s instructions.
2. Most likely no. If you’re doing a garage, for example, then maybe. But that’s worth a call to the manufacturer as I’ve never run into a situation where there could be extensive grease, oil, or other contaminants in the substrate.
3. That’s fine.
4. You wouldn’t have to, no.
5. Typically, manufacturer’s will have some sort of guideline on their patching product. Usually, 5 sq. ft, or more, you should use SLU. With concrete, you can go down to a feather edge. You don’t have to cover the entire floor.
6. Yes. I like to use a sharpie for marking and not all slu’s have a 1/8 inch minimum requirement. You can feather the edges a lot of times with a flat trowel or simply do as you mentioned. The way they screed the slu with a straight edge works well as long as you have low spots and the straight edge spans the low spots. In other words, it can sit on high spots on both ends and be used to flatten the slu in the middle.
7. It might
8. No, other than you’re supposed to get it flatter than a smaller tile
9. I think Mapei Self-leveler Plus is slower setting. Also. Levelquick ES (Extended Set)
10. I understand. I would lean towards smaller goals (areas) and doing them over multiple days, assuming you have that luxury. And you always prime before pouring slu.
11. If you have 870 sq. ft. then I would use a full bag as much as possible. That stuff isn’t inexpensive. But, otherwise, you can designate one bucket as a garbage bucket and pour the left-overs into it. Then dispose of it when you are completed. Or, better yet, use it the slu as fill for another project.
12. Large Tile & Stone is fine.
Hi DIYTileGuy,
I’ve had the chance to scope out my basement floor in a more detailed fashion prior to pouring SLU and was hoping to reconfirm the best approach with you.
I have a 16’x12’ rectangular basement bedroom that connects via a doorway to another 12’x10’ rectangular room in the basement, both of which have bare concrete floors.
Using a laser level I just bought, I’ve been able to determine that the high point in the bedroom sits at the back of the room at the base of the 12’-long wall which is parallel to and 16’ away from the doorway. This high point is about an inch higher than the level of the floor at the doorway.
In the adjoining room, the floor level at the same doorway is the high point in that room and lies about an inch above the low point, which is at the base of that room’s 12’-long wall parallel and 10′ away from the same doorway.
In other words, the floor slopes down from the bedroom wall facing the doorway to a level two inches lower at the other room’s wall (10’+16’= 26’ between both walls) facing the same doorway.
I’m clearly not interested in leveling the floor in both rooms, so that I lose as much as one inch of floor-to-ceiling height in the bedroom and up to two inches in the other room. I would think this is a clear case of wanting to flatten but not level the floor.
1) To reconfirm, the method you describe above, with the laser level and marker pegs, levels and does not just flatten a floor?
If so, I wanted to also reconfirm that to flatten vs level the basement floor I can use a straight edge (I used a 10’ piece of MDF baseboard) by shifting the straight edge across the floor in a perpendicular direction to the intended lengthwise orientation of my 6”x36” porcelain tiles to map low points and high points, as per the video in this link (INSERT LINK).
This straight edge method creates a different linear map of the floor versus when using a laser level.
2) Do you agree with this straight-edge method to flatten vs level a floor? Why does the straight edge need to be in a perpendicular direction to the length of the tile?
In my case, the lengthwise orientation of my tiles will be parallel to the doorway and so also parallel to the 12’-long walls opposite the doorway.
So starting in the bedroom, I placed my 10’ straight edge immediately beside and perpendicular to the bedroom’s 12′-long wall opposite the doorway, and went from one end of that 12’ wall to the other, while marking low points along the way at 1’ to 2’ increments. But because the 16’ distance between that 12’ wall in the bedroom and the doorway exceeds the length of my straight edge, I moved my 10’ straight edge over to the wall of the doorway and repeated the same process of marking low pointsl. In other words, having used a 10’ straight edge on either end of the 16’ long room, there was a 4’ overlap of markings in the middle of the room. And not surprisingly, the low and high points mapped from either side of the room did not match up.
3) Assuming this perpendicular straight edge method is viable, did I do this correctly? Should I have used a longer straight edge? Or not started immediately beside the wall? Or used a 6’ straight edge on the second part of the room beside the doorway so that there was no overlap?
In trying to flatten but not level the bedroom floor, I’m hoping to do this without raising the floor at the doorway. Having never done this before, I’m concerned that even in attempting to flatten an un-level floor by marking low and high points with a straight edge, the SLU will flow like water down the slope from the high point at the back of the bedroom towards and beyond the doorway and into the adjoining room, pooling around its lowest point and forcing me to level not just flatten the floor.
4) Is this a legitimate concern? I guess the amount of SLU poured near the doorway is a factor? Should I stick to the low end of the range of water to be added to the SLU to minimise this risk?
5) How would you dispose of any excess liquid SLU that you’ve made? Dilute it with a lot of water then pour it down the drain?
6) Finally, when using SLU, movement joints go down to the SLU and do not need to go down to the concrete floor?
As always, appreciate your patience with all my questions.
Many thanks in advance,
Kevin
I’m not sure that I understand all of the questions but you definitely don’t want to level your floor so you won’t be able to use your laser level for the marker heights. Unless, you want one way level and the other way not level. In that case, you could level the X axis but not the Y, if that makes sense.
I understand what you are trying to do with your straightedge. When it comes to placing markers over the floor, you may want to try using a string from the one wall to the doorway. You might have to be creative with how you place each end but that will give you a straight line.
Then, put your markers along that line every 18-22 inches. Then move the string and do it again. You’ll have to be careful with this in that you get the markers flat going in every direction. It’ll be a bit tedious but the flatter that you get the floor the easier it’s going to go.
Self-leveler doesn’t flow as easily as water. You might try mixing in the middle of the water range and see how that goes. Mixing for the required amount of time is important.
Also, don’t dispose of the self-leveling down the drain. You can pour the excess out into a bucket, container, or even a piece of plastic and throw it away after it’s dry.
And, yes, on the movement joint question.
Hi DIYTileGuy,
Apologies for any confusion (I forgot to include a video link), and thank you for answering many of my questions despite it.
I followed the straight edge method shown in this video link (https://www.youtube.com/watch?v=Zm2itxPgtOc), starting from the 9:00 minute mark in the video. Soon after the 11:00 minute mark, he states that “most the levelling” needs to be done perpendicular to the tile flow. It looks like that’s the only floor marking he does prior to pouring SLU. But maybe that’s because he’s already checked the floor in the other direction and it seems ok.
So if the length of my tiles follows the X axis, this video suggests that my straightedge should be lined up with the Y-axis, when marking out the floor. In other words when it comes to flattening the floor, we’re only doing it in one direction. This is what I’m confused about.
1) Does the flattening in only one direction (i.e., perpendicular to the tile flow) enough to ensure a flat enough flat floor for LFT?
If I understand your reply about the string (which suggests the answer to the question above is yes), you’re saying that using string that extends the full 16′ from the back wall to the doorway together with markers, instead of a 10″ straight edge that falls short, is a better way to go.
2) Is that correct? So I’d line the string up in the Y direction to the X direction of the tiles, and make sure the ends of the string are nailed as close to the floor as possible?
3) I didn’t understand what you meant about getting the markers “flat in every direction.” I thought all I needed to do was line markers up with the Y-axis of each string, mark where the line touches the marker, then cut the marker at the marked line?
4) Finally, you’ve eased my concern that the SLU will flow like water. But getting the SLU to follow that flat diagonal line versus a level horizontal line seems even more challenging. Any tips beyond adding water in the middle range? Doing it in phases or all at once? Is the smoothing tool the key here to push the SLU to the right heights along each line?
Thank you!
You want your floor flat in every direction. So, if you were to take your 10ft straightedge, keep one point fixed in one spot, and fan the other end then that straightedge should be flat in every direction. The industry standard for large tile is 1/8 inch in 10ft, which is pretty flat.
It’s probably easier to use the straightedge than a string. But you had mentioned that the 4ft section where your straight edge overlapped was uneven and that’s because the straightedge doesn’t go from end-to-end.
But if you have the time, you can keep addressing different sections and get the concrete flat. So, you could do one 10ft section, then do the other a different day, and then you’ll have to go over the section that they overlap on a third day. Make sure to prime each time
Great article, thanks! Do the leveling pegs interfere with the spiked roller, or does it just roll over the pegs?
The spikes are plastic and will roll over the pegs with no issues.
Hello, I will try to make this quick. 2 years ago, water pipe break under kitchen floor, in crawl space. (house over 100years old) Crawl space not accessible. Had to tear out old plywood subfloor (water damage) and joists warped do to getting wet, left them in place. Since this happen 2 weeks before thanksgiving I did a half ass repair. Installed new tongue and groove and vinyl floor. As I stated half ass and I’m not happy with my work. What I have now is an unlevel floor but the floor is “wavy” high and low spots . I’m trying to figure out the best solution without replacing joists. In your opinion what’s better, one large solid pour or tackle each individual low spot and what is the best leveler to use. The area is 12×16. PS I just finish digging out the crawl space, shovel, pick and a lot of 5 gallon buckets of clay. Thank you for your time.
Thank you so much for your incredibly helpful tutorial! I’m planning on using SLU (Henry 565) to fill in the low spots on my wooden sub-floor and then using a feather-edge patching compound (Henry 555) to refine the edges / finish the ramp up to my high spot.
I’m wondering how many bags of SLU I can mix in the same bucket (serially, though I’ll have someone mix while I pour) without it starting to set in the bucket and cause issues? I anticipate needing ~4 bags and think I can use the same bucket but I’m not sure. Wondering the same about the feather-edge patching compound. Thanks!!
The best way is to fix it at the joist level. So, planing and shimming the joists and then replacing the subfloor. If you want to leave the subfloor and simply level over that then I would look into a product like Ardex Liquid Backer board and pour the whole thing. If it’s more manageable for you to do smaller chunks then that’s fine too. Whatever will get you a flat floor is what you want to use. Doesn’t matter how many pours.
I think you’ll want to use Liquid Backer Board 542 instead of the one that you mentioned. LBB doesn’t require metal lath and it’s 1/8 inch minimum pour. Then use Feather Finish 549 to fine-tune any small areas.
I’m not really sure what you mean by using the same bucket. I recommend a 6-gallon bucket but you can fit a whole bag in one 5 gallon bucket. It’ll be up to the very top, though. Or you can mix all 4 bags at once but you’ll need to be able to do it in a large enough container, like a garbage can, and be able to move it around.
Ah, I considered LBB for those reasons but i’m actually installing LVP and from what I could understand the LBB is designed for tile or similar applications rather than “resilient” floor coverings which I think LVP falls into.
And sorry that my question was unclear – was simply asking if I can mix and pour the first bag in my 6 gallon bucket and then re-use that bucket to mix and pour the second bag (and so on) without having to worry about anything setting in the bucket.
Thanks!!
Just keep in mind that the other self leveler requires metal lath over the floor. For the buckets, I think you’ll be fine with one bucket. I usually have a trowel with me anyways to get all of the slu out of each bucket.
Removed tile from 850sf area of concrete slab custom home.
Found that the tile base had 1.5 inches of mortar beneath.
Checked blueprints. Slab was purposely designed such that game room, one bathroom, kitchen and main entry were 1.5″ lower than rest of slab.
Want to level the 850sf area to rest of slab.
Leveling compound can be expensive. Is there a cheaper product you’d recommend I could pour to 1.25″ and then use leveler over the last .25″?
Thanks in advance.
It was probably designed with tile in mind. The cheapest way of doing it from a materials viewpoint is to install a “mud floor” with a cement/sand mixture and reinforcing wire. That’s probably what you tore up and that’s the best way to get it back to what you want. You wouldn’t even need self-leverler when you’re done.
Doing it that way is a skill and probably best hired out. If you want to do it yourself and don’t feel comfortable with that method then I would look into filling it up to 1.25 inches and then self-level over it, as you mentioned. You could do the sand/cement mixture but I don’t see why concrete wouldn’t work either. Although you’ll need to follow the cure times and other instructions.
Thanks so much for all the information. After a LOT of searching; this is the definitive SLU info guide on the internet.
Would you be able to share the brand of the smoother you have in the pictures and video? The smoother that the link directs to is very different looking and has questionable reviews. Oh yeah, if I use screws for my grid, any particular kind, or any old drywall screw is fine? THANKS!!!
Let me look into the brand but smoother might be the one that Ardex sells. I’ll try to confirm that. And drywall screws are fine leveling.
edit: I just looked at the one that is linked and the one that I use looks just like that. Also, it shows on mine that it’s almost 5* reviewed.
Hi, I’m doing some work in a 8 x 8 ft bathroom that has a 1/2 inch plywood subfloor on 16 inch OC joists.. One side of the floor is perfectly level. the other side slopes to a 3/8 inch gap from the centre of the floor. My intention was to use Ditra, which I have used before but am not married to it if there is a better approach. My thought was to add a layer of 1/8 or 1/4 inch plywood or OSB to bring the subfloor thickness up to Schluter’s guidelines, use SLC to level the sloped side with the level side, then put Ditra on top, etc. Is this a decent approach? One challenge would be laying the Ditra on two different materials but my though was to use the Schluter thinnest as it touts itself as being usable on all materials. Alternatively I was thinking a thicker ply wood like 1/4 inch to 3/4 inch, self-level the entire floor then tile over top. Any advice you can give would be much appreciated! THX!
I like the first option. I think that’ll work fine
We used SLU recently to tile a stairwell landing. Once the SLU dried we loved it, it was a nice smooth finish that looked like it could be its own flooring material. We went ahead and tiled but we have a utility room/laundry in the basement and we’re wondering if we did just SLU in there – do you have any feedback on it being used as the main flooring material? It would be slab concrete underneath. It would not have heavy traffic, just a washer and dryer sitting on it.
I don’t think that the companies intend for the self-leveling surface to be a finished wear surface. They may recommend a coating, or something, over it but I don’t know. Your best bet would be to contact one of the companies and see what they recommend.
That makes sense – appreciate it!
This is an amazing article. Thank you for the time it took and all the links.
I really appreciate all the answers you provide as well.
I have a manufactured home. The subfloor is MDF. I am not putting tile over that. I would like to lay vinyl plan. I know its not your area of expertise, but I am trying to find out if there is any product that can be used to level low spots on MDF.
This is beyond my expertise. You may need to seal the mdf prior to using a self-leveler. You may need to install something over the mdf. Your best bet would be to contact one of the companies and have them spec a path forward so you can accomplish what you want to do.
Thank you. I will do that.
Thank you for your informative article. We followed most of your directions. We are leveling a 230 sq ft living room floor in a 1926 wood frame house. We had to repair the foundation with steel girders and in the process removed 3 sections of original sub flooring 3/4″ pine with 3/4″ plywood. Since we had never poured underlayment, we decided to divide the room into 3 sections. We poured the outer 2 sections first. Then came back for the middle section. In the process, we now have undulations mainly on either side of our seams.
Now we are trying to figure out how to measure the points that are un-level and decide how much more underlayment to pour on top of our original work. I do not want to grind these down because of the dust, but maybe that is an easier solution. Do you have any advice?
We are frustrated to say the least.
It sounds like these areas may need a little of both grinding and filling. It’s usually best to start with the grinding and then sometimes it’s easier to see what needs to be filled in.
I understand it’s disappointing. It’s really difficult to get a big area like that perfect on the first try.
Thank you for your reply! We ended up adding another 8 bags of underlayment and are currently very satisfied with the results. We may go back with a little feather finish in a couple of areas, but our 7 foot level in different sections all over the floor looks really good – and in our tolerance of 3/16 inch over 10 foot sections.
We also purchased an 18 inch wide with 1 1/4 inch spike roller for this stage of the project. I really loved using that tool to spread everything and wearing spiked shoe covers, I was able to work the entire area in multiple directions. That helped a lot more than the squeegee, although the squeegee was also useful. The depth rake did not work for our application (or at least I could not figure out how to make it work).
So, end of the story (hopefully), we ended up using a total of 30 bags of Ardex K 22 F underlayment for a very sloping living room of 230 sq ft.
In hindsight, I wonder if we had installed some 1/4 or 1/2 inch plywood in the deepest sections of the floor, we could have saved some money on the underlayment. But hindsight is 20/20 as they say!
I’ve never thought about adding plywood as a filler but it’s something to consider, I suppose. Sounds like a big project and I’m glad that it came out well. Thank you for sharing your struggles and successes!
Thank you for the great information. Best content I’ve seen on this topic by far.
I’m flattening/leveling an ~120sqft basement room (concrete). It slopes about 7/8″ from one end to to the other, and I think using leveling pegs might be the only way to accurately address the slope, or it would simply be estimating the amount of SLU to pour in lowest part of slope to get things started right.
You mentioned in the beginning the article that there are non-rapid setting SLU’s, but I’m not seeing any. They all seem to have about a 10-20 minute flow/working time. I don’t care if it would be days before I could install flooring if I could use a product with slower set up time allowing more time to flow the SLU out to level. Any suggestions?
Thanks much.
I wanted to confirm that you can put planipatch directly on SLU, that no primer is required between the two.
Also, once the SLU and any planipatch has set, should I be wetting the floor before applying LFT thinset and laying tile? I’ve been told that the floor will suck the thinset dry otherwise and presumably affect its performance.
Thank you in advance!
Correct, you do not need a primer under Planipatch. For damping the substrate, my advice would be that if your mortar is drying too quickly to spread a smaller area. If you are still fighting things at that point then there is nothing wrong with dampening the floor but you have to make sure that water isn’t sitting on top. You want the floor damp but the surface to be dry.
You can try Sika Level 125. Working time around 25-30 mins, that way enough to deal in your case.
I apologize for missing this. There are some selections for SLU’s that were listed under concrete that are not rapid set. There are a lot of SLU choices for self-leveler going over concrete. You might figure out which brands that you have access to and research from there.
Also, the comment above has a product selection that should work.
I love this guide and all the information. I do have a question though. My husband bought a bag of self leveler and while doing this he misread the bag and thought it said it would cover 160 square feet when it reality one bag covers 43 sqft. To make a long story short he primed correctly but he tried to stretch one bag for the entire 160 sqft room. So there are some spots that are thin, others are thick and some areas don’t even have anything. It’s splotchy. There were some really sharp mountains but i told him to scrape them up before it dried it completely which helped a little. So now, I’m pretty sure we have to grind down the floor, prime again, and then do it all over again using the the correct amount of self leveler. The plan is to install life proof drop click vinyl flooring. The floor under our carpet was already some kind of a self leveler, but I’m not sure what kind. The place was built in the 80’s. It was cracking and there were a lot of low spot patches so we figured self leveler would help us achieve the smoothest and most level base for the vinyl. I’m not really sure if we are going to be able to accomplish that now because we have to grind away at the floor and neither of us have experience doing that. Do we have other options or is this game plan the only one?
If some spots are high then they should be ground down. And it sounds like you’ll have to pour the floor over again but at least you have a little experience on your side now and know what to expect.
Okay cool. A few other questions… Do we grind it with a grinder or use an orbital sander? If we use a sander Which grit sandpaper do we use and what kind? Should we wet the ground first to help with dust or just hook up a shoo vac to suck up all of the dust? There is only a small window in the room and we will have to close the door so the rest of the condo isn’t affected.
I don’t think sanding would work. If you were going to try it then you want the lowest, most abrasive grit possible. But the grinder is the way to go.
You’ll want to rent or make a dust shroud and funnel for the grinder and vacuum which is covered in this post. Make sure to wear a respirator or another proper mask as those things don’t eliminate dust. Put a fan in the window blowing out as long as that doesn’t disturb other residents.
https://www.diytileguy.com/self-leveling-underlayment/#grinding
This article is amazing!!
I am looking to raise flooring in a bedroom by 1/2″ and was wondering what would be the best product to perform this task… The substrate is concrete and the room is about 100 Sq Ft. I was going to use plywood, but based on the current prices it seems almost as though pouring a 1/2″ in this space may be more cost effective. Please let me know your thoughts.
With going over concrete, your options are almost endless as far as products to use. Additionally, I don’t even know all the different products for this application. The best way to proceed is to figure out which products you have access to and narrow down the choices from there. Read the instructions and limitations and you’ll be able to figure out which is the best for your application and budget.
Hi DIY Man
Can I mix leveller by hand?
Thanks
The performance of the leveler is affected by how it’s mixed. Most of it needs to be mixed at high speeds. It just won’t flow if it’s not mixed right.
Excellent guide! Thanks!
Q: New plywood subfloor installed with shower drain hole yet to be cut. The hole will be 12″ from a corner of the bathroom that needs slight leveling. Is it worth it to cut the hole first, apply foam or sill seal then try to pour around the opening (which I imagine would be difficult to smooth with any kind of sizable tool given it’s in the corner) or can I pour first and drill/cut through the SLU/plywood after the pour to access my drain line?
I’m assuming that this is for a foam shower tray? There’s definitely nothing wrong with pouring directly over everything and cutting the hole later. That should yield better results than having to try to smooth out around a crain.
HI DIYTileGuy, great article. I’ve watched many videos and read much about SLU over the last few days. This is by far the most informative.
I’m renovating a small 5 x 8 bathroom. It has plywood subfloor which was already fairly flat, but unlevel. One entire side of the bathroom (the 8′ side) is about 5/8 ” lower than the other. There is no structural issue (rot, termites, etc…). The subfloor seems super stiff. If I put laser level on the floor and look at the line on the adjacent wall, the laser line doesn’t move at all if I step just next to the laser level. I used Primer T and Mapei Self Leveler Plus. The pour seemed to go well. No surprises. When the pour and smoothing were done, it looked nice and shiny. I could see that the SLU was thicker on the lower side and very thin on the higher side. However, after letting it sit 3-4 hours I put a 4 feet level across the 5 feet bathroom in several spots and it’s still 3/8″ to 1/2″ unlevel. I’m guessing that I just didn’t put enough SLU? I only used one bag. I had calculated that I needed 2. I will let this layer sit for 24 hours and do another. I realize I need to prime again. For plywood, it said to use non-diluted primer. But it doesn’t say anything about priming over the 1st layer. I assume I should follow the directions for concrete floor for priming this time around? My logic is that SLU is cementous based. But if you have any experience on this matter please inform me. Any advice in general would be greatly appreciated.
Yes, you want to follow the instructions like it were a concrete floor in this case. Good question.
Hi! Thanks for answering my question about the shower drain hole! I have another about the perimeter gap: the Sill Seal you referenced is only 5mm (1/8″) thick. Will that provide enough of a gap for possible expansion? Would regular 1/4″ foam or felt weatherstripping also work for this purpose?
You can use whatever gives you the space and will compress. Sometimes I use the sill seal at a single thickness and sometimes I cut in in half and double it up. For whatever reason, used at a single thickness a lot of times leaves a gap bigger than 1/8 inch.
Hello,
I have a bathroom project where I need to match tile and need the following Daltile import from Italy circa around 2003. This was a popular stone look alike in porcelain. I am in the Sacramento area, but would be willing to purchase elsewhere if someone has a box or two.
Pietre Vecchie Collection Porcelain Tiles
13 x 13 inch tiles
Champagne Color PV02….or… Antique White Color PV01
I believe it’s the Champagne color PV02…..included below are links to pictures, data sheet, etc.
I have done a ton of google searches, contacted Daltile, no luck. Still have a email out to Fioranese Ceramica in Italy, which was the manufacturer in case they have a lead for me.
QUESTION: do you know of a resource for this tile or a remainder house that has lots of surplus tile????
Thank you,
Hunting down old tile rarely goes well. The only thing that I can think of is to call every Daltile branch and talk to each location and see if you can find an old box somewhere. Unfortunately, the odds aren’t in your favor. It’s tough trying to find old tile that will match.
Thank you, glad I found your site. Have a great July 4th weekend.
Thank you!
Hi, how effective is foam spray vs silicon caulk for filling in cracks in a cement sub floor? I’m prepping the floor of a 30 year old house and the cracks are quite noticeable. If you step on it, you can see the crack in the floor shift noticeably. My concern about using foam is that I’m not confident the seal would prevent the self leveling (levelquik RS) from seeping into the cracks and draining downstairs. Would love your input. Your guide is the best I’ve seen after days of research.
I’m confused on whether your subfloor is concrete or wood. If it’s concrete how does the crack shift? But, to answer your question, foam works well when it’s used as a dam. If you’re filling a small crack then I think a caulk would work best.
File under “you’re the Man”. As usual, lots of great info. Thanks, Mr Tile Guy!! Greetings from Massachusetts.
Thank you!
When I apply planipatch or planiprep SC it dries but does not set. Where it dries, it is hard. Where it is still wet after a few hours, it is still soft and I can rub it off with a finger. Even after a few days, where it is dry, I can wet it and it turns soft and rubs off all the way down to the substrate. I have some scrap that I applied planipatch to years ago and that does not disintegrate when wet. Is this normal? Do these patches take weeks/months/years to set fully?
It’s been a while since I’ve used Planipatch and you can go over it when it’s dry but still doesn’t look fully dry. I don’t remember being able to rub it off after it’s fully dried though. I’m not sure if you have a bad bag? or maybe they’ve changed the formula? I’m really not sure. Normally, you should be able to go over it in about 10-30 minutes.
I tried this with 2 bags of planiprep SC and a bag of planipatch. One bag of planiprep SC was expired but the the other two good. All mixed according to instructions in conditioned space. Hard when it’s actually dry but turns soft again when it’s wet.
If it dries for a few days, you drip some water on it, rub it with your finger for a few seconds, and it turns to mud and rubs off, you would not consider that right, correct? Or is it just not meant for wet environments?
It doesn’t seem right to me but I can’t remember that I’ve ever tried to rub it off with water a few days later. That’s with any feather finish product. So, it doesn’t sound right to me but I can’t say for sure whether it’s OK or not. It’s probably best to contact Mapei and see what they say