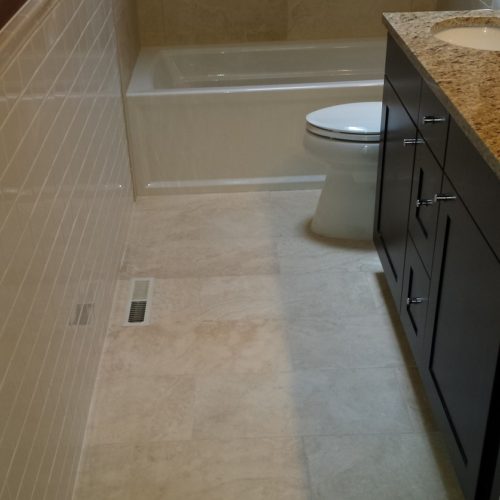
It seems like a simple project- a small bathroom floor. You’ve picked out your tile at the local box store along with a few supplies and you’re ready to go. The problem is: Where do you start?
This post assumes that your existing floor is removed and your tile underlayment is installed.
Basically, you need to layout your bathroom floor for the tile that you’ve picked out and begin installing.
See my previous post on tile layout concepts and why this layout was chosen.
So let’s get right into it. Here’s your plan of attack in 5 steps:
Estimated reading time: 5 minutes
Bathroom Floor Tile Layout
1. Find something to go off of
You have to measure off of something and draw a line. How do you know what to start measuring from?
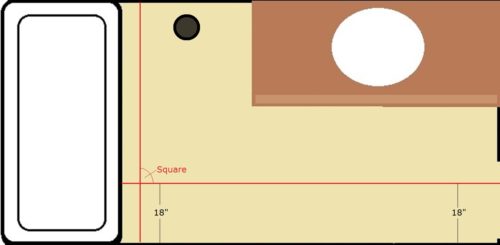
Generally, I look for the longest wall. Even better if it’s a long exterior wall.
Look to avoid small interior walls and tubs (plumbers go through extensive training to make sure they’re not put in straight).
Sometimes a vanity works and sometimes it doesn’t. Longer vanities work better but look to go off of walls first.
In the diagram above, I measured 18 inches. This is an arbitrary number and you can draw it wherever you like.
2. Draw square lines off of it
Draw a couple of square lines off of your main line to see how the tub and doorway(s) are square. Use straight edges and a framing square, a 3-4-5 triangle, a laser square, or whatever works.
5 Ways to Screw Up your Cement Board Installation on Floors
Then go around and check how straight everything else is.
Check the tub, the vanity, the doorway(s). Some things will probably be off.
If everything is off, go back to step 1, but try coming off of a different wall. Then (step 2) square off of that.
How does that work? Ask yourself this question: Does the room look straight and square off of these lines?
Sometimes there are bathrooms where everything is out of square. If that’s the case with your bathroom floor just do the best that you can and move onto step 3.
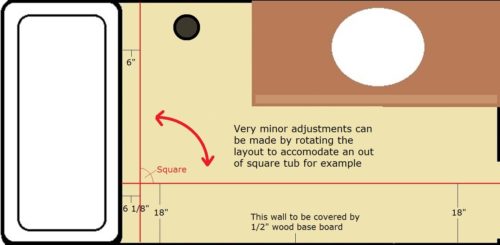
3. Make adjustments to your floor layout lines
Sometimes a minor adjustment can fix everything. For example: in the photo above the tub is out of square by 1/8 inch.
Nothing will cover the tile at the tub but there will be a wood floor base at the wall on the left (1/2 inch).
Since it’s easier to make square cuts than it is to make not-square cuts you may consider moving the layout to square off of the tub.
That way you can cut the tub cuts in square and the wall cuts will be covered by the base.
If the tub is out of square by 1/4 inch or more do not do this. Go off of your original square lines, bite the bullet, and cut the tub in at an angle.
Self-Leveling Underlayment: The Ultimate Guide
4. Draw a layout line the length of the floor
Now that you know what’s square you’ll need to adapt this to your bathroom floor tile layout.
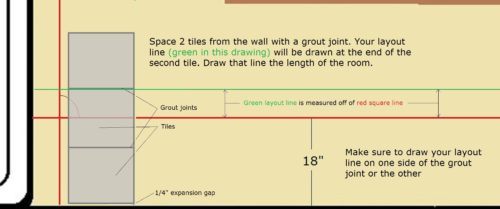
Do this: Place two tiles at your starting point with a grout joint in between. Remember to leave a gap at the wall.
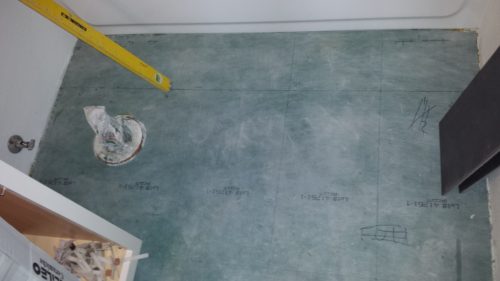
In the drawing, the starting point was off of the long wall. Draw that line the length of the bathroom (long green line in the diagram).
You now have one of your layout lines. See photo below:
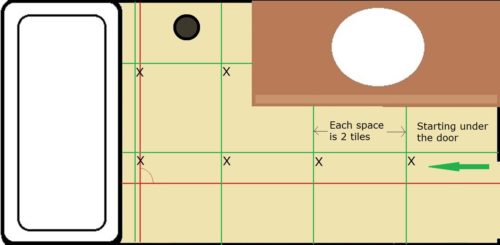
5. Make intersecting lines every two tiles
Now for the other direction. Ideally, your tile should transition underneath the center of the door when the door is closed. This way, when the door is closed you’ll see tile on one side and transition to carpet, hardwood, or whatever your other flooring is on the outside.
Start your tile under the door and measure two tiles and two grout joints. Draw an intersecting line.
Do this again every two tiles until you get to the tub. Your tile will start tight to the lines in one of every four corners. Draw an X in that corner.
Make sure you start your tile in the same corner every time.
With these 4 tips, you should have success with your bathroom floor tile layout. If there’s anything I’ve left out please let me know in the comments below.
Want to know how to calculate the square footage of your tile floor? Read this.
Douglas Mason says
I have a couple of questions about room layout, but mine is a walk-in pantry rather than a bathroom. We plan to do a different tile in the pantry and the hall just outside of it. The pantry will be separated by a sliding barn door. First question… should I use a different tile, like something decorative between the two in the doorway? If not, should my pantry tile extend into the doorway, or should my hall tile? Finally, if my pantry tile extends into the doorway, should I center a tile in the doorway and do the rest of my layout off of that tile?
DIYTileGuy says
I don’t like the idea of a decorative tile in the threshold between the two floors. Typically, the tile would transition from one to another under the door- so that when the door is closed it looks like the tile continues under it. However because your using a sliding barn door those tend to stay open. Also most of the traffic will be in the hallway side and not in the pantry. With this in mind I would probably run the hallway tile all the way to the backside (pantry side) of the door way and then start full tiles into the pantry. I just think the hallway tile is more important that the pantry tile in that situation.
That’s my best guess without seeing the project.
Douglas B Mason says
Great! Thanks for the advice! I also was not very keen on the decorative tile idea, so I’m glad you suggest otherwise
Douglas B Mason says
One more question… given your advice, how would you do the layout? The room is basically a 7’x8′ square, but the door is offset on one side of the long wall. Looking into the room from the hall/kitchen, the door is on the right, and there will be shelves on the opposite wall. A second refrigerator will be inside to the left of the door, so the greatest area of visible floor will be through the door in the middle and right of the room. Hope that makes sense
DIYTileGuy says
I would start with a full tile in the doorway. As far as the other direction goes- it sounds like the left side of the room doesn’t matter. So if the right side is visible then you could start with a full tile over there. Or you could just center the tile or grout joint in the doorway. Whichever would make the biggest visual impact.
Dave Clapper says
I love your advice for laying out the common bathroom which is exactly what I have. I need a little advice for 2 items. First, I have not found anything that addresses base board. I think it would make sense to remove existing baseboard before placing tile, then add baseboard over the new tile for a cleaner,finished look. What do you think? Second, I bought 6×24 inch porcelaine tile. I have a plywood underlayment and no water damage(second floor bathroom). Some advice is to screw down backer board…1/4 or 1/2 inch, or place a synthetic backer with a thinset mix on the underlayment as the adhesive before adding the tile. How would you prepare the existing underlayment plywood floor?
DIYTileGuy says
You’re right on with the baseboard. Hopefully your new tile floor will be the same, or slightly higher, than your existing floor so the baseboard will hide the old paint line. Otherwise you’re going to have a little more wall repair than what you bargained for. Also you could go with a new taller baseboard to cover the old line if that’s an issue.
With backerboard you will want to thinset it down. The membranes, like Ditra, all get thinset down but so do products like Durock and Wonderboard. A common floor tile failure is to neglect the thinset step the tiles come loose over time. 1/4 inch is the most common for floors but you can use 1/2 if you need extra height for some reason.
cindy says
This site is very helpful. I have a simple naive question. My bathroom is small, at the doorway, the shower is directly 5.5 feet away, the vanity directly to the left and a toilet squeezed in at the left. I am using 12″ tiles and 1/8 grout lines. The room is 5 feet wide. Should I put my row of whole tiles in front of the shower or the doorway? In other words, should a partial tile (8″ wide) be in front of the shower or at the doorway? Visually, the shower is the focal point, but, there is usually a mat in front of it. Will it look unprofessional to have a cut tile when you enter the doorway?
DIYTileGuy says
Start full at the door and put the cut in front of the shower. It’s just for the reason that you mentioned: there’s a mat in front of the shower and nothing will cover the doorway.
JP says
Great site. I’m tiling a shower with two walls. One is 60in wide the other 52. I’m using 12in tile so the one wall is a perfect 5 tiles wide. The 52in wall is the subject of my question, as I see it I have 3 options. I can, from the outside going toward the corner use 4 full tiles and have a 4in tile in the corner. I can put the 4in tile on the outside and then 4 full tiles toward the corner. Or start with an 8in tile on the outside then 3 full tile and another 8in tile in the corner. I’m not sure how the partial tile would look in the corner where it meets the full tile on the other wall. What would you recommend?
DIYTileGuy says
This is a good question and I don’t have a standard way of doing it every time. It’s case by case. If the shower glass will cover the grout joint on the 4 inch tile then I would run the full in the corner and put the 4 inch cut at the end. However the 4 inch cut at the end may be too visible or not a good option. If so you will want to look at centering the wall or starting full at the end and run the cut into the corner. Another option is to center it on the shower valve if that’s the plumbing wall.
I usually ask myself what is the most visible or biggest focal point. Sometimes sacrifices have to be made. I wish I had a definite answer for you but my advice is to do what you think will look the best.
JP says
If I put the 4 inch tile on the end the grout joint would be outside of the shower glass. Is this a strict no do? If I center on the shower valve it would end up a little larger on the end probably 6-8 inches. Which would put the grout joint right about where the shower glass starts. Either of these options a no go or is it whatever looks best. I understand that none of these are a perfect choice but I don’t want it to look unprofessional. Appreciate your time, thanks.
DIYTileGuy says
I think if you center on the shower valve and the grout joint is hidden by the glass then that seems like it would be the best. But no matter what the “rule” is whatever looks the best.
It’s rare that the back wall not be centered but the side walls are always case by case and should be determined on-site.
Ryan says
Hi,
I have a question about fixing a high spot with my hardibacker underlayment of a bathroom floor project. After dry setting and laying out our cut tile (12″x24″), a series of tile around an air vent teetered and lipped the next series of tiles. Difference is close to 1/2″ inch in just a few feet from the middle of the floor sloping down towards the vent. I’m curious what is the best way to fix my mistake. Do I 1) cut out the “hump”, scrape out the thin set, and patch or 2) use a self leveling compound or fill the low spots around the vent with thinset, smooth, and feather into hardibacker to flatten out the underlayment?
Thanks for the insight. I appreciate the help.
DIYTileGuy says
If you can raise the low spot that will be the path of least resistance. A feather finish floor flattening product would work but a self leveler should do the trick also and may be the easiest.
If raising the lower area isn’t an option then you’ll have to lower the high spot. The proper way to do it would be to remove the hardibacker and subfloor and plane down the joist. This assumes the joist is high. It could also be some sort of hanger of metal bracket on top of the joist. You mentioned something about a vent and it very well could be the metal flashing for the vent is causing the unevenness.
What you don’t want to do is remove material from the subfloor layer.
I suppose you could also remove the high section of the hardibacker, like you mentioned, fill it and go over the entire floor with and uncoupling mat or some sort of sheet membrane suited for floors. That assumes you can accommodate the extra height.
No floor is perfect and the flatter that you get it the easier it will be when you get to tiling.
Ryan says
Turns out it is the floor and the vent. I had to take up a 28″ square area of the hardibacker to get around the high spot. The high spot is almost 3/8″ higher, but i I don’t think taking up the subfloor is an option with the vent and repairing the subfloor back to sufficient strength.
Can I fill this space with a self leveler, then tile straight on the self leveler patch?
Just looking for the path of least resistance to move forward, but I want to fix this the right way. So, if repairing the sub floor is the only way I will.
I appreciate the help.
DIYTileGuy says
Going over self leveler directly on the subfloor isn’t recommended. What you could do is maybe go over the self leveler with something like Redgard. This isn’t recommended either but it might work for a spot in a residential bathroom floor. It would need to be applied drivers licence thick for it to have a chance.
I understand that real world situations occur and following the rules isn’t always convenient. But the best way would be to cover the entire floor with a crack isolation membrane or an uncoupling membrane. A failure isn’t guaranteed but you do raise the chance of one.
Cheryl says
Hi Tile guy,
I have a 25sq ft guest bathroom, I want to lay pebble tile. Can I lay it directly onto the cement, foundation or must I install cement backer board on top of the cement foundation?
DIYTileGuy says
If you have a concrete floor then you definitely don’t want to add cement backer board it. However you can install the pebbles directly to it. :-)
mike says
I am using USG ultra light backer board for walls in my shower. In the center section of each wall I am installing 12 x 12 honey onyx mosaic tile and on each side porcelain tile. The mosaic tiles are interlocking and there are approx 100 small 1″ pieces that make up each tile and there is no space between the sections within the tile to grout because they are so close together. It looks like this:
fastfloors.com/tile/diamond-tech-glass/contours-rome-interlocking-wave-polished/honey-onyx-black-marble
Questions:
1) If water seeps between the pieces of tile will it eventually degrade the thinset and cause the tile to fall off the wall?
2) If your answer to the above is yes, what kind/brand of sealer can be applied after installation to prevent seepage?
3) I am using Laticrete XLT modified thinset. Is there a better kind/brand to use if thinset gets wet, and if so, what?
4) Would using clear silicone instead of thinset to adhere the mosaic to the walls be better than using thinset?
Thanks.
DIYTileGuy says
This may not be the best product for a wet area.
If you tile has the arches, like I see in the photo, I don’t think there’s a way to grout it, which you’ve mentioned. If there’s no grout then sealer will be ineffective at stopping moisture from getting in. Yes, it’s nice to seal onyx but you won’t be able to stop moisture from penetrating.
For thinset choices, your best bet would be to call Laticrete’s tech line and ask if white 4XLT is ok for onyx. My hunch is they will say no, but they can get you lined up with the appropriate products.
These may include epoxy mortars or possibly they have a product that can seal the back prior to applying a cement mortar such as 4XLT. But I would think the back of the mosaic would have to be flat which the honey onyx in the link above probably isn’t.
Additionally, anybody that sells or manufactures that product should have installation instructions and even specific product recommendations. But I did say “should” and some of that stuff comes from overseas and all they really care about is if it sells, or not. They could care less about how to install honey onyx mosaic pieces.
If I were you, I would head over to John Bridge’s forum and type “onyx” into their search function. I seem to remember quite a few threads on onyx. Some were about backlighting but some were about the fussy-ness of that type of product.
I think you have a challenging install and your best to be armed with as much info as possible.
mike says
I tested two samples:
1) I put 4″ x 4″ piece of the mosaic on the backer board using the thinset and after 24 hrs, put in a bucket of water. After a few hours I was able to pull it off. However, before putting it in the water and while installing it on the board, about a 1/32″ gap opened up in between the pieces while pushing the tile into the thinset without going all the way to the other side…therefore, grout can be put on the tile, but only issue with that is that putting the grout will take a long time because of the two different colors of the mosaic…black/white. Since using one color grout on the mosaic wouldn’t look right (white grout would clash with the black pieces of the mosaic or black grout would clash with the white pieces of mosaic). I could put black grout on the black sections and white grout on the white sections but it would take a very long time. I am using Mapei flexcolor premixed grout on the porcelain on each side of the mosaic so and using the same type of grout would make the job easier. The mosaic has a mesh backing.
2) I put a 4″ x 4″ piece of mosaic on the backer board using 100% clear silicone and after 24 hrs put in a bucket of water. After a few hours I started to pull on it and it started to come loose. It did better at bonding than using the thinset but the silicone weeped through the white part of onyx and discolored it some.
I looked at the John Bridge forum as you suggested but could not find question similar to mine.
What is your opinion of using bondo (it is waterproof)? I could screw in a piece of aluminum flashing on backer board if bondo would adhere to it better than to the backerboard. I am determined to make this work..I love this mosaic tile and don’t want to use any other kind. If this would work, then grouting wouldn’t be necessary since the bondo and USG ultralight backer board is waterproof – right?
There are two shower walls I am tiling…one row of 12″ mosaic in the center of each wall…8 pieces in each row.
I looked at the John Bridge forum as you suggested but could not find question similar to mine.
Based on this info., how do you suggest proceeding?
DIYTileGuy says
My concern isn’t so much that the onyx won’t adhere to the backer board. It’s more about discoloration and longer-term maintenance.
I don’t think that mosaic is supposed to be grouted. So you can either do what you had mentioned and grout two different colors or just leave it ungrouted.
But I wonder about that type of mosaic in a shower environment. Assuming it’s your shower, there’s probably not a lot of risk in trying it out. The worst case scenario is probably having to change it out down the road?
I don’t have any experience with bondo so I can’t speculate on how that would work. I would still put in a call to Laticrete, or whichever mortar manufacturer you choose, and find out about the risks of cement thinset and onyx. I’m curious about what they would say.
mike says
I went to a local Laticrete dealer today and showed him the sample on my backer board. He recommended Laticrete 254 because it can be used in pools:
“The ultimate one-step, polymer fortified, thin-set mortar for interior and exterior installation of ceramic tile, stone, quarry tile, pavers and brick. 254 Platinum, designed to just mix with water, has a long open time with unsurpassed adhesion and workability. 254 Platinum is a LATICRETE approved substitute for 211 Powder mixed with 4237 Latex Additive.
Excellent for exterior and underwater applications as well as providing superior bond to exterior glue plywood (interior only) and concrete. The ultimate thin-set for porcelain and glass tiles.”
I showed him on my sample where the tiles spread apart a little and asked if it would need to be grouted and he replied no.
I bought a bag of it but decided to call Laticrete to verify. I told him about difficulty grouting and rep. said that Laticrete 2437 additive used with Permacolor grout would be better than 254 for wet areas…just mix the two and use it for the thinset:
“INSTALLATION OF PAPER-FACE MOUNTED GLASS MOSAICS (per ANSI A108.15):
Make sure that the substrate is clean, structurally sound, and free of any dirt, oil, grease, paint, sealers, form release agents, or curing compounds. Clean the surface with a damp sponge just before installation of the tile. This installation requires that the same mortar mix used to set the glass mosaics is also used to grout the tile. This is commonly referred to as the One-Step Method. PERMACOLOR®
Grout mixed with 4237 Latex Additive is an ideal combination for this installation. For the one-step installation of paper-face mounted glass mosaic tile, mix 3 quarts of (2.9L) of 4237 Latex Additive with 25 lbs. (11.3 kg) of PERMACOLOR Grout.
Installation of Glass Mosaic Tiles
TDS 145
Place each sheet of glass mosaics face down and work a small amount of the mortar into the back of each sheet with a rubber grout float or the flat side of a trowel. Remove excess mortar from the back of the mosaic sheets with the straight edge of the trowel of float. This should fill all of the joints and leave a thin, wet layer of mortar on the back surface of the sheet. For sheets with varying thickness of glass mosaics then level grout to the thickest tile on the sheet.
Key the mortar into the substrate using the flat side of a trowel to initiate a bond coat. Using the appropriate sized V-notch or small square notch trowel (e.g. 3/16” [4mm] square notch), add more adhesive and notch the mortar in a horizontal, straight pattern. The freshly prepared sheet of glass mosaics is placed onto the fresh combed mortar on the floor or wall.
After each sheet is placed, a flat wood block or rubber grout float is used to beat the face of the tiles and firmly embed the tiles into the mortar. A minimum of 95% coverage of mortar to tile should be achieved after the beat in. Check to make sure that a flat, uniform surface is attained.
Note: DO NOT APPLY EXCESSIVE MORTAR ON THE SURFACE TO BE COVERED WITH MOSAICS. Too much mortar will squeeze up through the joints and produce an uneven finished surface. Excessive thickness of mortar can also slow the hardening of the mortar which means that the mortar will remain soft for an extended period and delay the removal of the paper mounting.
Transparent and translucent glass tiles can show shadowing (ghosting) if the glass tile manufacturer’s installation instructions are not followed. Please be aware of visual and technical limitations with transparent and translucent glass tiles. A mock-up is strongly suggested to verify final appearance and acceptance.”
I just noticed in info. about 254 it states “254 Platinum is a LATICRETE approved substitute for 211 Powder mixed with 4237 Latex Additive.”
So being more confused, I contacted Laticete again using their chat service. The rep. recommended Latapoxy 300 because he thought it would bond better than 254 because my tile has the mesh. But due to the high price of the 300 I decided to try testing the 254 thinset and grout outside of tile using an unsanded grout.
mike says
Update…just put a test piece on the backer using 254 but the pieces didn’t open up at all like with the Mapei Ultraflex. If the sample holds up well to the water test would it be better to try floating in some grout or use a waterproof sealer between the cracks? If your answer is use a sealer, any recommendations?
mike says
Another possibility…each section of the mosaic can be folded open in each row…open each row up and put the grout and then put clamps on each end after folding back and let dry then install on backer with the 254 thinset…good idea or not?
DIYTileGuy says
What I’m wondering about using 254, or any cementitious mortar, is if it’s supposed to be used with moisture-sensitive stone. I’m fairly certain that onyx is considered a moisture-sensitive stone.
If you look at the data sheet for Laticrete 254 under “limitations” it mentions that it shouldn’t be used more moisture-sensitive stone and to use Latapoxy instead. The resin backing may be another reason to use Latapoxy.
At first, I thought that the 1-step method would work well and was something that I hadn’t considered. But the 1-step method is also a cementitious grout.
I don’t see how applying a liquid grout sealer will help fill the gaps in between the product. You may look into Spectrlock if you want to seal the gaps in the onyx. But that doesn’t sound fun to me.
https://cdn.laticrete.com/~/media/product-documents/product-data-sheets/lds6770_254-platinum.ashx?vs=1&d=20171212T163849Z
mike says
I don’t understand why using 254 with porous stone would matter since 254 is virtually waterproof.
I am concerned with possible staining of onyx using Specralock:
SPECTRALOCK PRO Premium Grout and SPECTRALOCK PRO Grout resins may affect the color of white or porous stone.
Also, minimum gap for this product is 1/16″…there is not that much gap between the mosaics. Additionally cleaning residue would be cumbersome.
I called a tile store today that sells Mapei products. He recommended using unsanded Mapei grout and Mapei grout maximizer:
Grout Additive for Enhanced Stain Resistance Grout Maximizer is a premium latex-based additive for mixing with Keracolor™ S or Keracolor U Portland-cement-based grout to increase resistance to water, dirt and oil-based stains. FEATURES AND BENEFITS • Increased stain resistance* • No sealing required after curing • Does not affect grout color • Easy to use in place of water for mixing with Keracolor S or Keracolor U • Repels dirt and stains • Reduces water absorption, improves flexural strength and reduces shrinkage of Portland-cement-based grout • Complements approved uses of Keracolor S or Keracolor U Portland- cement-based grout for interior/exterior, residential/commercial walls and floors • Maintains application properties of the grout it is used with • Improves routine cleaning maintenance.
I have piece of the mosaic on the backer using 254 and it has been sitting in a bucket of water for a few hours and so far it’s holding very strong. I’ll give you an update tomorrow.
,
DIYTileGuy says
You’re in a little bit of uncharted territory with this but I think you’re going about it the right way: testing and researching to see what works. It’s hard to tell what will happen but the testing should yield a bit more information.
I’ll be curious what you end up choosing. I hope you’ll continue to update.
mike says
I went to the tile store I mentioned in previous post and showed rep. the sample tile and he said not enough room to grout. I told him I had a bottle of Stain Guard 5000 I purchased from them and I could use that to seal the mosaic and he said that would be fine:
https://vanhearron.com/product/stain-guard-5000/
Is there a better sealer for porous natural stone? If so, what is it?
He recommended installing tile so water would have a way to evacuate if any water got through seams but didn’t give any suggestions how to do that. Would a way to do that is not to put a bead of silicone on bottom of first tile where meets the shower pan (will be 1/16″ gap)? If not, any suggestions?
DIYTileGuy says
From what I’ve heard, the best stone sealer is called “stain proof” from Drytreat.
However, I really don’t know a lot about Vanhearron’s sealers and his may be really good too. I just don’t know enough about them.
Sealers really shouldn’t be counted on for waterproofing though. I liken them to be more similar to Scotchguard for carpet.
But leaving the bottom of this accent strip uncaulked seems like a good idea to me for the reason that you’ve stated.
mike says
1) I had to tear out a piece of tile on the USG ultralight foam board. I used a 12″ blade on a sawzall so the tile wasn’t damaged but the foam board was damaged a little, so I patched it with a thin piece of 6″ x 8″ of orange kerdi using unmodified thinset and I re-tiled it to the foam board using modified thinset. A few days later I had to remove the tile again and noticed that the thinset didn’t stick well to the kerdi because it was smooth without tearing any. I was planning to use the USG 5″ membrane instead of the kerdi but didn’t have any left (I used the USG membrane to cover between the seams in the rest of the shower). I installed the kerdi according to specs by mfg (unmodified to install to wall/modified tile over it). Do you think when I reinstall, I should use unmodified thinset on both sides of the kerdi? My preference would be to use the kerdi since I have plenty of scraps but I don’t have any USG membrane but I’ll go buy it if that’s your recommendation.\
2) According to the mfg, the USG foam board should be installed using USG brand sealant with a small dab put on the board and the screws driven in through it. The specs of the USG sealant are:
USG Durock™ Brand Sealant is a multi-purpose, waterproof sealing and bonding compound for use with USG Durock™ Brand Shower System components. This unique sealant is a silane-modified polymer and is free of solvents and isocyanates. It cures via exposure to atmospheric moisture to form a highly durable, flexible seal. It has been formulated to offer outstanding primerless adhesion to most common building materials, including: tile backerboard, ceramic tile, stone, drywall, aluminum, glass, XPS and EPS foam, wood, and ABS plastic. USG Durock Sealant is composed of calcium carbonate CAS 1317-65-3, polymer CAS proprietary, plasticizer CAS proprietary, N-beta-(aminoethyl)-gamma-aminopropyltrimethoxysilane and vinyltrimethoxysilane.
Do you know what brand silicone would be similar in specs that is more economical (the USG sealant cost $12 tube)?
3) Keeping tools clean after they have come in contact with thinset is a challenge. I’ve tried soaking in 5 gal buckets of water and that is some help but not a lot. Any suggestions what to soak the tools in?
DIYTileGuy says
I understand not wanting to buy additional material and I would think Kerdi would function just fine for the result that you want to achieve.
My opinion is that I would rather have modified mortar to stick the tile to. It does take some time to grab the fleece of Kerdi and I would do your best to work it into the fibers but I don’t think you really gain anything from using unmodified. However, if the unmodified will stick to the tile then either would work.
As far as Durock sealant goes I’m not a chemist and don’t have a good knowledge of the chemicals in sealants. But here’s what I can say:
I know that before GoBoard had their own sealant that they used to recommend other products for use with their board. There’s a letter floating around the internet somewhere that had specific product recommendations. OSI Quadmax was one. SikaBond construction adhesive was another. The vendor that I purchased through sold a DAP polyurethane with it.
So these products worked with GoBoard. Now will they work with Durock foam board? I don’t have the answer to that.
Keeping tools clean: I clean my trowels with water, a scrub brush, and a metal putty knife. The putty knife scrapes the really tough stuff off of them. I suppose you could try vinegar & water? Muratic acid will rust the tools.
Also, I usually clean them during the day. With really tough thinsets I would clean them every time I mix mud or every hour or two at the latest.
On the bright side, it looks like the thinset that you are using is working. :-)
Andrea Jean Rice says
Hi- first time DIY here. Ive acquired some tile and supplies to redo my bathroom, so switching/buying new tile isn’t really an option. I have a small bathroom – 60×60 area except right next to the door entry the wall juts out to account for electrical I’d assume, the area outside the 60×60 (doorway area) is 34×17. I have 16 inch tile and doing 1/16 grout lines. I’m struggling to decide where to hide the cuts. Walkimg up to door, vanity on right (behind jutted wall) then toilet then tub at far end. My concern w putting cuts near the tub would be easier for water seepage? On an earlier post u said not to make cuts at the door entry but with the jutted wall I have no choice. Thoughts? I was thinking to try to hide any cuts under vanity and behind toilet area but at a loss.
DIYTileGuy says
It’s hard to picture your exact bathroom configuration but I would still put the full tiles in the doorway unless the tiles at the tub would be 1 inch, or less.
That’s my opinion.
Shelley A Christensen says
My bathroom layout is exactly like your example. I have gutted the entire bathroom and installed a new vanity and temporily re-intalled the toilet for use during remodel. I will be installing ceramic hexagon tiles on cement floor along with a new toilet. Can you please advise me on best and easiest way to ensure the toilet is flat/level? Tile first or tile around the toilet mounted to the cement floor?
Also, I am changing bathtub area slightly. It was originally one piece tub/enclosure which I will be replacing with compatible 32 x 60 shower pan and tiling the walls. Any advice for this DIY Mom with no help, but lots of ambition? hahaha…. thank you!
DIYTileGuy says
It’s best to install the toilet over the tile. They do make some toilet shims that you can use to steady the toilet during install and you’ll need an extra thick wax ring, at a minimum.
For the shower, you won’t want to hear this but the drain is supposed to be changed from a 1 1/2 inch tub drain to a 2-inch shower drain. I’m referring to the drain pipe under the tub that’s in the concrete. It’s supposed to be 2 inch all the way so I don’t know what that means for your situation. A lot of times it changes from 1 1/2 in a very short period of time but it could be cutting concrete also. Once you get the tub out you’ll know what you’re dealing with.
Dina says
Hello, I have a quick question. I’m tiling s little power room . The tile is bright with a pattern. Should the cut piece be at the door or directly across where the built in cabinet is?thank you.
DIYTileGuy says
I’d be more inclined to put it across especially if the built-in has a toe kick.
George E. says
I am installing ceramic tile in a small bathroom. I want to use Ditra underlayment. I also want the tile to be a smooth transition to an existing hardwood floor. How do you suggest I make up the difference from a subfloor to the hardwood floor using the Ditra?
DIYTileGuy says
It depends on the tile size. If you are installing a thick tile then you may not need anything more than simply the mortar. If your tile is, say, 5/16th inch thick then Ditra XL is probably what you want. If you have tile thinner than that then you’ll probably want to install a 1/4 inch backer board and then install Ditra on top of that.
Melissa says
Great site! I’ve got a bathroom with a layout like your example. Using 12×24 tiles, looks like you did them parallel to the tub.
Is there any reason to not do them so they run lengthwise from door to tub?
And full tiles at the door still? :)
Thanks!
DIYTileGuy says
There is no reason not to run them lengthwise. It’s a design decision. I would still start full/halfs or full/one-third/two-third unless it puts a little sliver cut at the tub.
Rolf says
Hi there,
Thanks for sharing your expertise.
I have a question about borders in a bathroom. Its a victorian style and there are border tiles which have corner pieces I can match at the corners. Do you have any tips for what to do about room lengths which dont match the repeating pattern distance so your corners no longer match and you have to cut the pattern tile across a shape/feature?
Thanks
DIYTileGuy says
With borders, I have typically cut the border to work for the main pattern in the center. So, if you have to have the corners full then I would cut the border tiles in between the corners to make it work out.
If the border has a pattern and that can make it more difficult. But that’s part of the challenge. On something like that, there is no set way of handling it. You are the problem solver and you have to solve the problem for your particular installation.
Additionally, if it’s something that just isn’t going to work then you might think about reselecting the tile to work for your room.
Susan says
Hi. When installing small black and white floor tiles in a small bathroom should we try to begin with a full tile along tub or a cut tile tile along tub? I’m confused which is correct way. Thanks.
DIYTileGuy says
If you can have a full tile in the doorway and a full tile at the tub then that is usually the layout that I prefer for *most* small bathrooms. If you have to choose between the two then I usually will opt for a full tile in the doorway.
Angela says
Hi there!
My rental has linoleum in the MBath that needs an update and I have a ton of 12×12 peel & stick tiles. But the bathroom has a corner jacuzzi tub, a small linen closet, a door into the walk-in closet and a sliding glass door shower behind the door. How in the world do I measure how many tiles I’ll need?
Also, would you suggest I remove the existing linoleum/vinyl or apply over it?
Would you suggest that I remove the existing 1/4 round and apply new or leave it and work with it?
And I also have an awful squeak in the floor right when you step into the bathroom. Any suggestions on fixing this?
And lastly, I read in a post where you suggested laying the tile first and then place the toilet with an extra thick wax ring. Does the same apply when using stick on tiles?
I know it’s a lot of questions but I could really use some direction. I’m a very hands-on, DYI single female, jill-of-all trades, master of maybe one or two, but do need help now and then…😉
Thanks for your time and help!
DIYTileGuy says
For measuring, I recommend trying to break your room up into a bunch of squares and rectangles and measure those. Then add up all of the squares and add 10-20% onto that. Further, I would remove and reinstall the 1/4 round, remove and reinstall the toilet, and sink some screws into the sqeek to try to get rid of it.
As far as whether to go over the vinyl, I don’t have any experience with peel & stick tiles. So maybe you go over the vinyl with those but I don’t know for sure.
I hope this helps
Julie says
Am I glad I found your site today…I need guidance/help/insight/a stiff drink. I am in process of a home remodeling project and do have a GC however, I’m selecting and buying materials. I have three bathrooms to do and my main bathroom is where I have selected a 24″x48″ tile; it is NOT sold in any smaller sizes no matter where I look (Emporio Calacatta Porcelain). My GC first said he would not work with such a big tile, but I’ve convinced him otherwise. This bathroom is currently gutted, and measures @ 12.5’x5′. So it’s a rectangle shape – pretty common. A soaker tub will be re-installed at one end, and if standing in the doorway (opposite end of tub), there’ll be a 60″ vanity and toilet installed on the right wall. Again, no fancy layout. So, with all that in mind, where on earth do you start to lay such a big tile…? Oh, and did I mention this same tile will also go all around the tub, and all the way up to the ceiling. Please…I’m turning gray and losing hair!
DIYTileGuy says
So, I’m not really sure what the question is here but one of the challenges is going to be how to cut the tiles. If the general contractor is doing the installation does he even have a way of cutting tiles that size? Hopefully, things go well. Let me know if i can help at all
Julie Murdoch says
Thanks….my question was buried in my description: where on earth do you start to lay such a big tile…? I just wanted to hear your opinion on where you’d place the first tile in a rectangle bathroom, that’s all. My inclination is to place it at the door, and grid stack it to the bathtub, and then right to under the vanity and toilet area.
DIYTileGuy says
With a 5ft wide bathroom, I would start with full tile in the door and full tile on the wall opposite the toilet and vanity. Those are the two focal points