How can installing pebble tile flooring be a miserable endeavor?
After all, when you use words like organic, zen, natural, and feng shui to describe the bathroom that you want aren’t pebble tiles always in the scheme somewhere? Well, I have a huge pet peeve when it comes to pebble tiles.
A crash course on installing pebble tile flooring

This post contains affiliate links. The site owner may earn a commission should you click on an affiliate link and make a purchase. Read more
Those pesky pebble tile seams
Once grouted you can always see the seams between the sheets.
I can hear it already…
- “But ours are shaped like puzzle pieces so you can’t see the grout lines”. Yes, I know.
- “They told us that they are designed to interlock so the seams will be hidden.” I know.
- “We put a couple of sheets together at the store and it looked good.” Again, I know.
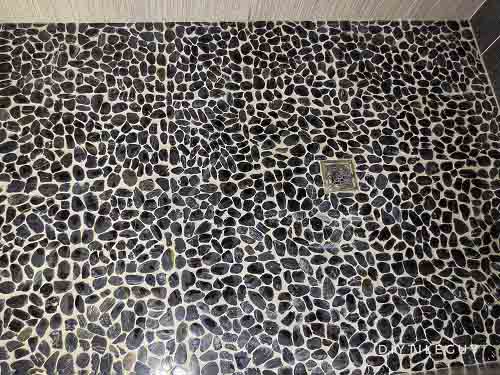
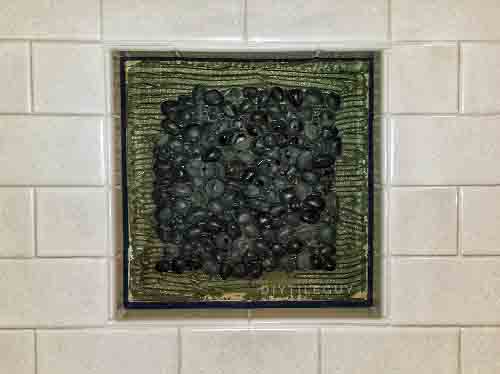
But, I’ll repeat: once grouted you can always see the seams between the sheets. Let me present Exhibit A:
And Exhibit B:
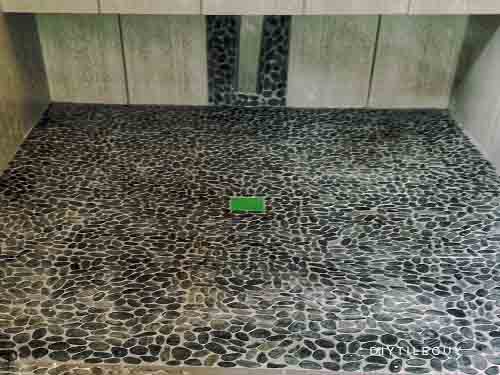
Although some pebble tile installations are more subtle than others it is highly unusual to find a brand in which the pebble tile sheet lines disappear.
So, what can be done about this? Well, there’s an installation “technique” that can make the seams disappear.

The Secret Installation Technique for Pebble Tile Flooring
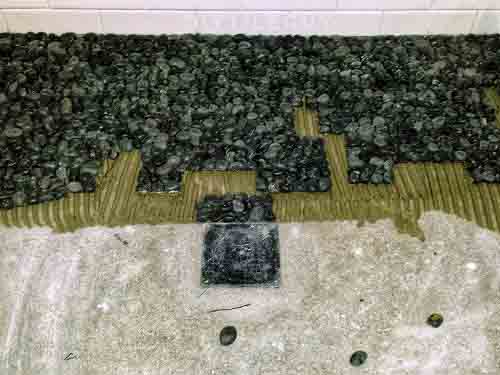
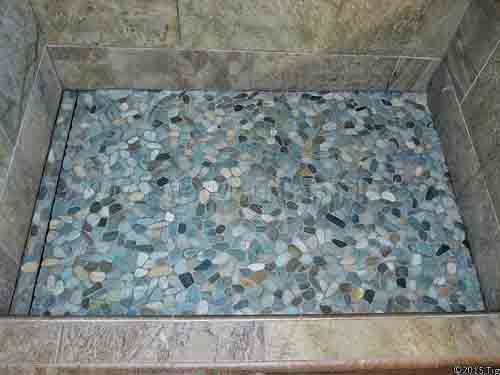
Keep in mind I use the term “technique” in jest. But, this photo shows the secret to getting the seams to disappear when installing pebble floor tile.
Installing pebble tiles individually!
Consequently, this is where the misery comes in.
In addition to the tediousness of sitting down and pulling off all of the tiles from the sheets (make sure to pull the strings off too) you then have to install those tiles individually.
But I’ll share with you a technique that I and a tile friend of mine came up with. It’s pictured in the photo below:
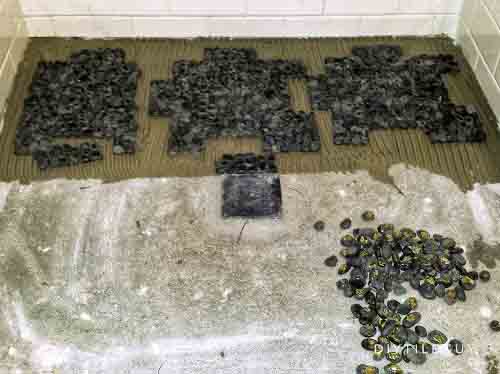
It’s a mix of full sheets and individual pebbles and it works for most applications. The basic concept is that you don’t interlock the sheets. Rather, you keep them spaced from everything else about 2-4 inches.
Spacing them closer than 2 inches makes it difficult to find pebbles to fill the space. Spacing them too far apart makes for slower work. However, installing them in this manner will make the seams go away.
Grouting Pebble Tile Flooring
As you can imagine these pebble tiles have their own grouting quirks as well. For starters:
Grout Selection:
For pebble floor tiles you DO NOT want to use single-component “urethane-type grouts.” These include Bostik Dimension, Fusion Pro, and Flexcolor CQ.
Rather you’ll want to use either a standard cement grout or a high-performance cement grout (my preference) like Prism, Permacolor, or Ultracolor. In fact, Custom Building Products recommend their Prism grout specifically for pebble tile flooring.
Please be cautious with the high-performance grouts. They are fast setting and you can get into trouble with the grout setting up too quickly before you’ve had a chance to wash it.
Additionally, epoxy grouts are a good choice for pebbles tiles but you’ll always want to double-check with the particular product that you are looking to purchase.
For epoxy grout, I like Spectralock Pro Premium or Ardex WA and this is one of the few situations that I would recommend the full-size Spectralock unit.
Calculating Grout:
This is basically the definition of an exercise in futility. What do you use for an average tile size? What about an average grout joint size? or depth?
Recently I used 23 sq. ft of black mini pebble tile and used about 85% of a 17lb box of Prism grout. A 17 lb box of Prism is supposed to be the same volume as a 25 lb bag of standard grout. Hopefully, this is helpful.
Installing grout:
For grouting pebble tiles the steps are basically the same as a normal flat tile although it’s a good idea to not walk on the pebble tiles until they are grouted if at all possible.
For instance, if you have a pebble tile shower floor you can probably reach everything from outside the shower. Basically, it installs like a normal grouting application although wiping your grout float like a squeegee is much less effective.
You’ll want to be careful of the amount of pressure and force that you use with a grout float also. You won’t be able to remove as much of the grout as you would with a normal flat tile floor.
Because of this, you’ll be constantly ringing your sponge out during the washing step. Probably a good idea to change your wash water frequently.
More Thoughts on Installing Pebble Floor Tiles
Cutting pebble tiles
The good news is that you don’t need a lot of equipment for pebble tile installation.
I usually don’t cut any of the pebbles so there’s no saw to rent or purchase. It’s just a matter of finding the right size and combination of pebbles to fit the space.
I find a 1/4×1/4 inch square notch trowel works for most every pebble tile installation. It’s always case-by-case but I would start with that size and see how it goes.
How much should a shower slope with a pebble tile floor?
When installing pebble tile shower floors, it’s not a bad idea to slope the shower floor more than the minimum. So, normally the rule of thumb for a shower pan slope is 1/4 inch of fall for every foot.
For example: If your shower is required to fall 3/4 inch from the edge to the drain you may decide to just make it 1 inch or even 1.25 inches if you know that you are going to be installing pebble tile on your shower pan floor.
The reason for this is drainage. Because of the odd shapes, water will take longer to drain and may not drain as efficiently as a flatter tile shower floor. This is still a factor with the flatter sliced pebble tile but not as much as the bigger rounded pebbles.
Point load on foam shower pans:
If you are installing a foam shower base, like a Kerdi shower tray or Wedi system, it would be advisable to read the instructions before committing to this tile.
They may have a minimum tile size requirement and if so, the pebbles are not likely to meet the minimum tile size.
Now obviously if it’s a residential shower you won’t be rolling heavy carts through. So you’ll have to use your judgment on whether you want to go ahead with it anyway.
Shower Wateproofing Crash Course
So, get some nice cushy pads to kneel on, mix really small batches of thinset, and get into your patient zen-like frame of mind. Your organic Feng Shui bathroom is taking shape!
Look at the bright side: at least you don’t have to worry about spacers, chalk lines, and difficult cuts.
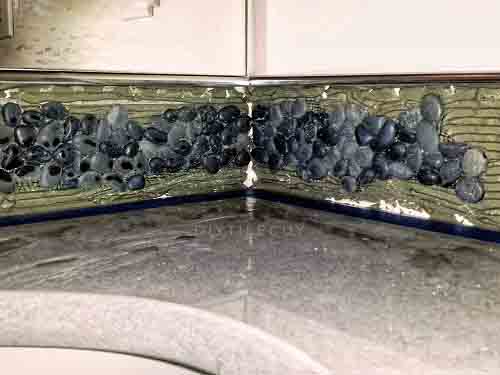
I use this same technique to install pebble tile for an accent strip
One last thing, when doing some research for this post I found this design blog had some good tips on what kind of pebble tile to select. You may find it helpful (although the background drives me nuts).
