The golden ratio is a mathematical equation found everywhere.
From snail shells to hurricanes; from pyramids to stock market charts.
We don’t need to know every detail to use the golden ratio in tile applications, nor do we have to be a math wiz to know how it works. We just need to know the basics.
Estimated reading time: 4 minutes
Using the Golden Ratio for Tile Installations
See my tutorial post on how to install a tile accent strip flat and even with the rest of the tile
This ratio is used to determine proportions that we unconsciously feel are pleasing to the eye.
Architects have used this equation for centuries and Leonardo Da Vinci is considered to have used the golden ratio masterfully in his art.
It’s just math
Basically, the golden ratio is 1.618 to 1.
For tile purposes, this doesn’t have to be exact so we can round it to 60/40.
If A=60 and B=40 then C=100.
The ratio of A to B is the same as C to A.
Easy, right?
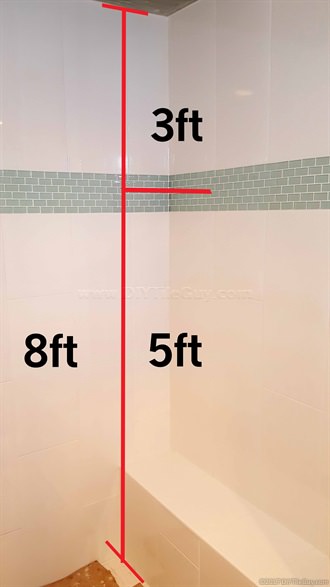
Using the golden ratio to layout tile
So let’s apply this to tile.
Oftentimes, tile showers will have a decorative stripe that runs horizontally through them.
Designers will always tell you to put this accent strip in around “shoulder height” or “eye level.” Why at this height? The answer can be found with the golden ratio.
It’s common for homes to have 8-foot tall ceiling heights.
If we multiply 8 ft x 0.618 it comes out to almost exactly 5 ft.
Which just happens to be shoulder height-ish. So with the accent placed at shoulder height
- Bottom portion is 5ft
- Top portion is 3ft
- total height is 8ft
3 is to 5 the same as 5 is to 8
It’s perfect!
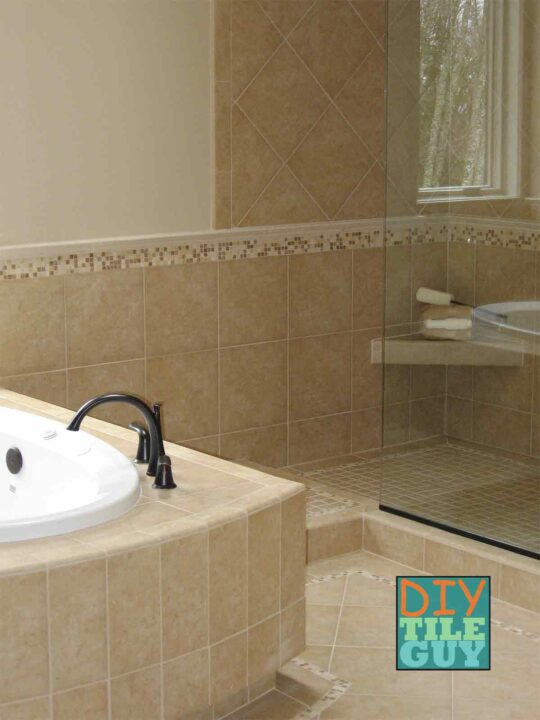
Other layout examples
If you flip the ratio over, you then have the proper height for a wainscot or a 3ft high accent strip.
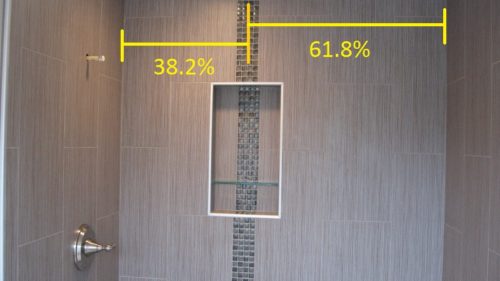
What about running the accent vertically? How did you determine the best proportions on the wall?
Use the golden ratio.
Since the back wall of this shower was 5 feet wide the tile accent stripe was at the 3ft-1inch/1ft-11inch split.
How Exact Do I Need To Be?
Typically, you don’t want to cut the accent into a tile when installing an accent strip.
Instead, you would want it in between two full rows of tile. As a result, if you’re a couple of inches too high or too low- that’s ok.
When it comes to tile installation the golden ratio should be used as a general guideline and not a strict rule.
Centering Your Accent Tile
Centering isn’t wrong. In fact, sometimes it’s preferable. In fact, I use it quite a bit with kitchen backsplash tile layouts.
Consequently, you’ll have to examine your bathroom and choose the layout that you feel is best.
If centering isn’t the best option then the golden ratio can be a guide for an off-centered placement.
Now that you’ve figured out where to put your tile accent strip check out my post on how to avoid a common pitfall on installing them.
How to get your accent strip flat and even with the wall tile
Want more math? How to calculate square feet for tile and how to measure a shower for tile should satisfy this need.
Ceramictec says
I really like this article and usually layout my accent bands using this rule.
DIYTileGuy says
I appreciate the comment, Brian. Thanks for checking my site out.
Lisa Miller says
We’re planning to put a single tall niche in a 9″ tall shower with two glass shelves creating two large sections for shampoo and one smaller one for soap and razors. We were thinking of starting 36″ from the floor (three tile widths) for 36″? Any other suggestions? Where would you put the glass shelves?
Ruth says
We have 9 ft ceilings and walk- in shower will only be 8ft. Do I use the golden ratio for ceiling height or short height?
Ruth says
I meant ceiling height or shower height??
DIYTileGuy says
I apologize. I typed a comment to this but it seems to be missing.
My instincts say to do it off of the 8′ height. I use the golden ratio as a guide. Stand back and see which looks best in the room.
Susan Jarvis says
Ok. This is weird! I taufght on the Golden Ratio today ( I am a math teacher) and tonight I am planning where place mosaic tile in the bathroom I am working on tomorrow. Why didn’t I think of this myself?!? Thank you so much. It will make everything I do feel more purposeful and beautiful.
Paul says
What if my shower tile only goes below the shower head? Would the accent go at the top or would it be better put lower down?
DIYTileGuy says
Probably I would look to lay it out with the total height of the tile. Make sure that you stand back and look at it to see if that looks OK in your space.
Jill says
Where do you put accent pieces on 8 foot ceiling where you are using 2 rows of accent and you have a niche? Do you put above and below niche separated by row of regular tile -using 6×24 horizontal.
DIYTileGuy says
I think the thing to do is to keep the accent liner at 5 foot-ish and figure out how to incorporate the niche. The accent can be above the niche, below, in between two niches, or wrap through. I’ve written two posts on niches and have a 3rd coming out on Tuesday morning. These posts have a lot of photos and examples of niches and also links to other resources to look at more and get design ideas.
donna says
The entrance is 64″ wide and 55″ deep. I am planning on putting a black border tile, a smaller white tile, a smaller yet black tile with the interior space filled with hexagon shaped tile. How wide should each of my border tiles be or should i scrape the idea and start with something else?
DIYTileGuy says
The best way is to get the tiles in the space and play around with the layout, pattern, and sizes. Being efficient with the material is a factor also. For example, maybe you decide to make one of the pieces 5 inches because you can get two tiles out of one piece. Being in the room and designing it will work much better than trying to come up with something over the internet.
Kerri says
we are doing a shower/tub combo project that also has a small window in the shower. We are using base tiles in large format (16×32). There are 77 inches above the tub. If we use your formula we will end up with a strange cut pattern in the 16″ tiles. Working from the tub up we were considering doing 2 full 16″ tiles and then putting the pattern at the 51″ mark, but that seems a bit low. If we do 3 16″ tiles then the pattern ends up at the 67″ mark which not only seems high but impacts the window which is there. The window would end up cutting through about 3″ of the strip pattern which seems problematic.
So, if this were you would you do the placement of the strip lower – the 51″ mark, or do additional cuts in the tile to achieve your 60″ placement?
And if you recommend tile cuts, would you recommend even cuts like cutting 3 16″ tiles down to 14″ each all the way around the tub, or conversely going 16″, 16″, 6″ above the tub and having that 6″ strip kind of be the odd ball tile in the whole shower.
DIYTileGuy says
I wouldn’t cut into a row of tile and if I did it would be in the center of the tile. The golden ratio is a guide. Here’s what I see the options being:
1. Re-examine the layout: You’re talking about starting with full tile off of the tub. What if you started with full tile at the ceiling? What if you centered the window? Maybe started full under the window? Centered the top and bottom cuts?
Take a look at it and see which layout works the best.
2. Re-examine the accent: What if you went with one 16 inch tile off of the tub. This would put the accent at 3 foot-ish rather than 5 foot-ish which is still Golden ratio-ish.
Maybe do something completely different. Vertical maybe? Something else?
3. Eliminate the accent and go neat and clean. (I know. Probably not going to happen)
4.
Install it at 67 inches.Edit: I just reread the comment. I don’t think it’s a good idea to have it go partway through the window. It usually would go completely under the window or the window would completely interrupt it. Part way doesn’t work.If all else fails you could cut it into the middle which would be 59 inches? Not my favorite but possibly doable.
Kerri says
Thanks! We’re going to do the start with full tile at the ceiling as you suggest – that should work out perfectly! Thanks!
Pamm says
Hello we have a tub shower combo we are tiling and have 8′ ceilings. If we use the golden ratio, it puts our mosaic strip that is 4 inches wide in the middle of our niche. I do not want to have the mosaic tile to go into our niche. What do you suggest we do go above the niche or below the niche ?
DIYTileGuy says
I would look at what you can do differently. Can you lower the niche? Can run the accent 3 foot-ish instead of 5 foot-ish? What about using the mosaic only in the back of the niche and not as a horizontal accent? What about running it vertically?
If all of those things are out you’ll have to just stand back and look at it. Do you want it around the middle or a foot or two from the ceiling? I think my vote is for the higher.
confused design says
Would it ever be proper to put transitions at 3′ and 5′ of 8′? Thanks so much. For example, square tiles up to 3′, then diagonal tiles to 5′, then back to square.
DIYTileGuy says
Yes, it’s proper. And can look good too!
Keryn says
Hiya DIY Tile Guy –
Great site! So informative, thank you :)
Firstly – apologies in advance – we use the metric system in Australia, so I am not good with imperial measurements and have just had to estimate these in my email below!
I’m in sunny Australia, and hubby and I are in the throes of bathroom and bathroom/laundry renovation. We have used your advice re: Golden Ration to assist our design, which has been a big help. My question however pertains to the aesthetics of tiling, and whether the Golden Ratio can help with this at all? In both rooms, the ceilings are quite high (around 2.9m/9.5 foot), and we are planning to have floor to ceiling tiling on all walls in both rooms.
In both rooms, we are having a 600x600mm/about 2ftx2ft I think?? rectified marble-look porcelain in the shower recess, which is on the short end wall (adjacent to the vanity wall). We are also using a white 75x300mm/about 3×12″?? tile [1:4 proportion] laid in a 45 degree herringbone on both (long) vanity walls, however we are unsure whether to have the herringbone pattern on:
1. Just the vanity wall
2. The vanity wall, as well as the wall opposite the vanity wall
3. All three other walls
My concern in using herringbone on more than one wall – even though we are using white grout to match the tiles – is that the room will look too ‘busy’. If we use herringbone on the two walls opposite one another however, what tiling do we use on the third wall? And also – if we have the herringbone on just the vanity wall, what do we have on the two other walls (these will be adjacent to one another)?
If we need to have a different tile layout on one or two other walls, I am keen to use just a 33% or 50% running bond pattern (not sure which?), but don’t know what size these tiles should be? Should we use the same size tile as the vanity wall i.e. 75×300? Or a larger tile? If larger, should this be the same 1:4 proportion e.g. 100x400mm/150x600mm tile? Or a different e.g. 1:3 proportion e.g. 100x300mm/150x450mm/200x600mm?
Sorry for the long email! Hope this makes sense, and thanks so much in advance for your assistance!
Warmest regards from sunny Australia –
Keryn :)
DIYTileGuy says
It’s hard to know without seeing the room but my inclination would be to use the herringbone as an accent wall on one wall only. Then use the neutral tile on the other walls. For neutral walls, I like the idea of no pattern- just lining up the grout joints.
I’m not sure if that’s helpful or not.
Keryn says
Wow – such a speedy reply! And yes, that is super-helpful, thank you so much! We’ll do our herringbone on just the vanity walls as you suggest.
Just one more question – if the herringbone is 75×300 (or 50×200), what size neutral tile do we use on the other walls; would a 150×300 (or 100×200) be ok, or do we go much bigger than the feature herringbone?
Cheers again! Such a great site, and a huge help with renos. You really know your stuff! :))
Keryn
DIYTileGuy says
I like the idea of bigger but that’s just an opinion. The 150×300 (6×12) would be my choice of the above.
Thanks for the comments!
Kim says
When using a mosaic strip, do you still start tiling the wall from the middle? We aren’t doing it ourselves and they have started at the bottom with a half tile. My OCD is screaming that they should have found the middle and tiled out!
DIYTileGuy says
If you are talking about starting with a half tile at the bottom of the wall then it’s probably not an issue. They may have a reason for doing this such as they wanted the top tile to be a full tile.
Layouts are different from project to project and there are a lot of factors that go into laying out tile. Whether, or not, your installers considered the many factors is impossible for me to say. But simply centering front-to-back and top-to-bottom isn’t always the best way.
Really, the bottom line is that layout is mostly an opinion and not black & white. Many installers will layout the exact same situation differently. If the layout is important to you it probably would have been good to go over it with the installers. But it sounds like it’s probably too late now.
Mallory says
I am putting tile in my bathroom. Bath tub with shower. I don’t want to take the tile all the way up to the shower head. How far below the shower head can I go?
DIYTileGuy says
I guess this would be a judgment call. The lower you go the more likely it is to get wet. You’ll have to handle it the way that you think is best. Typically, it goes above the shower head.
Mallory says
Thank you for your quick response. Still undecided.
Doris says
We are buying a new condo and asked for accent tile in the master shower. How many rows of accent tile do you suggest ? The rest of the tile is white and goes all the way up to the ceiling.
DIYTileGuy says
I like 3 or 4 inches tall for the accent itself usually.
Randy says
Can you provide me with your best suggestion? So have I have a sub floor which is pitched with plywood. It was then Fiber glassed and then sealed with Regard. The motor bed is on top of the Redgard and I am wondering if I should now regard the motor bed for extra protection before tiling?
DIYTileGuy says
No. If the shower is waterproof then there’s no need. This is a case where more isn’t better. Sometimes there are unintended consequences of too many layers of waterproofing.
andy says
For a tub and shower area, do you still use the golden ratio measuring the tub as part of the lower half?
Doing this for my install leaves 38 inches from the accent strip to the top edge of the tub and 35 inches to the ceiling, I am wondering if this looks to low?
DIYTileGuy says
No, and this is a good question. A lot of times I will use the space from the top of the tub to the ceiling. If that looks too tall then I might lower it just a bit.
The Golden Ratio isn’t a hard and fast rule. I use it as a guide and always do what I think looks the best once I’m onsite.
Brandon G Bennett says
I’m using a vertical accent. The wall tiles are 12″x24″ and 1/3 offset layout. Would you use a full 12″ of accent or smaller amount?
DIYTileGuy says
There nothing wrong with a 12 inch wide accent but my personal preference is 4 inches.
But tile layout would also work into the equation and sometimes that will dictate the width of the accent.
Shelly says
Our walk in shower ceiling is 9’. We will be staggering 12×24” tiles vertically to the ceiling. At what height should we put an accent tile strip? Also, any suggestions on what height the niche should be?
Thanks
DIYTileGuy says
The golden ratio for a 9 ft ceiling is about 5 ft-5 in.
Niche height there is no standard just that it needs to be useable to the people in the shower and needs to fit in with wall construction and tile design.
JKR says
Hi Tile Guy,
We are installing a full wall tile option. The wall tiles are 900mm wide and 300mm high. We have an accent row of the same tile size that we are trying to determine at what height to install.
Install at 5 feet will be interfered with a wide window 1800mm wide. My installer has recommended to install the 300mm high accent at the top of the vanity height. This would be 900 high off the floor to 1200 high. This is the only height where we can get the accent to fit. This will mean no interference from the show caddy wall cavity, the 1200 wide mirror, and the 1800 wide window.
What do you think? is this a good solution?
DIYTileGuy says
The golden ratio is simply a guide and not a hard-and-fast rule. It doesn’t take into account the intricacies of each individual installation. Your situation isn’t something that I can opine on, especially with no ceiling height given.
You have to do what you feel is best for your room. I know that’s not the answer that you are looking for but it’s the best input that I have.
Chris says
Putting a vertical strip in a 5’ shower. How wide do you make the strip? The full width of the tile I.e.12 in or would you suggest smaller? While it may just be personal preference Im hoping you’ve seen enough to really know what looks. Thanks for your help.
DIYTileGuy says
This is something that is personal opinion. But if your walls tiles are 12 inches wide it’s always been my preference to go with a skinnier vertical accent. Maybe 4 inches? Maybe 8 inches?
Again, just personal opinion.
Miriam says
Great article.
Please let me know if there is a rule for my situation. Our shower is straight ahead when entering the bathroom. We intend to tile the one wall that you face with a framed mosaic (colorful 1×4 herringbone with 1/2″ pencil frame). The wall is currently framed at 87″ tall but the ceiling wallboard and shower pan haven’t been built so I guess it will end up at 84 or so. The current framed width is 56.5″ but again, no wall so I estimate it will go down to 54″. I am struggling with what the dimensions of the mosaic should be. Firstly, how large to make it. Secondly, how to determine the width and height. Should I calculate the width and height of the frame proportionally to the total width and height of the shower wall? (When I tried that it didnt seem high enough, big enough). Or, should I focus on the tile around the perimeter? Should the perimeter tile surrounding the framed mosaic be of a specific length and should that be the same on all sides (above, below, left and right)? I guess I am spatially challenged and math challenged! Any advice would be greatly appreciated!
DIYTileGuy says
This is something that is hard to give a definitive answer over the internet. Also, it’s important to keep in mind that the golden ratio is simply a guide or suggestion.
The best thing that you can do is lay out the tile and come up with different options. Frame it with blue tape on the back shower wall and stand back and look at it. Then move it up-down, make it bigger/smaller, and stand back and look at it. I know this is highly unscientific but it’s what I’ve found to be the best real-world way of making layout and design decisions like this.
Use the golden ratio to start but make the final decision based on what it looks like in your space.
Miriam says
Many thanks for your reply!
Anthony says
I am having 12″ x 24″ tiles installed in my shower horizontally in a brick pattern. What width do you suggest going with for the horizontal glass accent strip, 4″ or 6″?
DIYTileGuy says
Personally, I prefer the look of the 4 inch but it’s very much an individual decision.
Michele says
We want to put decorative tile accents in our showers, at that eye level, and most of the tile sheets come in 12″x12″. How wide should a tile accent be? is 12″ too big?
DIYTileGuy says
This is opinion, but in general, I think 12 inches is too big for most residential applications. Personally, I like 3-4 inches and some prefer 6-inches. If you have an eye for design and think 12-inches is right then do it.
Ave maloney says
Redoing small bathroom with just shower. Wanted to use 13 x 26 large tiles at bottom than accent tile above 4×9 . Do you suggest chair rail height accent or eye level. Lower tiles will be on top of each other- top staggered.All tiles same design.
DIYTileGuy says
Typically, 5ft-ish with an 8ft ceiling. But, it very much depends on what you are working with. Depending on the layout you may need to make some adjustments.
Sonja says
We just finished setting the tiles in our shower and we used the exact measurements for the strip position and the strip length without even finding this page. It is btw a great resource for someone with no experience. I’m glad we did it the way, it makes me fell better we did a good job. One question – we had to tile the sides of the jacuzzi and for the ends we ended up using metal strips so that the rough edges of the tiles will not been seen, especially since we have used a small mosaic tiles for it. Is using metal edges for rough tile ends not “in” any longer, or not?
clifford cadle says
Great info. Thank you. I have an unrelated question.
Is it possible to lay ceramic tile over a linoleum floor? If so, what product do I need?
Thanks
DIYTileGuy says
It’s more of a question of which look you want. The metal profiles are still quite popular and have been expanding in colors, shapes, and textures.
Thanks for the comments and I’m glad that it went well!
DIYTileGuy says
Yes. The vinyl floor can’t be a perimter glue and it needs to be well adhered to the substrate. Make sure that any waxes or anything else is cleaned off of it and it doesn’t hurt to scarify the surface. Then you’ll want to use a good modified mortar. Megalite, or something like that, is what I would use.
clifford cadle says
Thank you!
Susan N Levenson says
We are remodeling and building a new bathroom down stairs. It will be the guest bathroom. The over all dimensions of the bathroom are 9.3′ x 6.5′. The shower will be in a corner (not an alcove) with a glass enclosure that will measure 4′ x 3′, with a 6′ height. We are using glossy white subway tiles that are 12″ x 3″ with a light green glass accent that measures 1.5″x 6″. Now that I have given you those details here is my question. How do we decide whether to tile to the ceiling or just above the height of the shower enclosure? What questions should we be asking ourselves? What would you do if this were your house?
DIYTileGuy says
It’s a cosmetic design decision. If you’re going for the older, craftsman style look then you might just tile above the showerhead. Most people these days are going to the ceiling.
Mike Mills says
I have a separate shower and tub, with the tub having only a roman faucet and flexible handheld sprayer on the sides of the tub.
The knee wall between the shower and the tub is about 2″ above the end of the tub, so when laying in the tub, the shower walls will be seen through the glass after it is installed.
The shower has 2 walls, which will be 12″ x 12″ honey onyx from bottom of pan to 8′ ceiling. I have 12″ x 12″ glass mosaic tile that will be cut to use as accent. I will be using schluter quadec between the onyx and mosaic.
Here is link of pic of mosaic:
https://www.lowes.com/pd/Elida-Ceramica-Night-Reflections-Glass-12-in-x-12-in-Glossy-Glass-Linear-Mosaic-Wall-Tile/1000548017
I am having a difficult time deciding the tile pattern since the walls between the tub and shower are visible.
Here are some possible patterns I’m considering:
1) On the shower walls, 2 rows of mosaic 4″ wide horizontally on both walls using your golden ratio method (about 3 ft. apart) with remainder of walls honey onyx. The bottom row of mosaic continuing from shower wall to back of tub wall with 2 rows of honey onyx above and below it. The top row of mosaic would end at shower glass within the shower. However, the disadvantage to this layout is:
If I were to continue the top row of mosaic from the shower through the tub area, I’d have to install the honey onyx tile on remainder of side and back of tub walls, which would take a lot more time and cost a lot more money. Also, I’m not sure if it would look right to have the bottom row of mosaic continuing from shower through to the tub area and the top row ending at the glass within the shower.
2) The top and bottom row of mosaic end within the shower glass and neither rows continue within the tub area. There would be a row and a half of onyx (18″) along side and back of tub. I would install purple drywall for remainder of tub walls and paint it.
3) Install a 12″ wide row of mosaic vertically in row in center of shower wall were valve/shower head from bottom of pan to ceiling. and rest of tile in shower and tub (18″ on side and back wall) only onyx.
From your experience installing tile, which option do you think would look best or do you have other idea?
DIYTileGuy says
This is very much an opinion with no correct answer. Personally, I like option 1 but I understand that it takes the most time and money. #3 I think would be the simplest to execute and would probably be the one to go with.
Mike Mills says
Do you think would be ok to mount shower door to the honey onyx (after sealed with DryTreat and drilling holes with a diamond bit) since I’m concerned of possible cracking? Or would be better to install pieces of approx.3/4″ thick by 2″ wide x 36″ long marble (using threshold from Lowes from Home Depot) and mount the door to it instead? If your answer is marble, is Laticrete Platinum 254 ok installing for the marble to the GoBoard? One disadvantage to installing the marble is it would interrupt the flow of the mosaic from the shower area to the tub area if marble piece also installed on knee wall between shower and tub.
DIYTileGuy says
I think you’re probably OK mounting it to the existing onyx, especially if you have framing in wall for the glass, but I understand wanting to be cautious. So, marble could work fine and 254 is a good way to install it.
Edward Ruminski says
We are looking to remodel a 1/2 bath or powder room and would like to know about an accent strip along the perimeter of the room, how wide 4”, 6” etc. Also, what type of flooring do you recommend. We are going to have a pedestal sink and a toilet that we already have in there now removed and installed new.
DIYTileGuy says
These are design decisions and are best made by people that can see and understand the room under construction
mike mills says
I think I may have posted this question or similar one to it somewhere before, but if I did I’m not able to find it, so here it is again:
I will be installing 24 x 48 tile on 2 walls of my shower, laid horizontally.
Behind the shower is the bathtub that is separated by a knee wall that is 18″ high. I will be installing the 24 x 48 tile in the shower horizontally and continuing into the tub area. Since there’s only a handheld shower head in the base of the corner of the tub, there’s 3 options for continuing the tile into the tub area:
1) Install full piece of 24″ tile on bottom row of shower. Then cut 6″ wide tile and install on 1st row beside tub and then install full tile on top of it, resulting in the gout lines of the tile between the shower wall and tub being continuous (since tile in shower will extend 6″ above the 18″ high knee wall).
Advantage: Grout lines continuous between shower and tub.
Disadvantages: More cutting (6″ row required on bottom row of wall beside tub), and more material needed.
2) Install full piece of tile on bottom row of shower and install 1 row 24″ wide tile on wall beside tub.
Advantage: Less cutting (no 6″ row required on bottom row of wall beside tub).
Disadvantage: Grout line between shower and tub not continuous.
3) Cut 24″ tile to 18″ wide for bottom row of shower so will be even with top of knee wall and then install 24″ wide on wall beside tub,
Advantages: Grout lines between the shower wall and tub continuous, less cutting (no 6″ row required on bottom row of wall beside tub), top row of tile doesn’t have to be cut.
Disadvantage: ?
With both #1 and #2 is that with #1 is the top row would need to be cut to 20″ wide to go to top of ceiling, but with #3, the bottom tile for shower would need to be cut to 18″ wide. Not sure if narrower row at bottom or top would best.
Considering the advantages/disadvantages and depending on either the narrow row at bottom or top of shower, which option you think is best?
DIYTileGuy says
I’m confused. Is the tub a platform-type that the tub drops into? So the shower wall has two walls and the “third” wall is an 18-inch high wall? If so, is there a backsplash on top of the tub platform?
Your first option is what is confusing to me because cutting a 6-inch piece seems completely arbitrary with 24-inch high tile.
Also, let me know how hight the tile goes in the shower. To the ceiling? How high to the ceiling?
mike mills says
Walking into the bathroom the whirlpool tub is on the right sitting inside a platform. Directly behind the tub is the knee wall that is 18″ high between the tub and the shower.
The knee wall extends about 3″ above the tub. Behind the knee wall is the shower pan, where there are 2 shower walls to be tiled…one on the right and one facing the tub where shower head to be installed. (“L” shaped shower wall).
The tile will completely cover the 2 shower walls and full tile and will continue from the shower into the tub area on the side and back of the wall beside the tub, but the tub will have only one 23.5″ tile installed on the wall surrounding the tub. The remainder of wall above the tile beside the tub will be drywall to the ceiling.
Since the last question I posted:
1) The tile is 23.5 wide x 47.25 long (not 24 x 48).
2) I decided to install full 23.5 wide tile on wall beside tub even though top edge will not be continuous with grout line of tile in the shower.
Therefore, my question is if it’s better to install the narrow piece of tile on bottom or top row of shower:
From bottom of pan to ceiling is 90.5″, therefore:
1) If tile cut to 19.75″ and installed on bottom row, then would be room for 3 full tiles above it to ceiling including 1/16″ gap at bottom and between each tile and 1/16″ at bottom and top.
Advantage: Cut edge on top of bottom lip of shower pan.
Disadvantage: If either bottom tile not cut to exactly 19.75″ or if gaps not exact between each row of tile, then either a full tile will either be to wide to fit on top row (thereby having to trim it) or may be too narrow leaving more than a 1/16″ gap between top row of tile and ceiling.
2) If three full tiles installed on bottom row, then one 19.75″ tile would need to be cut for top row including 1/6″ gap at bottom and between each tile and 1/6″ gap at top.
Advantage: Would know exact width to cut tile for top row.
Disadvantages: If ceiling not exactly level, would be more complicated ripping the top row to fit (but schluter trim or caulking may help).
Which of above 2 options are better?
I have 2 additional questions regarding shower wall, which I will post separately….
mike mills says
…Continuing from last question:
1) The distance from wall where shower head located to middle of knee cap is 49.25″. Since the tile is 47.25″ long, there are 2 options for placement of knee wall glass:
a) Installing full piece of 47.25″ tile on shower wall beside tub, resulting in back glass having to be installed 3″ from left of center of knee cap (leaving add’l 1″ to left edge of knee cap).
Advantages: No additional cutting of tile, less material, less time aligning seams between tiles.
Disadvantages: Glass would be installed 3″ to left of center of knee cap, would not look as good.
b) Cutting 2″ wide pieces of tile and installing beside 47.25″ tile.
1) Installed on right edge of tile from bottom of knee cap to ceiling.
Advantage: Would be able to center glass on top of knee cap and therefore look better.
Disadvantages. More cutting, add’l cut pieces would not look as good, more material, more time aligning seams between tiles.
2) Cutting 2″ wide pieces of tile and installing in corner of shower from bottom of shower pan to ceiling and installing 47.25″ tile beside them.
Advantages: Would be able to center glass on top of knee cap, cut pieces installed in corner, hiding any imperfections.
Disadvantages. More cutting, add’l cut pieces would not look as good, more material, more time aligning seams between tiles.
Which of the above options from are better?
mike mills says
…Continuing from last question:
Additional questions regarding shower wall (with the shower head) facing the knee wall / tub:
There is a door to the toilet area beside the shower wall (with the shower head). The distance from that wall to edge of door is 49.5″, there are 3 options:
1) Install 47.25″ tile on the wall against adjacent shower wall, leaving 2.25″ between edge of tile and door that will result in 2.25″ remaining that will be painted drywall from the floor to the ceiling.
Advantages: Less cutting, less material, no cut edges.
Disadvantages: More cutting, tile will not go to edge of door (but not sure if that’s a disadvantage or not),
2) Install 47.25″ tile on the wall against adjacent shower wall, and cut 2.25″ wide tile to fill remainder from edge of 47.25″ tile to to edge of door frame.
Advantages: Tile will be even with edge of door, will not be as noticeable if door frame not perfectly plumb.
Disadvantages: More cutting, more tile required, add’l cut pieces would not look as good, more time aligning seams between tiles.
2) Install 47.25″ tile on the wall even with door frame, and cut 2.25″ wide tile to fill remainder from right edge of 47.25″ tile to corner.
Advantages: Tile will be even with edge of door, 2.25″ wide cut edge in corner.
Disadvantages: More cutting, more tile required, aesthetics of add’l cut pieces, more tile required, more time aligning seams between tiles.
3) Cut tile to 41.5″ which will be at edge where shower door to be installed, then cut tile 9.5″ wide to be installed from edge of 41.5″ piece to edge of door frame of toilet entrance.
Advantages: Tile will be even with edge of door frame to toilet area, seam between tiles will be located where sliding glass door opens.
Disadvantages: More cutting, more tile required, more time aligning seams between tiles.
Which of above 3 options are better?
DIYTileGuy says
Thanks for the additional info. This one is completely an opinion. In fact, I recently polled a bunch of professional tile setters about a similar situation and everyone had a different way of doing it.
My opinion is that it looks the best when there is a full tile at the ceiling. You’re eye will rarely be focused on the bottom of the shower and, once shower glass is in, the ceiling will be most visible. However, you absolutely can’t be short of the ceiling. So, you might think about trimming the ceiling tiles say 1/2 inch which won’t be noticeable but will leave you some wiggle room just in case. So that would mean that you start with a 20.25 inch tile, I think?
Another way of doing it is to split the top and bottom cuts evenly. So, each cut would be 20-inches (+/-). I’m doing some rounding. In your scenario, you’d only be cutting off 2-inches (+/-) and it would leave you room to cut both the top and bottom in.
But all 3 options are good options and mine is simply an opinion.
DIYTileGuy says
What I’m not clear on is how big the shower area is but if one full tile will fit on the back wall then I think that’s what you di.
If the shower is 47 from wall-to-wall then I think you put one full tile on the back wall then add a piece of tile that will extend past the glass. Oftentimes, the cut that would go to the right would extend to the other end of the knee wall.
So, if the shower is 47 and the knee wall is 6-inches you would add a 6 inch piece of tile and put the shower glass in the center.
Not sure if this answers the question but let me know if I’ve misunderstood things.
DIYTileGuy says
This is kind of a tough one but my vote is that #3 will look the best. Hiding the cut behind the shower door.
But here’s what I’m wondering: Is it supposed to look like the whole room is tiled? I wonder why you couldn’t simply cut the tile for the shower head wall at, say, 45-inches which would allow you to put one full tile on the shower head wall, completely cover the curb and give you 2, or so, inches of a tile “leg” down to the floor?
Then you would just leave 4.5 inches of wall to paint next to the door. Additionally, I’m assuming there is painted drywall above the door to the toilet? Then the tile will look like it’s part of the shower and then there is painted walls all around the toilet closet.
It’s just an idea.
mike says
I addition to the 2 shower walls being fully tiled and 1 row of tile beside tub, only the 2 side walls beside the vanity across from the tub to be tiled.
Above door to toilet will be glass blocks installed and above them there will be approx. 2″ of painted drywall to ceiling.
It’s 49.50″ from back shower wall to edge of door to toilet, so if I install a full 47.25″ tile, it would extend past shower curb and there would be 2.25″ remaining that would either be painted drywall or filled in with tile.
So I’m not clear from your answer if better to have painted drywall between edge of shower tile and door to toilet or to fill in with tile to edge (considering the advantages/disadvantages of each listed in previous post)…?
Let me know if way to either send pics through your website or email to you to better explain the project.
DIYTileGuy says
I think it’s personal opinion but I don’t see any reason to take it to the door other than it’s a small strip to paint. But I think I’d be inclined to leave the drywall strip.
mike says
Since the recommend trowel size for large format tiles, in my case 24 x 48, is 1/2 x 1/2, shouldn’t a 1/4 x 1/4 trowel be used if thinset put on back of tile and wall for total 1/2″ bead?
DIYTileGuy says
I think you’re probably going to end up thinner doing two 1/4’s than one 1/2. With tile that size, you may want to use a 1/2 inch on the floor and a 1/4 inch on the tile. If the centers are high on the tile you may want to use the 1/4 inch on the center of the tile only and the flat side of the trowel on the rest of it.
mike says
Would 1/2 on wall and 1/2 on tile create 1″ thick thinset between backer and tile? If so, there’s a chance my valve will not protrude far enough past the tile in order to bolt on trim plate. If not, approx. how thick would thinset be?
DIYTileGuy says
I would guesstimate the finished mortar thickness would be about 3/8 inch thick total.
mike mills says
Additional question regarding the previous messages for the 24 s 48 porcelain tile I’m installing: The tile is to be install in corner shower with 2 walls. I was initially going to install the tile on the first wall before installing the 2nd. However, wouldn’t be better to install the rows of tile on each wall at same time and work up to the ceiling? My reasoning for this is that I could put a level on top of the tile from one wall to the other wall.
DIYTileGuy says
Either way is fine and I know tile installers that do each way. It’s a personal preference and if you do both walls at once then you can make sure they line up in the corner properly.
mike says
I decided to hire someone to tile my two shower walls and knee wall:
80 sq/ft for all 3 walls
Permabase Plus backer board
24″ x 48″ porcelain tile
I received quotes from 3 different contractors, 2 highly rated on Angi for $1,200, and one from Craigslist for $1,200. All said they would include installing the backer, waterproofing with redgard, installing the tile, if I supplied all the materials and I did the grouting.
I asked the contractor from craigslist how he calculated his quote because it would be only 7 pieces of tile to install, he asked me to make an offer, and I replied $600 and he agreed. However, he later changed his price to $9 sq/ft, which would be $720 based on square footage of my shower. The pictures of his work on his craigslist ad are excellent but I couldn’t find reviews of him anywhere from doing online search and he is not rated on BBB, so I asked him for references and he replied that he replied “I don’t want you calling my customers over $600 job but I would give you references if the job were $20K”. I asked if he charged a deposit, and he replied no.
My main reservation of doing the tile job myself is getting the thinset mixed correctly. What is your opinion of hiring the craigslist contractor without any reviews, who refuses to give references because $ amount of tile job too low, and who changed the price?
BTW, the two contractors from Angi refused to lower their quote.
DIYTileGuy says
$720 doesn’t seem like a lot of money to me. Really, $1200 doesn’t either. I’m trying to figure about how many days it would be. Cement board and waterproofing are more labor-intensive to install and more trips back than something like Wedi board. Plus, dealing with 24×48 inch tiles. I don’t see how it would take less than 4 trips out. So, $720 for 4 trips?
Another thing you might want to factor in is that you are supplying and purchasing the materials. If things end up installed incorrectly then you’ll likely be on the hook for the wasted materials.
Only you can make the decision on what your budget is and what you think the project is worth. Nothing wrong with doing your homework.
mike says
I asked the contractor how many trips the job would take and he replied “hopefully one”.
I called the mfg. of permabase and asked if the permabase plus I purchased has to be waterproofed and was told no, however, in the mfg. literature it shows a waterproofing membrane, and you wrote in other thread in your forum that it has to be waterproofed (it is advertised as moisture resistant). Then I saw a youtube video of someone who installed regular permabase without any waterproofing. So, there’s conflicting information, but you’re the expert, so I trust you more. The permabase WP (waterproof) backer is not sold in my area.
The reason I had to remove the GoBoard backer from my shower twice is because the material flexes if the walls not perfectly level. After I removed the GoBoard, I leveled the walls the best I could but I’m hesitant to reinstall it for same reason. I purchased the permabase plus because I liked it’s rigidity, However, now I don’t want the additional expense of buying redgard and not sure if contractor will put enough coats on it and trying to do the waterproofing and tile installation in one day. Therefore, here’s two options I’m considering:
1) Install 1/4″ regular cement board on the wall first so the wall will be flatter and then install 1/2″ GoBoard on top of it. I realize that doing that the bottom edge will protrude 1/4″ over the lip of the prefab marble pan (1/2″ wide), however, there would still be enough clearance on pan for the tile to be installed over it.
2) Same as #1, except install 1/4″ USG waterproof foam board over it. I can get the USG foam board at local tile shop who still has some sheets remaining even though discontinued. The only tile shop in my area that sells GoBoard doesn’t have 1/4″ in stock.
Which of above two options you think are best?
mike says
After thinking about this further, option 1 will not work because of the thickness of the boards will jut out 1/4″ past adjacent drywall above tub. Therefore, any problems with doing option 2?
DIYTileGuy says
If you want to stiffen up the walls then your best bet is to cross block the stud bay with wood. You could choose to just do where the seams fall on the backer board or you could choose to do it every 18-inches or even 12 inches. The only manufacturer that OK’s 1/4 inch backer board on walls that I am aware of is Hardibacker. Maybe some will allow it to be doubled up but I don’t know?
This is a post I wrote about the very issue of if waterproofing is required over cement board. Ultimately, it’s up to you to decide. Though it is curious why they would even invent a waterproof cement board if their existing product manages water just fine.
mike says
The walls are already stiffened with cross blocking. I meant 1st installing 1/4″ durock on wall then adding 1/4″ USG waterproof foam board over top…total 1/2″ thickness.
My intent of installing the 1/4″ durock is to give the wall a flatter surface so doesn’t flex as much as using only the 1/2″ foam board that previously was on the wall.
DIYTileGuy says
If you already have cross blocking then I can’t imagine how your backer board isn’t already stiff enough. This is assuming 16 inch OC framing and assuming it’s done in a typical framing fashion. Maybe something else is going on? Does the wall itself shake? I’m starting to think you may have a serious issue over there that is beyond what I would know what to do with.
As far as doubling up the 1/4 inch backer, I don’t know much about this. Would it work? Maybe. I doubt USG would approve such a use but you could always check.
mike says
I decided to re-install the foam board, however, there’s a lot of screw holes recessed into the board. Here’s some options:
1) Install screws in same holes and cover heads with sealant.
2) Install screws in other areas on the board and cover screw heads and the previous holes with sealant.
3) Cover previous holes with sealant and install board on opposite side and install screws in new places and cover screw heads with sealant. Only the pinholes where previous holes created from screws when drilled from other side would need to be covered with sealant.
I am leaning towards option #1 because would be less chance of water penetration and less sealant required, but not sure if would lessen strength of board using same holes. I could add some additional screws to compensate for that.
Which option you think is best?
DIYTileGuy says
I’m liking option 2. The issue with 1 is that I don’t think the holes will have the same holding power.
mike says
The backer for my 2 wall shower not installed yet.
Because there would not be enough access with 6″ diameter hole in backer/tile for valve and limited space in the access door to replace it if ever needed, I asked a friend who is a licensed plumber for his suggestions. He said to install a remodeling/repair plate.
I went to a local plumbing supply store and found a Moen brand and put my valve cover on top of it. With dimensions of 13.5″ by 9″, it would give enough access to replace the valve.
I’ve read posts in forums with people saying there’s not enough clearance to remove the valve, so why isn’t installing a remodeling/repair plate not more of a general practice by tile installers when tile first installed?
DIYTileGuy says
I’m guessing because people don’t know about them? I can’t even picture what one would look like. I don’t think I’ve ever heard of something like this. Typically, a plumbing valve should last in the decades and I think many of them are serviceable so new cartridges can be installed. Additionally, going through the wall behind it is an option for some valves. So, maybe there isn’t enough demand either.
edit: I just looked up what was mentioned. You’re talking about a bigger cover plate, I think. The reasons that I mentioned would still apply.
mike says
Some questions about the kneecap I’m getting ready to install on the knee wall between the shower and tub and also about waterproofing the hole in the niche:
1) How many 16th’s of an inch should the cap be sloped towards the shower? One side of the shower glass will be installed on top of the cap.
2) I cut out a 14.5″ x 14.5″ hole for a niche in the knee wall and there is wood on 4 sides. The niche is 18 gauge stainless steel. Is kerdi ok to use for waterproofing it? If not, best material?
mike says
Correction to #2 of previous question….I meant is it ok to use kerdi to waterproof the 4 sides of the wood for the hole that I cut out for the niche? If not, best material?
After waterproofing the perimeter of the hole, I will run a bead of silicone around the inside of the 1/2″ edge of the niche before inserting it over the tile.
From test fitting the niche in the hole it’s a very tight fit.
James Upton says
For slope, the industry standard is 1/4 inch per foot minimum. So if your wall is 6 inches wide then you want at least 1/8 inch. If it’s 3 inches wide then you want a minimum of 1/16th.
For your niche, I’m not sure what you want to waterproof. Does the niche manufacturer have instructions for how to install their niche? If I assume the niche itself is waterproof and you are going to silicone the perimeter of it then what is left to waterproof?
mike says
I meant waterproofing the four 2×4’s of the hole where the niche is to be installed. The mfg. instructions doesn’t mention waterproofing that area since the niche is stainless steel. Since I posted the question, I lined the 2×4’s with ditra.
Another question…the knee wall top is a treated 2×4. The granite knee cap is 8″ wide by 42″ long and weighs approx. 60 to 80 lbs. From your suggestion in your previous response, I’ll put popsicle sticks along the length of the wall at the back so the cap is tilted towards the shower pan.
I have some scrap pieces of 1/4″ and 1/2″ waterproof goboard.. Would it be better to:
1) Install the cap on top of the 1/4″ or 1/2″ goboard? If your answer is either of these, I’ll put a bead of goboard sealant along the edges of all sides of the board after installed.
2) Buy cement board and waterproof it with redgard, and if so, use 1/4″ or 1/2″?
3) Don’t install cap on any backer and install directly on top of the wall (with the popsicle sticks underneath) using thinset?
FYI, someone mentioned to me that it was a mistake to use treated lumber for the knee wall because the lumber will expand/contract and cause the tile to crack. However, the wood on all sides has been exposed to air for a long time and has completely dred out, so I don’t think there will be any issues with expansion/contraction of the wood.
James Upton says
Definitely 1 or 2 and not 3. If it were me, I would use the GoBoard in whichever thickness works best for the layout or whichever is your personal preference and use the sealant to waterproof it.
I always use thinset mortar when installing backer board on horizontal surfaces. I apply the mortar to the top of the wall and half of the backer board so that it is well covered with the shims in there.
It’s the same technique that I use in this post on shampoo niches.