• Skip to primary navigation
  • Skip to main content
  • Skip to primary sidebar
  • Skip to footer

www.diytileguy.com

Expert Tile installation information for the DIYers

  • Trowel Size
  • Thinset
  • Planning and Design
  • Prep
    • Showers/Bathtubs
    • Floor Prep
    • Heated Floors
  • Install
    • Setting Tile
    • Tile Layout
    • Tips & Tricks
    • Glass Tile
  • Recessed Shampoo Niches
  • Tool/Product Reviews
You are here: Home / Install / Recessed Shampoo Niches / Installing a Recessed Shampoo Niche in an Exterior Wall of a Shower.

Installing a Recessed Shampoo Niche in an Exterior Wall of a Shower.

September 22, 2015 by Spencer 32 Comments

Share this post!

  • Share
  • Tweet
  • Reddit
  • Email

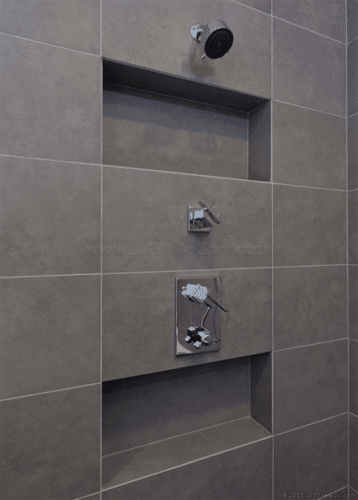
Here’s the dilemma. The customer wants a recessed shampoo niche. But once the walls were opened up there is no good place to put one.

There are either wires and pipes in the way or the stud bay is too narrow. The only good place to install one would be on an exterior wall which would leave a big gaping hole in the home’s insulation. So what’s the best way?

One option is to install some elegant shower corner shelves. But if their heart is set on a recessed niche?

To rule out an exterior wall for a shower niche can sometimes mean that you just can’t put one in a shower. But do you just ignore the giant cold spot (or hot spot, depending on your climate) and put one in any way?

Estimated reading time: 5 minutes

recessed shampoo niche in an exterior wall

I wrote a post called 10 things to consider before building your shampoo shower niche along with 2 things not to do. Spoiler: this is one of the two things not to do. Check out the post if you are curious about the rest.

Insulating a Recessed Shampoo Niche in an Exterior Wall of a Shower

Here’s a method that I have come up with to make the best of both worlds. A compromise.

You still get the recessed shampoo niche in the shower and some insulation as well. Here’s how it works:

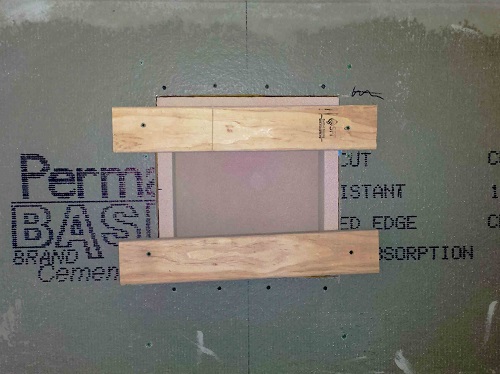
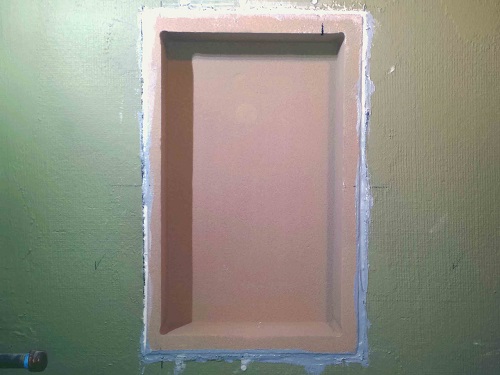
Most exterior walls are 2×6 framing. I recommend buying a pre-made foam niche such as the Laticrete Hydroban niche,  Noble Niche, or Schluter Kerdi Niche.

laticrete premade niche
A recessed shampoo niche from Laticrete is added in front of the foam increasing the r-value of this exterior wall.

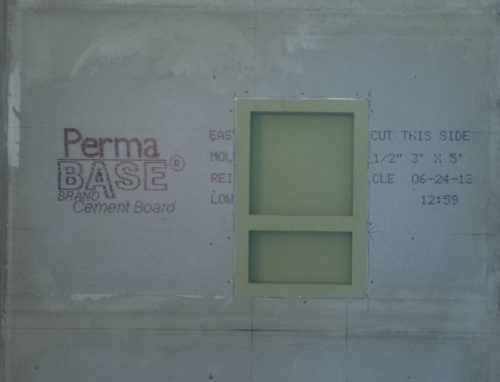
They come in a variety of sizes and are made to fit in a typical stud bay. Some come with shelves and compartments.

Be sure to look at my 4 part series dealing specifically with shower niche installation:  The Ultimate Guide to Building a Preformed Recessed Shower Niche

How much R-value?

We know insulation is rated in terms of r-value. The foam niches are made from a foam called polystyrene. This type of foam has an R-value of 5 per inch. This would give the pre-made foam niche an R-value of 2.5.

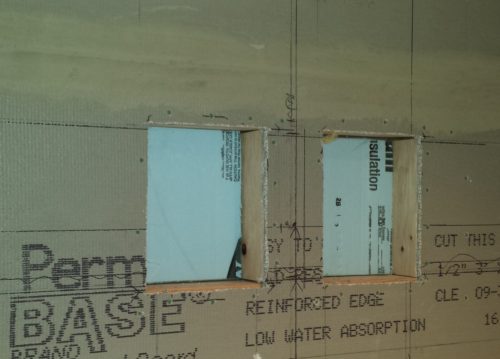
Now the pre-made foam niches come 4 inches deep. This is to allow for 3.5 inch wall stud (common in interior walls) and 1/2 inch tile backer board.

Since the niche will go on an exterior wall (5.5 inches instead of 3.5) this gives 2 inches of unused space.

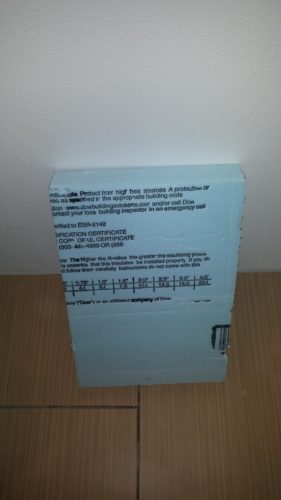
Down at your local home improvement center, you can buy 2-inch polystyrene foam. I bought this blue foam and it comes in a 24×96 inch size and costs approximately $30.

This is what I use to fill the 2-inch space behind the niche. An r-value of 10 (remember: 5 per inch) added to the 2.5 from the niche gives you an r-12.5 wall.

Less than a normal 2×6 wall with an r-19 value but still better than a window.

Currently, I’m not aware of a way to purchase smaller sizes of the 2-inch foam. It’s not that the cost is overwhelming but you would only use a small piece of it. I wish you could buy by the foot.

How to install a recessed shampoo niche on an exterior wall of a shower

This is what I’ve come up with for a way to install a recessed shampoo niche in an exterior wall without leaving a big hole in your wall’s insulation.

If you have a way to improve upon it or see any issues that I may have overlooked please let me know in the comment section.

2 inch foam
I add a block of 2-inch foam to the back of a recessed niche.
2 inch foam in back of recessed niche in an exterior wall of a shower
The foam is added to the backs of the niches.
shower niche installation
Here I use adhesive to attach the niche and the framing blocks help hold it in place while it dries
shower niche installed
Finally, I use sealant around the edges and waterproof as normal. Shown is Hydroban waterproofing with a Noble niche

Installing a shampoo niche on an exterior wall isn’t ideal but sometimes the benefits outweigh the drawbacks. Using this method can help regain some of the energy loss.

Filed Under: Recessed Shampoo Niches

Reader Interactions

Comments

  1. trey mo says

    May 3, 2016 at 6:47 pm

    do you think an inch of sheet rock between the 5/8 sheathing and half inch hardi backer would be sufficient or should I go for this method. thanks

  2. DIYTileGuy says

    May 4, 2016 at 7:25 am

    You’ll have to determine what is best for your particular situation. I’m not sure what the R value is for drywall or where the vapor barrier is in your wall assembly.

  3. Shane Kohls says

    June 20, 2016 at 7:56 am

    I purchased a Laticrete niche for use in an exterior wall. I initially chose this location because I didn’t want the “water wall” to appear too busy with valves, handheld shower wand, bench and niche.

    Unfortunately, I’ve got 2×4 studs instead of 2×6 and the stucco intrudes into the wall space up to 1/2″in spots.

    Would you recommend adding 2×6 sister studs to the exterior wall and frame a spot for this preformed niche, or build one to suit available space on the water wall?

    Thanks,

    Shane

  4. DIYTileGuy says

    June 21, 2016 at 11:01 am

    You may have to build a custom niche. It may be a bit challenging with the uneven backing. If you are able to grind the back without affecting the siding then that would be ideal. One thing you could do is extend the sill past the wall at the bottom of the niche to give yourself a bigger shelf to put things on.

  5. Aunhwa Kwon says

    June 26, 2017 at 10:51 am

    Hello, I like your installation which do not show any edge of tiles. I do not see any edge either front or inside of the niche. Would you share how did you do it?

  6. DIYTileGuy says

    June 26, 2017 at 7:20 pm

    Thanks! It’s done by beveling the tile edges. I talk further about it in this post.

    5 Tile Edge Trim Options Besides Bullnose Tile

  7. Jeremy says

    November 19, 2017 at 4:41 pm

    The water proofing if the shower is considered an acceptable vapor barrier.

  8. N Jamon says

    November 7, 2018 at 2:05 pm

    An inch of sheetrock gives you only an R value of 0.9 (gypsum board has an Rvalue of 0.45 per 1/2 inch sheet). So, no, two pieces of sheetrock wouldn’t come even close to the R value of the polystyrene foam which has an R value of 5 per inch.

  9. DIYTileGuy says

    November 8, 2018 at 7:50 am

    Not all waterproofing layers also qualify as vapor retarders. Depends on the product and how it’s applied.

  10. DIYTileGuy says

    November 8, 2018 at 7:50 am

    Thanks for the contribution!

  11. Nomal says

    December 29, 2018 at 6:55 pm

    The R value of sheetrock is very low. Use foil-faced polyurethane or polyisocyanate foam instead that has an R value of 6.8/inch.

  12. Steve says

    March 17, 2019 at 4:51 am

    I’m in the same situation. Could a can of spray foam insulation do the trick?

  13. Karen says

    March 23, 2019 at 9:00 am

    I would really like a large say 16×30″ niche along the bath wall but once opening it up it is just tile thick then two layers of gypsum and then breeze block??? I can not have one can I? ?

  14. DIYTileGuy says

    March 23, 2019 at 1:00 pm

    If you see two layers of gyspum a lot of times I see that with multifamily housing and that’s a shared wall. Not sure if that’s the case, or not?

    If you don’t think it will work on the back wall you might try the other walls. A lot of times I’ll have the plumber reroute the shower head pipe to accomodate a niche.

    Otherwise, you may want to consider built-in shelves or some other way of storing things, I suppose.

  15. James says

    March 26, 2019 at 1:08 pm

    So is a niche in a 2×4 exterior wall definitely a bad plan? It would leave almost no room for insulation.
    For climate I’m in southeast Pennsylvania.

  16. DIYTileGuy says

    March 27, 2019 at 8:01 am

    I personally don’t think it’s a good idea because of the lack of insulation. If you can put it in an interior wall that would definitely be preferrable.

  17. Justin says

    June 15, 2019 at 9:07 am

    I am putting one in my exterior wall and I’m in Pittsburgh. However, my house has T-111 plus a foam wrap, plus foam core vinyl siding, so I have a similar setup as describing, by the foam is on the outside of the house rather than inside. It’s a lower R-value for sure, but I don’t expect to see much of an issue for such a small area. I have an attic space that is accessed just with a slide on/off piece of 1/2” plywood, with no insulation, about 2’x3’ dimension and I don’t get much draft there with no insulation.

  18. Israel says

    June 28, 2019 at 2:19 am

    I am in Florida and my exterior wall is bricks masonry, can I break part of the bricks to make the niche? I mean I know Incan do it, my question is if is something that I should not do for some reason.

  19. DIYTileGuy says

    June 30, 2019 at 9:57 am

    I wouldn’t recommend it as that’s the exterior of the home. Shouldn’t there be more than just brick between the interior and the exterior?

  20. Taylor says

    November 10, 2019 at 9:20 am

    I use both, spray foam is a good sealant

  21. Beth says

    January 11, 2020 at 5:25 pm

    I have a kerdi niche that I am planning on installing on an exterior wall because I’m limited on where to place it. The walls are 2×6 and the niche fits nicely in-between. I was wondering if I can just “squish” down the insulation and place the niche on top on the existing insulation in the walls? Or would this compromise the benefit of the insulation all together? Thanks for all the advice!

  22. DIYTileGuy says

    January 12, 2020 at 10:54 am

    It might be too much to squish. You’ll have to wait until you get the wall opened up. If you end up having to remove insulation then it may make sense to go with foam instead.

  23. Brad says

    January 19, 2020 at 7:06 pm

    What about a niche on exterior wall in the mid-west.

    Brick home, with 2×4 frame, and full sheathing . All 4 season.

    Thanks

  24. DIYTileGuy says

    January 21, 2020 at 9:42 am

    You’ll have to make a determination for yourself but I don’t think it’s a good idea.

  25. Jinsung Wang says

    July 16, 2020 at 10:10 pm

    Hello,
    Thanks for sharing your idea of using the form board. If I want to use a custom size niche on the 2×6 exterior wall, what do you think if I just use the form board itself as the backerboard, on which I put waterproofing membrane (Tec HydraFlex or Mapei Aquadefense) and fabric tape around the inner corners? Do you think that is a bad idea? I wonder if the foam board is hard enough as backerboard, and also if waterproofing membrane will stick to the foam board. I’d greatly appreciate your response!

  26. DIYTileGuy says

    July 18, 2020 at 12:37 pm

    That would probably work fine

  27. Bruce Williams says

    January 23, 2021 at 11:27 pm

    I wonder if anyone has some thoughts on using a heating element behind the cubby in colder climates? It could be low wattage of course, and on a permanent circuit. Anyone have experience with this? I know Schluter makes floor heating systems, so why not cubby heating? More complexity, but you could add a timer to run at programed times.

    Comments?

  28. DIYTileGuy says

    January 24, 2021 at 6:07 am

    I suppose that could be done. I don’t know of an off-the-shelf heating unit that could be used as they would all be too much wire but something could be customized if the desire was there. This is more of a “treating the symptom” way of going about it though.

  29. Kevin Oran says

    September 5, 2025 at 11:16 am

    I have some clarification questions about installing a polystyrene foam niche in an exterior wall. We’re looking at this from Amazon which is also 4″ deep and fits between two studs that are the standard 16″ O.C. apart.

    Judging from your second picture, the one with the Laticrete niche, it seems that the border of the niche rests on the studs on all four sides and DensShield drywall comes up to the foam edge and is flush with it. In other words the foam edges don’t rest on the drywall, they rest on the studs. Is that correct? If so, doesn’t that mean the drywall requires a second set of studs around the niche for the drywall to be attached to?

    Also, during most bathroom renovations, does the tiler do the shower drywall installation and taping or is it a drywall guy? And who does the niche installation, tiler or drywall person?

    Thank you as always:)
    Kevin

  30. James Upton says

    September 7, 2025 at 11:00 am

    Greetings! Typically, the pre-formed foam niches come about 14.25 to 14.5 inches apart so they slide into a standard sized stud bay. So, whether the front of the niche “folds over the studs” or not is irrelevant. The part that fits in-between the studs should be the same, either way.

    Further, a decent tile setter will insist on doing their own prep work. I’ve never met a tile setter worth anything that thought it was a good idea to have someone else install their backer board. The tile installer should also be the one to put the niche in as they can lay out the tile first and figure out what the best placement will be. However, if you were to have two cross blocks pre-cut so they can quickly install them on top and bottom of the niche, then that might be helpful. Cross blocks would be 2x4s cut to fit horizontally in between the two studs.

  31. Kevin says

    September 7, 2025 at 8:43 pm

    Appreciate the quick response as always. Sorry I might have misunderstood but the niche we are interested in fits between studs, but has an edge with a width of 16″. So wasn’t sure if that edge goes on the drywall or directly on the stud. (https: amazon. ca/gp/product/B0F3X9Z9HY/ref=ox_sc_saved_image_6?smid=A3DWYIK6Y9EEQB&psc=1)

    In any case, is it fair to say that having a niche installed are typically pricey, given the work involved?

    Finally, James I’m wondering about your view on XPS foam vs DensShield. I understand XPS foam is more expensive, but how much more expensive typically in percentage terms and is it worth it. If you’ve already posted a discussion, please let me know.

    Thanks,
    Kevin

  32. James Upton says

    September 13, 2025 at 7:40 am

    It’s hard to tell from the product page, but as long as that flange is 1/2 inch thick then, yes, it’s meant to install over the stud and flush with the drywall. I don’t know anything about that particular brand, so I don’t really know how they design their niches.

    Also, I much prefer XPS foam to any qypsum-based products, like Denshield. I feel it’s a superior product. To me, gypsum-based backer boards are cheap and typically meet code. Otherwise, they really are not useful in wet areas.

    Just FYI, because of the links that you have put in, the system automatically confuses the comment with ‘spam’ and so it filters it out. So, I apologize for just now seeing your comment.

Leave a Reply

Your email address will not be published. Required fields are marked *

Primary Sidebar

exact batch cheat sheet square

Read More…

Footer

  • Trowel Size
  • Thinset
  • Planning and Design
  • Prep
    • Showers/Bathtubs
    • Floor Prep
    • Heated Floors
  • Install
    • Setting Tile
    • Tile Layout
    • Tips & Tricks
    • Glass Tile
  • Recessed Shampoo Niches
  • Tool/Product Reviews

Blog roll

About Me

Contact
Privacy Policy

As an Amazon Associate I earn from qualifying purchases.

Follow Me!

Copyright © 2026 · News Pro on Genesis Framework · WordPress · Log in