
Buying thinset mortar is one of those tile-project details that’s easy to underestimate. Too little can interrupt an installation. Too much leaves you with extra bags you may never use.
The most useful way to estimate thinset is to start with your total area, choose the actual mortar and trowel notch, and check the manufacturer’s published coverage per bag. Not every 50-pound bag covers the same area—and not every mortar comes in a 50-pound bag.
We have created a thinset calculator to help estimate how much you will need for your project. The calculator pulls information for specific thinset types while also giving the trowel options recommended by that manufacturer. This is a great starting point but you should always double check the manufacturers recommendations for converage amounts.
Thinset Mortar Calculator
Estimate how many bags you need. Choose a listed mortar product, use a general planning estimate, or enter coverage from your own bag.
Use the coverage for your actual bag size and trowel. If the manufacturer gives a range, enter its lower value for a conservative estimate.
Generic estimates are illustrative, not manufacturer specifications. Added notch-size estimates are approximate and should be checked against the mortar bag; trowel angle and coverage requirements affect actual use.
Optional estimating allowance only. Actual extra mortar varies with tile backs and technique; avoid double-counting if the manufacturer coverage already reflects your method.
How to calculate the number of bags of thinset
1. Measure the area you're tiling in square feet. For a rectangular area, multiply length by width. Add separate areas together.
2. Identify the mortar product and package weight you plan to use.
3. Look up the coverage range for the notch size you'll actually use.
4. Add an allowance for material left in the bucket, substrate irregularities, and other losses. Ten percent is a reasonable planning starting point, not a universal rule.
5. Divide the adjusted area by the low end of the manufacturer's square-feet-per-bag estimate, then round up to a whole bag.
Example: A 10-by-12-foot floor is 120 square feet. With a 10% allowance, plan for 132 square feet. If your mortar's stated coverage is 60–67 square feet per bag with the chosen trowel, 132 ÷ 60 = 2.2, so the conservative purchase estimate is three bags.
Does trowel size change thinset coverage?
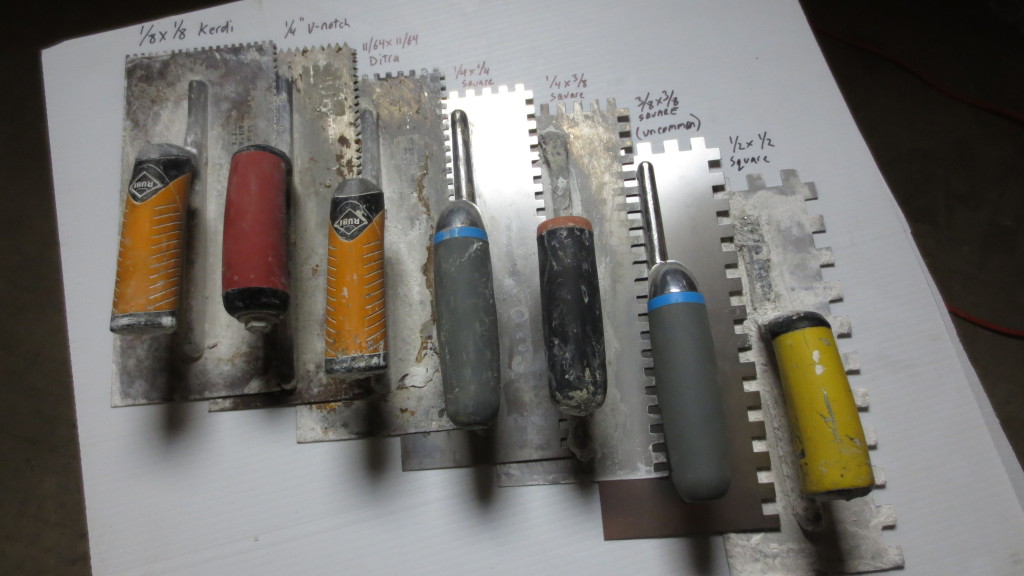
Yes. A larger notch generally deposits more mortar, so a bag usually covers fewer square feet. But the correct trowel size that you need isn't determined by tile size alone. Tile-back geometry, substrate flatness, mortar properties, and the amount of mortar contact required all matter.
Don't downsize your trowel just to make a bag go farther. Periodically lift a freshly set tile and check that the mortar is transferring and achieving the coverage required for the installation. For example, TEC notes that its Ultimate Large Tile Mortar should be installed with a notch that achieves proper coverage and specifically discourages the 1/2-inch square-notch because the ridges can be difficult to collapse.
Does back-buttering change the estimate?
It can. Flat back-troweling a tile adds mortar to the back of the tile and can improve contact, but it also uses material. The calculator's allowance is intended to help with planning; it cannot precisely predict the extra amount for every tile and installer. If you plan to back butter all of your tile, you will likely want to add a larger allowance to your estimate.
What if my mortar isn't in the calculator?
Choose "Enter bag coverage" and type the lower end of the coverage range printed on your mortar bag or technical data sheet for your actual notch size. Enter the actual package weight. This works for products not yet listed in the calculator without assuming that all brands behave alike.
If you don't know the product yet, the "Quick estimate" tab gives a rough starting point. Treat it as preliminary and recalculate using the selected mortar before purchasing.
How much thinset for shower walls and shower floors?
Measure each tiled wall separately (width × height) and add the areas together. Subtract major openings if they will not be tiled; include returns, bench faces, niche sides, curbs, and other small surfaces that will receive mortar. For a shower floor, use its actual plan area, not the sloped surface's projected area as a precision measurement; the small difference is usually less important than trowel choice and substrate condition.
Wet-area tile installations generally require at least 95% mortar contact. This is a contact requirement, not a 95% bag-coverage multiplier. Verify that the mortar is compatible with the waterproofing membrane and tile. Some shower assemblies require specific mortar formulations and curing conditions. Do not assume the mortar used to set tile is also suitable for forming the shower's slope or waterproofing it.
Do I need additional thinset for cement board, uncoupling membrane, or waterproofing membrane?

Possibly—and this can be a significant omission in a project estimate. Some cement-board installations require a supporting bed of mortar beneath the board in addition to mortar used above it to set tile. Some uncoupling or waterproofing membranes require mortar beneath the membrane, above it, or at seams, depending on the system. Follow the actual product instructions: mortar types and coverage can differ for each layer.
**Calculator tip:** Calculate each mortar-consuming layer as a separate job, with its own product, trowel and area. Add the resulting bag counts. Do not simply double the tile-setting estimate.
How to measure L-shaped rooms, backsplashes, and areas with openings
Split an irregular area into rectangles, calculate each rectangle's length × width, and add the results. For a backsplash, multiply the total run length by the tiled height (convert inches to feet). For example, a 15-foot backsplash that's 18 inches high covers 15 × 1.5 = 22.5 square feet before allowing for outlets and small returns. Measure niches and edge returns separately if they will be tiled.
Do not confuse tile waste with mortar allowance. Extra tile purchased for cuts and breakage doesn't automatically require mortar over the same additional area. Mortar allowance covers material loss and variation in actual consumption.
What do 1/4-inch, 3/8-inch, and 1/2-inch trowel notches mean for coverage?
A larger notch generally deposits more mortar, reducing the square footage covered per bag. But notch shape matters too: square-notch, U-notch and slant-notch tools are not interchangeable just because one dimension looks similar. The angle at which you hold the trowel also changes how much mortar is deposited. Manufacturer coverage tables assume a particular notch and application method. If your trowel differs from the table, treat the estimate cautiously.
Choose a trowel that achieves proper contact when you lift and inspect freshly set tile. Don't select a smaller notch just to save mortar.
How can I tell whether I'm getting enough mortar beneath the tile?
Key mortar into the prepared substrate with the flat side of the trowel, comb additional mortar in straight, parallel ridges, and embed the tile while the mortar is still fresh. Move the tile across the ridges to help collapse them. Periodically lift a tile to inspect transfer and contact, including corners and edges. Industry guidance commonly calls for at least 80% contact in dry interior applications and 95% in wet or exterior applications; natural stone can require 95% as well. Follow the applicable standards and product instructions. A calculator cannot tell whether your installed tiles actually meet these requirements.
Thinset vs. premixed tile adhesive: can I use the same calculator?

No. Cementitious thinset mortar is generally sold as powder in bags and mixed with water or a specified additive. Premixed organic tile adhesive (sometimes casually called “premixed thinset”) is sold in tubs and has different coverage, permitted applications and drying characteristics. Do not convert a bag-based thinset estimate directly into buckets of premixed adhesive. Use the exact adhesive manufacturer's coverage chart and suitability instructions.
Should I count mortar used for back-buttering?
Yes. Flat back-troweling can help fill tile-back recesses and improve contact. It consumes additional material, but the amount varies by tile. A 10% allowance is a starting point, not a guarantee; where substantial additional mortar is needed, use a larger allowance and check actual consumption after the first few tiles.
How much thinset should I mix at once?
Only mix what you can install within the mortar's stated working time. Pot life, open time and adjustment time are different measures and vary with the product and conditions. Mixing too much can increase waste and cause you to run short even when your original bag estimate was reasonable. Never restore mortar that has begun to set by adding extra water unless the product specifically permits it. If you want more information on mixing thinset, check out our article: How to mix thinset mortar.
Does thinset coverage change on walls versus floors?
It can, because the tile, trowel, mortar type and application method may differ. Estimate each surface with the product and notch actually planned rather than using one universal figure.
Is thinset coverage the same as grout coverage?
No. Grout is estimated from tile dimensions, joint width, joint depth and product yield. Thinset is estimated from the area, trowel, mortar and installation method. Use a separate grout calculator.
Bottom Line
Measure your project, choose the actual mortar and notch, and calculate from the manufacturer's coverage—not a one-size-fits-all estimate. The calculator above helps you plan the number of bags while making the assumptions visible. Once you have your measurements figured out, you're ready to get your project going!

Leave a Reply